How to Use This Guide
UsethisguidetoquicklysetupyourEnterasys
®
SecureStack
™
A2
switch.Forcompleteinstructions,seetheSecureStackA2Hardware
InstallationGuideassociatedwithyourswitch.
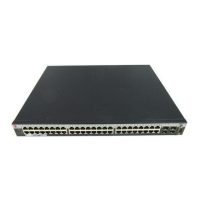
Hardware Components
Thefollowingfiguresshowtheseveraltypesoffrontpanelport
andrearpanelconnectionsonA2switches.
Figure 1 A2H123-24
Figure 2 A2H124-24, A2H124-24P
Figure 3 A2H124-24FX
Figure 4 A2H124-48, A2H124-48P
Figure 5 A2H254-16
Figure 6 A2 Switch Rear (A2H124-24 Displayed)
Key
Electrical Hazard: Only qualified personnel should
perform installation procedures.
1
DB9 RS232 console port connector
2
Password Reset button
3
Switch Status LEDs
4
RJ45 10/100 Mbps ports
5
MT-RJ fiber-optic ports
6
SFP slots
7
LC connector, 100BASE-FX connections
8
RJ45 ports for stack connections
9
RJ45 port status LEDs
10
MT-RJ port status LEDs
11
SFP port status LEDs
12
LC connector, 100BASE-FX status LEDs
13
RJ45 stack port status LEDs
14
Redundant power supply (RPS) DC connector
15
AC power input connector
Handling the Switch
Topreventelectrostaticdamage,attachanelectrostaticdischarge
(ESD)wriststraptoyourwristbeforehandlingtheswitch.
Unpacking the Switch
Unpacktheswitchasfollows:
1. Removethepackingmaterialprotectingtheswitch.
2. Removetheswitchfromthenon‐conductivebag.
3. Performavisualinspectionoftheswitchforanysignsof
physicaldamage.ContactEnterasysNetworksifthereareany
signsofdamage.See“GettingHelp”formoreinformationon
contactingEnterasys
Networks.
Connecting Power to the Switch
YoucanconnectanA2switchtoasingle,primarysourceofpower,
ortotwosourcesofpowerforredundancy.
Thefollowingredundantpowersuppliesareavailableforpurchase
fromEnterasysNetworksforconnectiontoanA2switch:
•C2RPS‐PSM,a150wattDCpowersupplycapableofproviding
power
toafully‐loadednon‐PoEswitch.
•C2RPS‐POE(A2H124‐24PandA2H124‐48Ponly),500wattDC
powersupplyforPoEswitches.
Topower‐upyourA2switch:
1. Ifyouareconnectingaredundantpowersupply,attachthe
C2RPS‐PSMcable(fornonPoE)orC2RPS‐POEcable(forPoE)
from
yourredundantpowersupplytotheA2switch’s
redundantpowerconnector.
2. AttachtheACpowercordtotheA2switch’sACinputpower
connector.
3. Plugtheredundantpowersupply(ifapplicable)andtheA2
switchACpowercordsintodedicated,groundedACoutlets.
4. Oncepowerisconnected,verifythattheRPSpower
LEDturns
green,andtheCPU(system)LEDturnsamberuntiltheA2
switchfinishesitsinitialization.
5. Iftheinitializationprocessissuccessful,theCPULEDturns
green.IftheCPULEDdoesnotturngreen,refertothe
SecureStackA2HardwareInstallationGuideassociatedwithyour
A2switchfortroubleshooting
information.
Completing the Setup and Downloading the Latest
Firmware
OnceyouhaveconnectedpowertotheA2switchandverifiedLED
activity,youcancompletethesetupprocessasfollows.Refertothe
SecureStackA2HardwareInstallationGuideassociatedwithyourA2
switchformoreinformation.
1. DeterminethelatestA2firmwareversionbyvisitingthe
EnterasysNetworksdownloadsiteat:
http://secure.enterasys.com/services/support/downloads/software
2. Connecttheswitchtothenetwork.
3. Connectamanagementstationtotheconsoleport.
4. Verifythatthenetworkdevicesconnectedtotheswitchports
arepoweredon,andthateachlink/activityLEDison(solid
greenorblinkinggreen).
5. Atthedeviceconnectedtotheconsoleport,performthe
following:
a. Enteradminfor
Username.
Caution: The switch can be damaged by electrostatic
discharge.
Note: Enterasys Networks recommends installing
any components before powering on your switch.
Note: To take full advantage of redundancy, each power
supply should be plugged-in to a separate, dedicated AC
outlet.
b. AtthePasswordprompt,pressENTER(RETURN).
c. Atthecommandprompt,determineifthelatestfirmware
imageisloadedontheswitchbyenteringthiscommand:
show version
d.Iftheoutput(underFWVer s i o n )displaysanolderversion
numberthanthatdeterminedinStep1,downloadand
activatethenew
versionasdirectedonthedownloadwebsite.
(Alternatively,youcanusetheCLIcommandlistedin
Table 1.)
Basic Setup Commands
Table 1listsCLIcommandsthatarerequiredforsettinguptheA2
switchwiththelatestfirmware.Table 2listsadditionalbasic
configurationsforyourA2switch.ForthecompletelistofCLI
commands,seetheEnterasysSecureStackA2ConfigurationGuide.
Table 1 Required CLI Setup Commands
Step Task CLI commands
1 Set a new password
set password [username]
2 Set the switch IP address
set ip address ip-address [mask
ip-mask] [gateway ip-gateway]
3 Download, activate, and
verify new firmware on the
switch using TFTP copy.
Note: You can reboot the
system immediately with the
set boot system command,
or reboot later with the reset
command.
copy
tftp://tftp_server_ip_address/
filename system:image
set boot system filename
show version
Table 2 Optional CLI Setup Commands
Task CLI commands
Save the active configuration
save config
Enable or disable SSH
set ssh enable | disable
Enable or disable Telnet
set telnet {enable | disable}
[inbound | outbound | all]
Enable or disable HTTP
management (WebView)
set webview {enable | disable}
Enable or disable SNMP port link
traps
set port trap port-string
{enable | disable}
Set the per port broadcast limit
set port broadcast port-string
threshold-value
Configure a VLAN
set vlan create vlan-id
set port vlan port-string
vlan-id modify-egress
Set a Syslog server IP and severity
set logging server index ip-addr
ip-addr severity severity state
enable
Configure and enable a RADIUS
server.
set radius server index ip-addr
port [secret-value]{realm
{management-access | any |
network-access}
set radius enable
Specifications
Foracompletelistofspecifications,seetheSecureStackA2
HardwareInstallationGuideassociatedwithyourA2switch.
Interfaces
A2H123‐24
•Twenty‐four10/100BASE‐TRJ45ports
•Two100BASE‐FXfiber‐opticconnections
•Two10/100/1000BASE‐TXRJ45connectorsforstacking
A2H124‐24,A2H124‐24P
•Twenty‐four10/100BASE‐TRJ45ports
•TwogigabitSFPslots
•Two
10/100/1000BASE‐TXRJ45connectorsforstacking
A2H124‐24FX
•Twenty‐four100BASE‐FXcompliantports
•TwogigabitSFPslots
•Two10/100/1000BASE‐TXRJ45connectorsforstacking
A2H124‐48,A2H124‐48P
•Forty‐eight10/100BASE‐TRJ45ports
•TwogigabitSFPslots
•Two10/100/1000BASE‐TXRJ45connectorsforstacking
A2H254‐16
•Eight10/100BASE‐TRJ45ports
•Eight100BASE‐FX
compliantports
•TwogigabitSFPslots
•Two10/100/1000BASE‐TXRJ45connectorsforstacking
Switch Dimensions
Size:354.40x441x44.0mm
Power Consumption
InputVoltage:100to240VAC
InputCurrent:
• A2H124‐24P:5.1AMax
• A2H124‐48P:5.0AMax
• A2H123‐24,A2H124‐24,A2H124‐24FX:1AMax
• A2H254‐16:0.5,0.47
Temperature and Humidity
Operating:0ºCto50ºC
Storage:‐40ºCto+70ºC
Operatingrelativehumidity:5%to95%
Note: The 10/100BASE-T RJ45 ports on the A2H124-24P
and A2H124-48P also support 802.3af PoE connections.