4. The bridge end
with pins is
strung as
shown at right.
Once strings
are secure in
the bridge, tug
the string end
slightly to
make sure it’s
seated secure-
ly in the bridge.
5. Bring the string from the bridge to the
corresponding tuner post located on the
headstock.
6. Put string (A) through the hole in the post at
(B) to (C); around the upper side of the post
(D), and under the string (A) at (B), back again
around the string post (D). Now when you
wind the string, it will lock itself against the
post as shown in the image at above.
Note: The string should run closer to
the inside of the head stock than the
outside.
7. Start tuning the string up to pitch. Again, a
string winder speeds up the process.
8. Proceed to the section on Tuning and tune
the string to pitch. When it’s on pitch, follow
the same procedure for the remaining strings.
9. When you’ve finished tuning your guitar, use a
wire cutter to trim the string ends to within
about 3/8” of the machine head.
Action Adjustment
Action is the distance that a string must
be depressed before it meets the fret. Action
measurements are taken in 64th’s of an inch,
and are calculated from the top of the 12th fret
to the underside of the string. We set the action
on all instruments at the factory to the optimum
playability setting. On occasion, lower than stan-
dard settings are desired by the player. Note how-
ever that lower than standard action can often
result in “buzz” or “rattle”. This is caused by the
string vibrating against the fret. Buzz or rattle
caused by lower than standard action is not
considered a defect of the instrument.
For action at the 1st fret, all instruments are
set at the same height. Treble strings are set to
1/64” and the action progresses up to 2/64”
for the bass strings. Be sure that the truss rod is
properly adjusted before setting action.
Trussrod Adjustment
All guitar necks are subject to great stress
as a result of string tension, humidity or changes
in climate. Occasionally there are times when
the neck may need adjustment. The truss rod is
adjustable at the headstock, using an Allen
wrench or an adjustment wrench.
NOTE: This adjustment should be
performed periodically and only by qualified
repair personnel. Over adjustment can result
in damage to the instrument.
NOTE: All Epiphone guitars use A-440 for
standard pitch. Play the harmonic at the 12th
fret, compare it to the fretted note at the
12th fret, these notes should read the same
on the tuner.
* (Adjusting the intonation and string
height will affect the playability of your
guitar. If you are unsure of any of the above
operations please take your guitar to an
Authorized Epiphone Dealer or experienced
guitar technician.)
Preamp Controls
(Volume, EQ - Bass, Middle, Treble, Phase,
Low Battery Indicator)
The PR-4E’s piezo pickup system is located
under the saddle. The guitar’s built-in electronics
are mounted on the upper bout of the guitar and
feature easy-to-use boost and cut controls for
Treble, Middle, and
Bass. There is also a
Volume control along
with a Phase switch
and a low battery light
indicator.The “Phase”
button on the preamp
reverses the polarity
of the output signal to
help reduce feedback.
A 9-volt battery com-
partment is located
above the EQ controls
allowing for quick
changes of the battery
during a show.
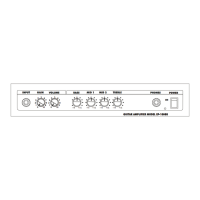
A M P S P E C I F I C A T I O N S
Output Power 15 Watts
Headphone Jack 1/4”
Speaker 6.5” - 8 ohms
Power Consumption 28 Watts
Action at the 12th fret
Treble Side Bass Side
Electric Guitars 4/64 6/64
Acoustic Guitars 5/64 7/64
Bass Guitars 5/64 7/64
 Loading...