Introduction
Thank you for purchasing your eSoft Pro Water Softener. The Clack CI valve with which your water
softener is tted has been selected to provide the best e ciency & performance possible. Only
attempt this installation if you have been trained on the installation of water softeners.
Packing List
Your water softener comprises of:
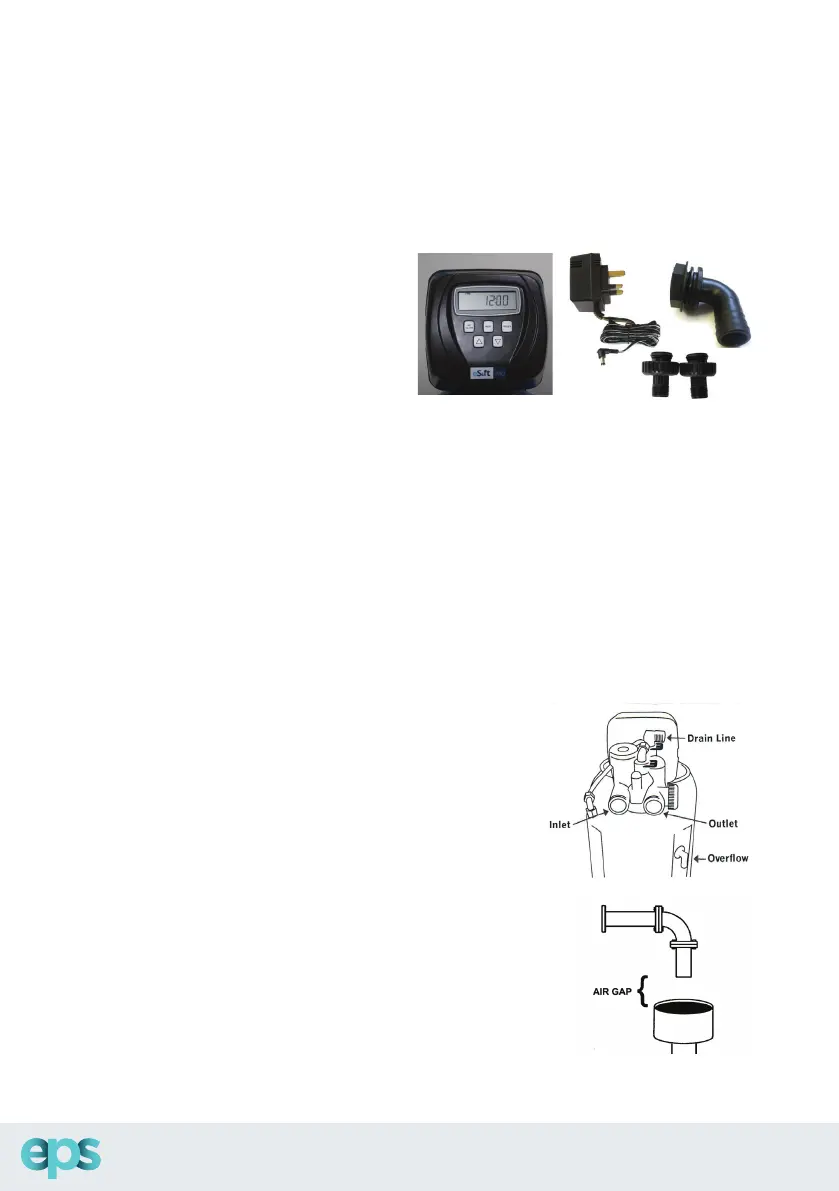
Assembled eSoft Water Softener
Transformer
¾” quick connect ttings
Over ow adaptor
Installation Instructions
Firstly, the area needs to be level, have access to electricity and an open drain. Your water softener has
been designed to operate between 1.7 and 5 bar pressure. If your water pressure falls outside these
parameters it may be necessary to t a booster pump or a pressure reducing valve to prevent damage
to the unit. The operating temperature range of the appliance is 3°C and 45°C. Follow the instructions
supplied to connect the ¾” quick connect ttings.
Please observe local regulations concerning the installation of your system. Check that you have
allowed space for access to the unit for possible future maintenance. This installation may require
plumbing work and will require an electrical outlet to be tted near the system. If the system is
installed externally, take necessary precautions to prevent frost damage.
Inlet: This is the water supply from the mains or other. Always
install a suitable pre lter on well water supplies.
Outlet: This is the softened water leaving the softener to
supply the rest of the house.
Drain: This is the water used during regeneration which is
ushed to drain. This water will be at mains pressure and must
be taken directly to a waste-pipe with an air gap.
O v e r o w : This is used in the event of an over- ll of water
to the salt cabinet. This should always be taken directly to
a waste-pipe with an air gap. Install the supplied over ow
tting by drilling a 20mm hole. Its recommended to install the
over ow 2-3 inches below the salt lid of the cabinet.
Introduction
Thank you for purchasing your eSoft Water Softener. The Clack CI valve with which your water softener
is tted has been selected to provide the best eciency & performance possible. Only attempt this
installation if you have been trained on the installation of water softeners.
Packing List
Your water softener comprises of:
Assembled eSoft Water Softener
Transformer
¾” quick connect ttings
Installation Manual
Overow adaptor
Installation Instructions
Firstly, the area needs to be level, have access to electricity and an open drain. Your water softener
has been designed to operate between 1.7 and 5 bar pressure. If your pressure falls outside these
parameters it may be necessary to t a booster pump or a pressure reducing valve to prevent damage
to the unit. The operating temperature range of the appliance is 3°C and 45°C. Follow the instructions
supplied to connect the ¾” quick connect ttings.
Please observe local regulations concerning the installation of your system. Check that you have
allowed space for access to the unit for possible future maintenance. This installation may require
plumbing work and will require an electrical outlet to be tted near the system. If the system is
installed externally, take necessary precautions to prevent frost damage.
Inlet: This is the water supply from the mains or other. Always
install a suitable prelter on well water supplies.
Outlet: This is the softened water leaving the softener to
supply the rest of the house.
Drain: This is the water used during regeneration which is
ushed to drain. This water will be at mains pressure and must
be taken directly to a waste-pipe with an air gap.
Overow: This is used in the event of an over-ll of water
to the salt cabinet. This should always be taken directly to
a waste-pipe with an air gap. Install the supplied overow
tting by drilling a 20mm hole. Its recommended to install the
overow 2-3 inches below the salt lid of the cabinet.
1.
2.
3.
4.
5.
1.
2.
3.
4.
 Loading...