EasyManua.ls Logo

Epson L Series - User Manual

Epson L Series
4 pages
Print Icon
To Next Page IconTo Next Page
Loading...
Start Here
2 Press the power button to turn on the product, then
wait for the power light to stop flashing. The power
light and the ink light stay on.
3 Press and hold the stop button for 5 seconds until the
power light starts to flash and ink charging begins.
Note: Ink charging takes about 10 minutes. When the power
light stops flashing, ink charging is complete.
Caution: Do not turn off the product, open the front cover, or
load paper while the product is charging or you’ll waste ink.
4
Load paper
See the online User’s Guide for information about loading
capacity and available paper types and sizes.
1 Make sure the product is not charging ink. Then raise the
paper support and tilt it backwards slightly.
IMPORTANT: Before using this product, make sure you read
these instructions and the safety instructions in the online
User’s Guide.
1
Unpack
Note: Do not open the ink bottles until you are ready to fill the ink
tanks. The ink bottles are vacuum packed to maintain reliability.
Remove all protective materials from the product.
Note: Do not turn on the product yet.
2
Fill ink tanks
Warning: Keep the ink bottles out of the reach of children and do not
drink the ink.
Caution:
This product requires careful handling of ink. If ink spills, wipe it off
immediately with a damp towel to avoid permanent stains. If ink
gets on your clothes or belongings, it may not come off.
Epson cannot guarantee the quality or reliability of non-genuine ink.
The use of non-genuine ink may cause damage that is not covered
by Epson’s warranty.
Note: Use the ink bottles included with the printer to set up the
product. Part of the ink will be used to charge the print head. These
bottles may print fewer pages compared with subsequent ink bottles.
1 Open the ink tank cover and the cap for the black ink
tank.
Note: Refer to the color-coded sticker on the ink tank unit to
identify the color of each tank.
2 Unpack the black (BK) ink bottle. Hold the ink bottle
upright and slowly turn the bottle cap to remove it.
Caution: Do not shake or squeeze the ink bottles. Do not touch
the top of the ink bottle after its cap is removed.
3 Place the top of the ink bottle on the filling port, then
slowly stand the bottle upright to insert it, as shown.
Note: Do not force the bottles into position; they are keyed for
each color.
4 Wait for the ink to fill the tank. Do not squeeze the bottle.
Note: Ink flows into the tank and stops automatically when the
ink tank is filled to the upper line. If ink does not flow from the
bottle, lift and reinsert the bottle.
5 When the ink tank is full, remove the ink bottle and
securely close it with the bottle cap.
Note: Do not leave the ink bottle inserted; otherwise the bottle
may be damaged or ink may leak. If any ink remains in the bottle,
store the bottle upright for later use.
6 Close the black ink tank cap.
7 Repeat the previous steps for the other colors.
8 Close the ink tank cover.
3
Turn on and charge the ink
1 Connect the power cord to the back of the product and to
an electrical outlet.
Caution: Do not connect to your computer yet.
L1110
4136912 Rev.0
1-F C
4136912 Rev.0
1-F M
4136912 Rev.0
1-F Y
4136912 Rev.0
1-F K
Question and Answer IconNeed help?

Do you have a question about the Epson L Series and is the answer not in the manual?

Summary

Unpack Printer

Remove Protective Materials

Instructions to remove all protective materials from the printer before proceeding.

Fill Ink Tanks

Open Ink Tank Cover and Black Ink Cap

Open the ink tank cover and remove the cap from the black ink tank.

Unpack and Open Black Ink Bottle

Unpack the black ink bottle and remove its cap carefully.

Insert Ink Bottle into Filling Port

Place the ink bottle on the filling port and stand it upright to insert.

Wait for Ink to Fill Tank

Allow the ink to flow into the tank until it is full; do not squeeze the bottle.

Complete Ink Filling Process

Remove ink bottles when full, close caps, and repeat for other colors.

Turn On and Charge Ink

Connect Power Cord

Connect the power cord to the printer and an electrical outlet, but not to the computer yet.

Power On and Wait for Light

Press the power button, wait for the power light to stop flashing.

Start Ink Charging

Press and hold the stop button for 5 seconds to begin ink charging.

Load Paper

Prepare Paper Support

Raise the paper support and tilt it backwards slightly.

Slide Edge Guides

Slide edge guides all the way out, then against the paper, but not too tightly.

Load Paper into Support

Load A4 or letter-size paper, glossy or printable side up, short edge first.

Pull Out Output Tray

Pull out the output tray, then raise the paper stopper.

Install Software

Prepare for Software Installation

Ensure the product is NOT connected to your computer before installing software.

Run Software Setup

Insert CD or download software, then follow on-screen instructions.

Troubleshooting and Support

Common Print Quality Issues

Address lines or incorrect colors by running nozzle checks and cleaning the print head.

Setup Connection Problems

Ensure the product is on and securely connected if setup cannot find it.

Understand Error Indicators

Follow steps for error indicators like flashing lights or paper jams.

Product Information and Support

Accessing the Users Guide

Instructions on how to access the online User's Guide via desktop icon or website.

Technical Support Contact

Provides website for drivers/manuals and phone numbers for technical assistance by country.

Paper and Ink Recommendations

Guidance on using Epson specialty papers and information on replacement ink part numbers.

Overview

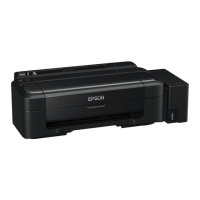
This document serves as a "Start Here" guide for the Epson L1110 printer, outlining the initial setup, ink filling, power-on, paper loading, and software installation processes, along with troubleshooting tips and support information.

Function Description:

The Epson L1110 is an inkjet printer designed for home or small office use, featuring an integrated ink tank system for high-volume printing. It is designed to be user-friendly, with a straightforward setup process that involves filling ink tanks from bottles rather than replacing cartridges. The printer supports various paper types and sizes, including A4, letter, glossy, and printable side-up paper. It connects to a computer via a USB cable for printing and requires software installation for full functionality. The printer's design emphasizes ease of maintenance, with clear instructions for ink refilling and troubleshooting common issues like paper jams or clogged nozzles.

Important Technical Specifications:

While specific technical specifications like print speed, resolution, or connectivity options beyond USB are not detailed in this "Start Here" guide, the document highlights several key operational aspects:

  • Ink System: Integrated ink tanks with refillable bottles. The printer uses four colors: Black (BK), Cyan (C), Magenta (M), and Yellow (Y).
  • Ink Bottle Capacity: The initial ink bottles are designed for setup and may yield fewer pages than subsequent replacement bottles due to ink used for print head charging.
  • Ink Charging Time: Initial ink charging takes approximately 10 minutes.
  • Paper Handling: Supports A4- and letter-size paper, with instructions for loading glossy or printable side up. It includes a paper support and an output tray with a paper stopper.
  • Software Compatibility: Compatible with Windows and Mac operating systems. Software can be installed via a product CD (Windows only) or downloaded from the Epson website.
  • Power: Connects to an electrical outlet via a power cord.

Usage Features:

  • Unpacking: The guide provides clear steps for unpacking the printer and removing all protective materials. It advises against opening ink bottles until ready to fill the tanks, as they are vacuum-packed for reliability.
  • Ink Filling System: Features a unique "keyed" ink bottle design, ensuring that each color ink bottle can only be inserted into its corresponding ink tank. This prevents accidental misfilling. The ink flow into the tank is automatic and stops when the tank is filled to the upper line, eliminating the need to squeeze bottles.
  • Intuitive Controls: The printer has a power button and a stop button. The power light and ink light indicators provide status updates, such as flashing during initial ink charging or staying on when ready.
  • Paper Loading: Instructions detail how to raise the paper support, slide out edge guides, load paper (short edge first, printable side up), and adjust edge guides against the paper. It also covers pulling out the output tray and raising the paper stopper.
  • Software Installation: Emphasizes connecting the printer to the computer after software installation to avoid issues. For Mac users or computers without CD/DVD drives, an internet connection is required to download the software.
  • Error Indicators: The guide includes a visual table of error indicators (flashing/on lights) for common issues like incomplete ink charging, paper out/multiple pages fed, paper jams, and general printer errors, along with corresponding troubleshooting steps.

Maintenance Features:

  • Ink Refilling: The primary maintenance feature is the user-friendly ink refilling process. Users are instructed to remove the bottle once the tank is full and securely close the cap, storing any remaining ink upright.
  • Troubleshooting Guide: The "Any problems?" section provides solutions for common print quality issues (lines/incorrect colors) by suggesting a nozzle check and print head cleaning. It also addresses connectivity issues during setup, advising users to ensure the printer is on and securely connected via USB.
  • Ink Handling Precautions: Warnings are given regarding keeping ink bottles out of reach of children and not drinking the ink. Cautions include handling ink carefully to avoid permanent stains on clothes or belongings and wiping spills immediately.
  • Genuine Ink Usage: Epson explicitly states that it cannot guarantee the quality or reliability of non-genuine ink and that damage caused by non-genuine ink may not be covered by the warranty.
  • Support Resources: The guide directs users to the online User's Guide for detailed information on loading capacity, paper types, sizes, loading envelopes, and legal-size paper. It also provides a website for technical support (drivers, manuals, FAQs) and phone numbers for service technicians in various countries.
  • Replacement Inks: A table lists the part numbers for genuine Epson L1110 replacement inks (Black, Cyan, Magenta, Yellow), making it easy for users to identify and purchase the correct supplies.

Epson L Series Specifications

General IconGeneral
BrandEpson
ModelL Series
CategoryPrinter
LanguageEnglish

Videos

How to Fill Ink & Install Setup of Epson L Series Printer

How to Fix Red Light Blinking Error in All Epson L Series Printers

Related product manuals