Introduction 1
About This Manual
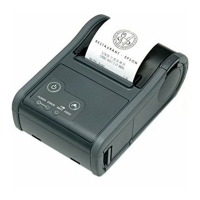
This manual contains operating procedures for the
Mobilink TM-P60 printer and provides you with all the
information necessary for setup and operation.
Authorized distributors and their employees
can view or download this manual from the
Rice Lake Weighing Systems distributor
site at
www.rlws.com.
1.0 Introduction
The Mobilink TM-P60, built with Epson’s quality and reliability, is designed to meet the needs of both retail and
hospitality industries for high-speed, on-the-go thermal receipt printing. Features include:
• Eight-hour battery life
• Rugged design for harsh environments
• High-speed thermal receipt and label printing
• Auto cutter and drop-in paper loading
• Supports 802.11 wireless protocol
(Bluetooth
™ wireless available)
• Print width up to 54 mm (2.13")
• Non-volatile memory to store logos and print
clean receipt
• Belt clip and shoulder strap for maximum
mobility
2.0 Setup
This section describes procedures for installation, setup, and connecting serial communications cables to the
Mobilink TM-P60 printer.
2.1 Unpacking and Assembly
Immediately after unpacking, visually inspect the
Mobilink TM-P60 to ensure all components are included
and undamaged. The shipping carton should contain
the printer (PN 85456) and the parts kit listed below.
• AC battery charger (PN 85351)
• Serial cable (PN 85459)
• One roll thermal paper (PN 79447)
• Installation CD (PN 85461)
• Installation manual (PN 85457)
2.2 Serial Connection
This section includes instructions on how to set up a
serial connection to the
Mobilink TM-P60 printer.
1. Turn off the printer
2. Open the RS-232 connector cover located on
the side of the printer.
3. Connect the serial interface cable to the
printer and the serial port on the host PC.
4. Press and hold the FEED button on the printer
and press the
POWER button.
NOTES:
• RS-232 nine-pin cable (PN 85459) used for
setup only
• Printer senses serial cable on power up
• The printer automatically prints the self test
results before use.
2.3 COM 1 Port Setup
Using an IBM-compatible personal computer running
Windows
®
2000 or XP follow the steps in this section
to set up COM 1 port properties to printer default
settings.
NOTE: Setup may vary with operating system.
1. Click the start button on the PC monitor
2. Go to the Control Panel option
3. Select System Properties and Communication
Port
4. Go to Port Settings
5. Enter the default printer settings listed below.
See
Figure 2-1 on page 2.
• Bits per second: 19200
• Data bits: 8
• Parity: none
• Stop bits: 1
• Flow control: Xon / Xoff
 Loading...