Epson Stylus SX230 series / SX235W series / SX430W series / SX440W series Revision B
Confidential
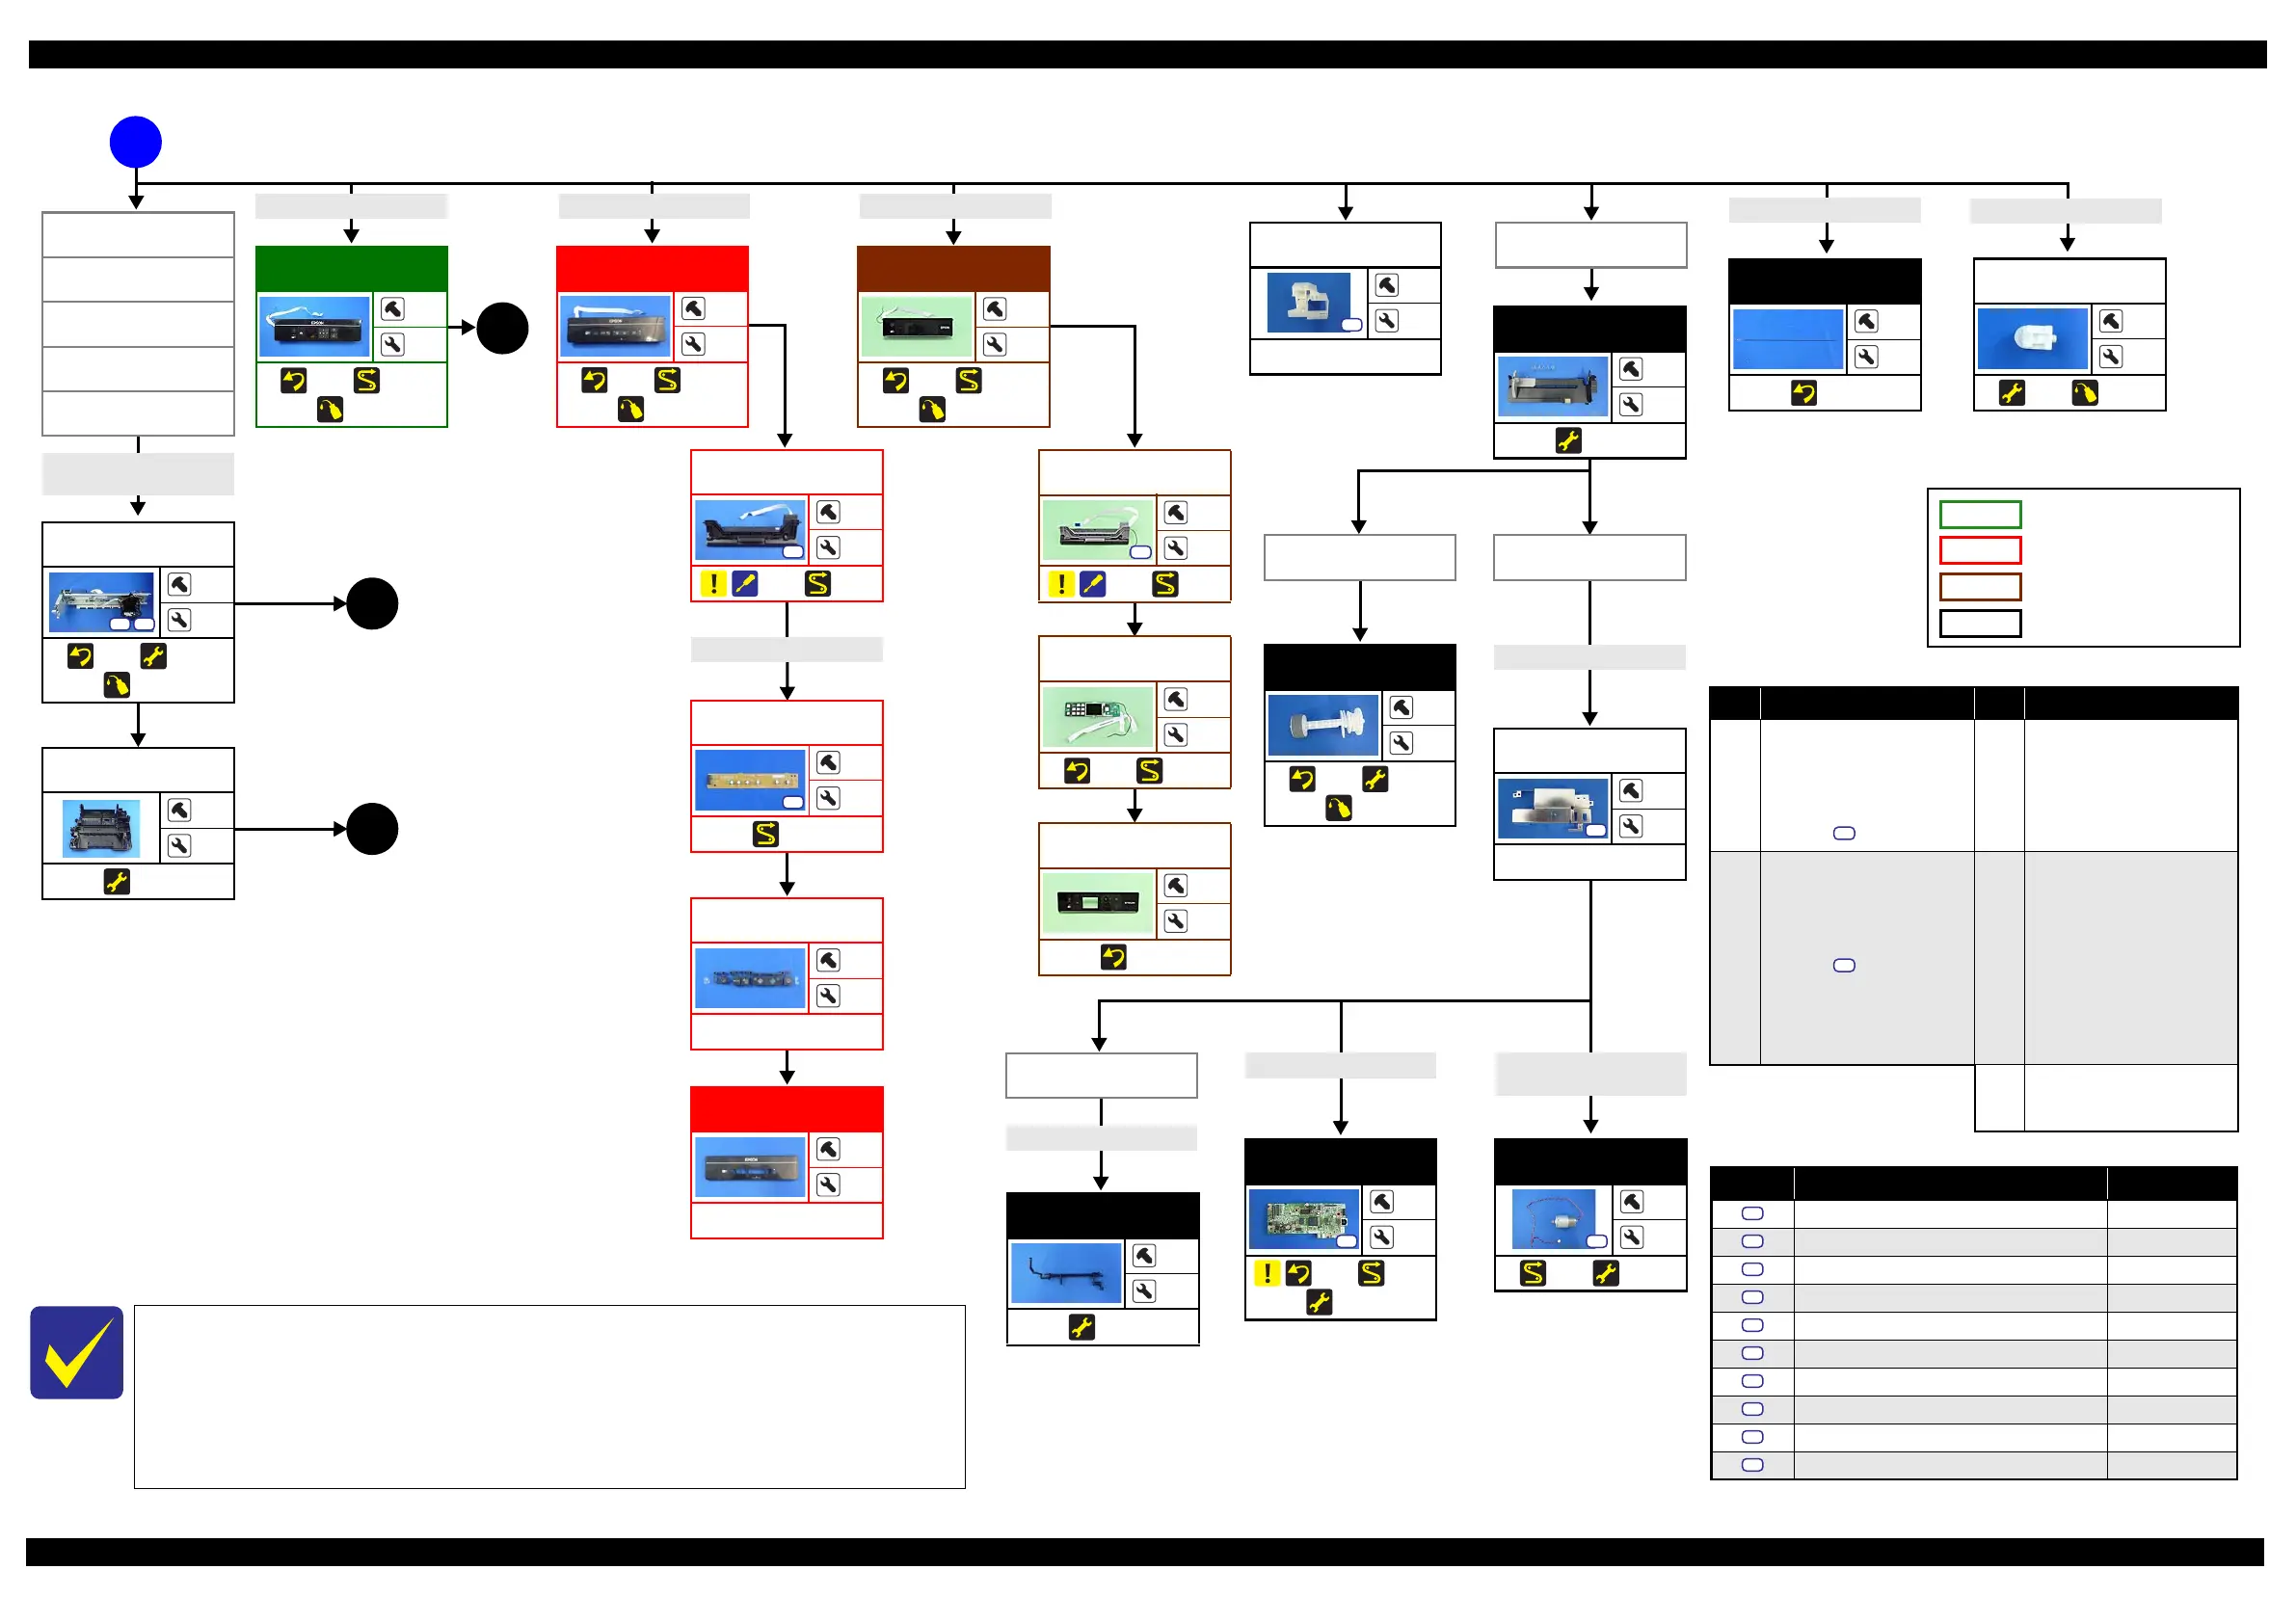
Disassembly/Reassembly Disassembly Flowchart 28
Panel Housing
Lower Assy
3
4
(p 33) (p 38)
S4
Panel Buttons
---
---
---
Panel Board Assy
---
3
(p 38)
S4
FFC/Cable* 8
Panel Housing
Upper Assy
---
---
---
Flowchart 2-2. Disassembly Flowchart (2)
Panel Unit
---
4
(p 33) (p 38)
(p 52)
CR Scale
---
2
(p 32)
LD Roller Cover
1
1
---
S4
LD Roller
Assy
---
2
(p 34) (p 41)
(p 52)
Main Frame Assy
5
---
(p 36) (p 41)
(p 52)
S4 S6
Frame Base Assy
---
---
(p 41)
CR Driven Pulley
---
---
(p 41) (p 52)
A
4
(p 30)
Screw type/torque list
Symbol Screw Type Torque
C.B.P-TITE SCREW 2.5x8 F/ZN-3C 3 ± 1 kgf·cm
C.B.P-TITE SCREW 2x8 F/ZN-3C 4 ± 1 kgf·cm
C.B.P-TITE SCREW 3x10 F/ZN-3C 5
± 1 kgf·cm
C.B.P-TITE SCREW 3x10 F/ZN-3C 6 ± 1 kgf·cm
C.B.S-TITE SCREW 3x6 F/ZN-3C 4
± 0.5 kgf·cm
C.B.S-TITE SCREW 3x6 F/ZN-3C 6 ± 1 kgf·cm
C.B.S-TITE SCREW 3x8 F/ZN-3C 6
± 1 kgf·cm
C.P SCREW 3x4 F/ZN-3C 4 ± 1 kgf·cm
C.P.F.B-TITE SCREW 2x8 F/ZN-3C 4
± 1 kgf·cm
C.P.S-TITE (P2) SCREW 3x6 F/ZN-3C 7 ± 1 kgf·cm
S1
S2
S3
S4
S5
S6
S7
S8
S9
S10
Paper Support
Assy (p27)
When the CR Unit or the Head FFC is removed from the Main Frame Assy, remove the
following parts before removing the Main Frame Assy.
FFC Cover Inner
FFC Cover Outer
Holder Board Assy
Printhead
5
(p 30)
Hopper
---
2
(p 41)
Shield Plate
1
---
---
S6
Main Board
1
---
(p 34) (p 38)
(p 41)
S7
CR Motor
2
---
(p 39) (p 41)
S8
LD Roller Assy
(p28)
PE Sensor Lever
---
2
(p 41)
FFC/Cable* 2
Extension Spring (x3)
FFC/Cable* 1
Extension Spring
CR Timing Belt
FFC/Cable* 3
Extension Spring
FFC/Cable* 4 CR Timing Belt
FFC/Cable* 5
FFC/cable list
No. FFC/Cable No. FFC/Cable
1
Remove/disconnect the
following.
Panel FFC (CN2)
(double-sided tape)
Grounding wire
(screw x1)
3
Remove/disconnect the
following.
Head FFC (CN102)
CSIC FFC (CN6)
PF Motor cable (CN13)
PS Unit cable (CN501)
2
Remove/disconnect the
following.
Panel FFC (CN2)
(double-sided tape)
Grounding wire
(screw x1)
Card Slot Board cable (CN9)
PF Motor cable (CN13)
PS Unit cable (CN501)
CR Motor cable (CN12)
4
Remove/disconnect all FFCs/
cables.
5
Release the CR Motor cable
from the hooks of the Main
Frame and Frame Base.
S6
S6
PF Encoder
Sensor (p29)
PF Scale (p29)
CR Scale (p28)
CR Driven
Pulley (p28)
LD Roller Cover
(p28)
Panel Unit
---
---
(p 33) (p 38)
(p 52)
FFC/Cable* 1
Panel Housing
Lower Assy
2
3
(p 33) (p 38)
S4
Panel Board
w/ Touch Panel
---
5
(p 34) (p 38)
Panel Housing
Upper Assy
---
---
(p 34)
SX440W series specific parts/unit
3
(p 29)
FFC/Cable* 1
Panel Unit
---
4
(p 33) (p 38)
(p 52)
SX235W series specific parts/unit
Common parts/unit
SX430W series/SX230 series
specific parts/unit
LD Roller Cover
(p28)
FFC Holder MB
(p29)
(p 27)