EasyManua.ls Logo

Erato RIO 3 - User Manual

Erato RIO 3
5 pages
Print Icon
To Next Page IconTo Next Page
Loading...
EN
Factory reset
Turn on the left earphone first.
Then press and hold the
“+”and “-” buttons on the left
earphone for 5 seconds until
its LED flashes red and
white twice.
The earphone is now reset
Charging guidelines
Open the USB port cover and insert the Micro
USB cable to charge.
LED turns red when charging and white when
earphones are fully charged.
Headset sync
Turn both earphones off. Press and hold the
“+“ button on the left earphone and the
“Power“ button on the right earphone for 5
seconds until you hear “true wireless stereo
pairing“ followed by “headset connected“.
The two earphones are now fully connected
and synced
Technical Specifications
RIO 3 True Wireless Earphone
Play
Music
Basic
ON/OFF
Play
Music
Play
Music
Phone
Call
Basic
ON/OFF
Pairing
Play
Music
Siri
Google
PRESS AND HOLD LEFT
EARPHONE POWER BUTTON
FOR 5 SECONDS UNTIL YOU
HEAR VOICE PROMPTS
SECURELY ADJUST THE
FLEXIBLE CLASP AROUND
YOUR EAR
PHONE
CONNECTED
RIO 3
PAIRING
POWER ON
HEADSET CONNECTED
POWER ON
PAIRING
TAP RIO 3 ON
YOUR DEVICE
ON
2
PRESS AND HOLD RIGHT
EARPHONE POWER
BUTTON FOR 2 SECONDS
UNTIL YOU HEAR THESE
VOICE PROMPTS
5
1
3
4
L
L
L
R
R
1 2 3 4
Bluetooth specification BT Version 4.2
Bluetooth Profile
A2DP 1.3, AVRCP 1.6,
HFP 1.6 ,HSP 1.2
Supported audio codecs
aptX / AAC / SBC
Wireless Range 10M (30feet)
(from paired device)
Battery Capacity 130 mAh / each
Driver Size Ø 14.2mm Comply
Diaphragm Driver
Sensitivity 100 db@1kHz
Frequency 20Hz ~ 20KHz
Impendence 32 Ohm
Microphone MEMS Omni
-38dB (+,- 3dB)
Direction Type Input
Sensitivity
Water Resistance Nano Coating IPX5
Dimensions
51mm (L) x 34mm (D)
x 46mm(H)
Weight 14g x 2
Battery time:
•Headset : 6hrs music / 8hr talk
•2hr to full charge
**Important: fully charge earphones before
first use
Button functions
LED indicators
One click Double click
Long press 2 secs
Long press 5 secs
Action LED indicators
Power on White LED flash for 1 second
Power off Red LED flash for 1 second
Pairing Red and white LED flash
alternately
Play music White Breathing Light
SBCaudio One blinking red
mode (Left earphone)
AACaudio Red LED blinks 3 times
mode
aptXaudio Red LED blinks 3 times
mode
Phone call White LED blinks 5 times
(cycle repeats)
Low battery All LED are showed in red
Charging Red LED (Solid)
Fully charged White LED (Solid)
Factory Reset Red and white LED flash twice
LED
Size:8x16cm
展開:8x32cm
All manuals and user guides at all-guides.com
all-guides.com

Other manuals for Erato RIO 3

Question and Answer IconNeed help?

Do you have a question about the Erato RIO 3 and is the answer not in the manual?

Summary

Getting Started: Wearing and Pairing

Wearing and Pairing Steps

Step-by-step visual guide for properly wearing the earphones and initiating the pairing process with a device.

Earphone Controls and Functions

Button Functions for Music and Calls

Details on single click, double click, and long press actions for music playback, calls, and voice assistants.

Headset Sync Procedure

Instructions to synchronize the left and right earphones for true wireless stereo pairing.

Maintenance and Indicators

Charging Guidelines

Instructions on how to charge the earphones using the Micro USB cable and LED status during charging.

LED Status Indicators

Explanation of LED light patterns for various states like power on/off, pairing, and audio modes.

Factory Reset Process

Procedure to reset the earphones to their original factory settings, indicated by LED flashes.

Technical Specifications and Battery

Technical Specifications

Detailed specifications including Bluetooth version, supported codecs, range, driver size, and sensitivity.

Battery Performance

Information on headset battery life for music and talk time, charging duration, and initial charging recommendation.

Overview

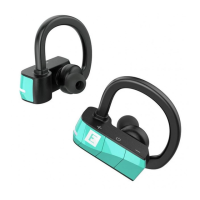
The ERATO RIO 3 True Wireless Earphone is designed for users seeking a seamless and high-quality audio experience with the convenience of a truly wireless design. These earphones are engineered to provide comfort, ease of use, and reliable connectivity for various activities, from listening to music to making phone calls.

Function Description

The RIO 3 earphones operate as a pair of independent wireless earbuds that connect to each other and to a Bluetooth-enabled device. They support both music playback and phone call management, offering a comprehensive audio solution. The earphones are designed to fit securely around the ear with a flexible clasp, ensuring stability during movement.

Usage Features

Getting Started and Pairing:

To begin using the RIO 3 earphones, users first need to power them on and pair them with their device.

  1. Secure Fit: Start by securely adjusting the flexible clasp around your ear for a comfortable and stable fit.
  2. Power On (Left Earphone): Press and hold the left earphone's power button for 5 seconds. You will hear voice prompts indicating "POWER ON" and "PAIRING."
  3. Device Pairing: On your Bluetooth-enabled device (e.g., smartphone), tap "RIO 3" in the Bluetooth settings to initiate pairing. Once connected, you will hear "PHONE CONNECTED."
  4. Power On (Right Earphone): Press and hold the right earphone's power button for 2 seconds. You will hear "POWER ON" and "HEADSET CONNECTED," confirming that both earphones are linked.

Headset Sync (True Wireless Stereo Pairing):

For a true wireless stereo experience, the two earphones need to be synced.

  1. Power Off: Ensure both earphones are powered off.
  2. Initiate Sync: Press and hold the "+" button on the left earphone and the "Power" button on the right earphone simultaneously for 5 seconds.
  3. Confirmation: You will hear voice prompts such as "true wireless stereo pairing" followed by "headset connected." This confirms that the two earphones are now fully connected and synced for stereo audio.

Button Functions (Left Earphone):

The left earphone features multiple controls for various functions:

  • Basic Play/Music:
    • One click: Play/Pause music.
    • Double click: Activate Google Assistant or Siri.
    • Long press 2 seconds: Skip to the next track.
    • Long press 5 seconds: Power ON/OFF the earphone.
  • Phone Call:
    • One click: Answer/End a call.
    • Double click: Reject a call.
    • Long press 2 seconds: Transfer call to phone.
  • Volume Control:
    • One click on "+": Increase volume.
    • One click on "-": Decrease volume.

Button Functions (Right Earphone):

The right earphone also has controls, primarily for music playback and power:

  • Basic Play/Music:
    • One click: Play/Pause music.
    • Long press 2 seconds: Skip to the previous track.
    • Long press 5 seconds: Power ON/OFF the earphone.

LED Indicators:

The earphones use LED lights to communicate their status:

  • Power on: White LED flashes for 1 second.
  • Power off: Red LED flashes for 1 second.
  • Pairing: Red and white LEDs flash alternately.
  • Play music: White Breathing Light (a slow, pulsing glow).
  • SBC audio mode: One blinking red light (on the left earphone).
  • AAC audio mode: Red LED blinks 3 times.
  • aptX audio mode: Red LED blinks 3 times.
  • Phone call: White LED blinks 5 times (repeating cycle).
  • Low battery: All LEDs are shown in red.
  • Charging: Red LED (Solid).
  • Fully charged: White LED (Solid).
  • Factory Reset: Red and white LEDs flash twice.

Maintenance Features

Charging:

To ensure continuous use, the RIO 3 earphones are easily rechargeable.

  1. Access USB Port: Open the USB port cover on each earphone.
  2. Connect Cable: Insert the Micro USB cable into the port.
  3. Charging Indication: The LED will turn red while the earphone is charging.
  4. Full Charge Indication: The LED will turn white once the earphone is fully charged. It takes approximately 2 hours to fully charge the earphones. It is important to fully charge the earphones before their first use to optimize battery life and performance.

Factory Reset:

If you encounter connectivity issues or wish to clear all previous pairing information, a factory reset can be performed on the left earphone.

  1. Power On: Turn on the left earphone first.
  2. Initiate Reset: Press and hold both the "+" and "-" buttons on the left earphone simultaneously for 5 seconds.
  3. Confirmation: The LED will flash red and white twice, indicating that the earphone has been reset. This clears all pairing data, allowing you to re-pair the earphones as if they were new.

Water Resistance:

The RIO 3 earphones feature Nano Coating IPX5 water resistance, making them suitable for use during workouts or in light rain, protecting them from sweat and splashes. However, they are not designed for submersion in water.

By following these guidelines, users can enjoy a robust and user-friendly experience with their ERATO RIO 3 True Wireless Earphones, benefiting from their intuitive controls, secure fit, and reliable audio performance.

Erato RIO 3 Specifications

General IconGeneral
Continuous audio playback time6 h
Headset typeBinaural
Product typeHeadset
Product colorBlack, Turquoise
Wearing styleEar-hook
Recommended usageCalls/Music
Protection featuresWaterproof
BluetoothYes
3.5 mm connectorNo
Connectivity technologyWireless
Ear couplingIntraaural
Microphone typeBuilt-in

Related product manuals