1
Item no: 07495
ASSEMBLY MANUAL
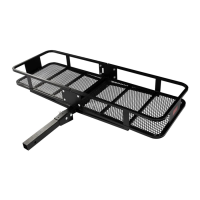
60” x 20” HEAVY DUTY
CARGO CARRIER-FOLDABLE
Assembly Instructions
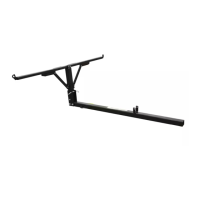
1. Unpack all parts and identify according to the FIG. and parts list.
2. Install two M12 bolts (11) through frame (1), 2” tube body assembly (2), and frame (1).
Install flat washers M12 (10), and lock nuts M12 (9) on the bolts.
REMARK: DON’T TIGHTEN THEM UNTIL THE CONNECTING PLATE (PART NO. 3) INSTALLATION IS FINISHED.
3. Place the 2 pcs of connecting plates (3) onto frames.
Install M10 bolts (14) through frames (1), flat washers M10 (13), and tighten them
together with the M10 lock nuts (12).
4. Connect the 2” foldable tube (4) onto 2” tube body assembly (2) with the bolt M16 (8)
and connecting pin (6)
Loading Your Cargo
WARNING: ONLY USE THE CARGO CARRIER WITH A PROPERLY INSTALLED 2 IN HITCH RECEIVER,
CAPABLE OF SUPPORTING THE CARGO CARRIER AND ITS LOAD. REFER TO MANUFACTURER’S
SPECIFICATIONS AND LOAD CAPACITIES BEFORE USING.
1. MAX. WEIGHT OF CARGO NOT TO EXCEED 500 LB.
2. Slide cargo across the frame to find the center of gravity, where the cargo will
rest without rocking easily.
3. The cargo needs to be bungee corded or otherwise tied to prevent swaying.
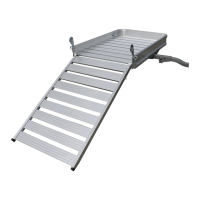
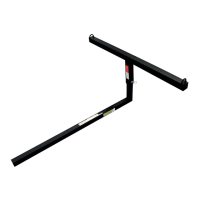
Folding The Frame Body When Not In Use
1. Pull out the pin (5) and the connecting pin (6).
2. Turn the frame body up until the frame body is vertical.
3. Insert the connecting pin (6) through the 2” tube body assembly (2) and the lower
hole of the 2” foldable tube (4) and insert the clip (5) into the connecting pin (6).
LIST OF PARTS
!
FIGURE
ITEM QUANTITY DESCRIPTION
1 2 FRAME( LEFT, RIGHT)
2 1 2” TUBE BODY ASSEMBLY
3 2 CONNECTING PLATE
4 1 2” FOLDABLE TUBE
5 1 CLIP
6 1 CONNECTING PIN
7 1 LOCK NUT M16
ITEM QUANTITY DESCRIPTION
8 1 BOLT M16x80
9 2 LOCK NUT M12
10 2 FLAT WASHER M12
11 2 BOLT M12x75
12 8 LOCK NUT M10
13 8 FLAT WASHER M10
14 8 BOLT M10x20