8
CT 2094 FDE 326023 02 25.09.07
Démontage / Zerlegen / Dismantling Montage / Zusammenbau / Assembly
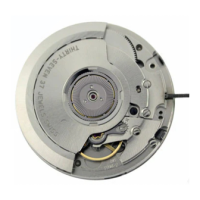
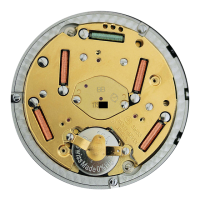
Chasser la roue avant de monter le bâti du
dispositif automatique 1134. Soutenir la roue
au niveau de la pierre (porte-pièce 10 1/2’’’
avec appui au centre).
Rad vor dem Einbau des Gestells der automa-
tischen Vorrichtung 1134 aufpressen. Rad auf
Steinhöhe unterstützen (Werkstückhalter 10 1/
2’’’ mit Stütze im Zentrum).
Drive off the wheel before fitting the framework
of the automatic module 1134. Hold the wheel
at the same level as the jewel
(component
holder
10 1/2’’’ with support
in centre
).
Respecter la hauteur de chassage 0,46
±20
pour la roue 284 (mesure depuis le haut de
la platine).
Aufpresshöhe 0,46
±20
für das Rad 284 ein-
halten (ab Oberseite der Werkplatte
gemessen).
Observe correct driving height 0.46
±20
for
wheel 284 (measure from top of plate).
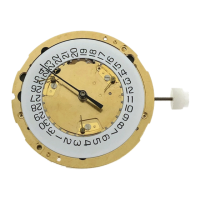
Remarque B Hinweis B Note B
Le module chronographe (8510) est livré sans
calendrier. Il est fourni huilé, réglé et prêt à
être assemblé avec le mouvement de base.
Comme aucune fourniture n’est livrable pour
ce module, nous vous déconseillons vive-
ment de le démonter mais de procéder à un
échange standard en cas de problème.
Das Chronomodul (8510) wird ohne Kalender, in
geöltem, reguliertem und für den Zusammenbau
mit dem Basiswerk bereiten Zustand geliefert. Da
zu diesem Modul keinerlei Bestandteile lieferbar
sind, empfehlen wir Ihnen dringend, dieses
nicht zu zerlegen, sondern an dessen Stelle,
falls Probleme auftreten, ein Standard-
Ersatzmodul einzubauen.
The chronograph module (8510) is supplied
without a calendar. It is supplied oiled,
adjusted and ready to assemble with its basic
movement. Since no other fittings can be sup-
plied for this module, we would urgently
advise you against dismantling it. Instead,
you should opt for standard replacement if
you encounter any problems.
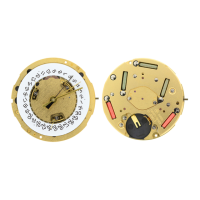
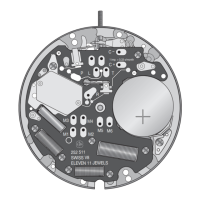
Pour le remontage du module chronographe
sur le mouvement de base, mettre le poussoir
A en position Start et suivre la procédure ci-
dessous :
Zum Aufbauen des Chronomoduls auf das
Basiswerk, Drücker A in die Start-Position
versetzen und die nachstehende
Vorgehensweise befolgen:
To install the chronograph module on the
basic movement, move pusher A into Start
position, then proceed as follows:
Assemblage avec le porte-pièce 226 676 Zusammenbau mit Werkhalter 226 676 Assembly with component holder 226 676
- S’assurer que le mouvement de base fonc-
tionne.
- Sicherstellen, dass das Basiswerk funktio-
niert.
- Ensure that the basic movement is working
properly.
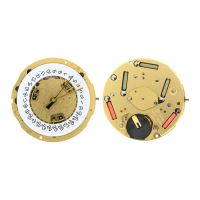
- Vérifier le parallèlisme du mouvement de
base avec le module chronographe.
- Basiswerk und Chronomudul auf gegen-
seitige Parallellage überprüfen.
- Check that basic movement is parallel to the
chronograph module.
- Vérifier le parfait engrènement des mobiles
suivants :
- Folgende Radpaare auf einwandfreien Eingriff
überprüfen:
- Check that the following wheels and pinions
mesh perfectly with one another:
-Engager puis serrer les quatres vis d’ac-cou-
plement (58510) selon l’ordre 1 - 4.
-Die vier Verbindungsschrauben (58510) in der
Reihenfolge 1 - 4 einschrauben und fest-
ziehen.
-Install then tighten the four connecting
screws (58510) in order 1 - 4.
Assemblage avec posage spécial Zusammenbau mit Spezial-Werkzeug Assembly with special fixture
- Orienter le posage spécial avec le levier à
gauche, en position verticale (neutre).
- Poser le module chronographe, côté cadran
en bas, au fond du posage, tige à 3 h.
- Poser le mouvement de base monté, en le
retournant, au-dessus du module, dans le
posage, sur l’appui.
- Actionner le levier vers l’avant (direction
12 h) jusqu’à la butée pour faire remonter le
module chronographe contre le mouvement
de base.
- S’assurer que le mouvement de base fonc-
tionne.
- Vérifier le parfait engrènement des mobiles.
- Engager les quatre vis d’accouplement
(58510).
- Tirer le levier du posage à 6 h et serrer les
vis d’accouplement selon l’ordre 1 - 4.
- Spezial-Auflage mit dem Hebel nach links zei-
gend in Vertikalstellung (Neutralstellung) brin-
gen.
Chronomodul mit der Zifferblattseite nach
unten (Stellwelle bei 3 h) in die Auflage legen.
- Das zusammengebaute Basiswerk umge-
kehrt bis zum Tiefenanschlag in die Auflage
einsetzen.
- Hebel nach vorne (gegen 12 h hin) bis zum
Anschlag bewegen, um das Chronomodul an
das Basiswerk heranzuheben.
- Sicherstellen, dass das Basiswerk funktio-
niert.
- Radpaare auf einwandfreien Eingriff überprü-
fen.
- Die vier Kupplungsschrauben (58510) ein-
schrauben.
- Hebel der Auflage nach 6 h ziehen und
Kupplungsschrauben in der Reihenfolge
1 - 4 festziehen.
- Align the special fixture with lever on left
side in vertical position (neutral).
- Fit the chronograph module, dial facing
downwards, at the base of the fixture with
staff at 3 o’clock.
- Fit the assembled basic movement on
support in fixture, first turning it above the
mo-dule.
- Operate the lever forwards (12 ‘clock
direction) as far as the limit stop to refit
the chro-nograph module up against the
basic movement.
- Ensure that the basic movement is wor-
king properly.
- Check that the wheels and pinions mesh
perfectly with one another.
- Secure the four connecting screws
(58510).
- Withdraw the lever from the fixture at
6 o’clock and tighten the connecting
screws in the sequence 1 - 4.
284
284
0,46
20
Tige de mise
à l’heure
Mouvement
de base
Module
chronographe
En position 1
(tourner
légèrement)
Roue entraî-
neuse sur roue
seconde (284)
Roue
embrayage de la
seconde
En position 2
(tourner
légèrement)
Renvoi de
correcteur
(9712)
Correcteur
monté
Aufzugwelle Basiswerk
Chronograph-
Baugruppe
In Stellung 1
(leicht drehen)
Mitnehmerrad
auf Sekundenrad
(284)
Sekunden-Kup-
plungsrad
In Stellung 2
(leicht drehen)
Verbindungsrad
für Korrektor
(9712)
Korrektor, mon-
tiert
Hand-setting
stem
Basic
movement
Chronograph
module
In position 1
(turn gently)
Driving wheel
on second
wheel (284)
Second clutch
wheel
In position 2
(turn gently)
Corrector
setting wheel
(9712)
Corrector,
assembled
 Loading...