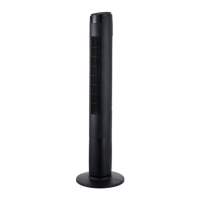
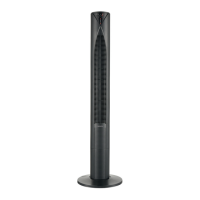
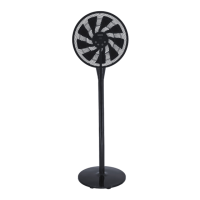
This document describes the Euromatic TF116RC Tower Fan, a 116 cm tall electrical appliance designed for indoor household use.
Function Description
The Euromatic TF116RC is a tower fan that provides airflow to cool a room. It operates with multiple speed settings and modes to suit different preferences. The fan is controlled via a control panel located on the top of the unit or a remote control. It also features an oscillation function to distribute air across a wider area and a timer for automatic shut-off.
Important Technical Specifications
- Model Number: TF116RC
- Height: 116 cm
- Rated Power: 45 W
- Rated Voltage: 220-240 V~
- Rated Frequency: 50-60 Hz
- Timer: 7.5 hour timer (set in half-hourly steps)
- Fan Speeds: 3 (Low, Medium, High)
- Mode Settings: 3 (Normal, Natural, Sleep)
- Remote Control: Powered by two AAA batteries
- Dimensions (approx.): 116 (H) x 20.7 (W) x 18.5 (D) cm
- Weight (approx.): 3.7 kg
- Compliance: Fully tested and meets AS/NZS 60335.1 and AS/NZS 60335.2.80 standards.
- Climate Suitability: Suitable for use in tropical climates under ambient temperatures of 18 °C to 43 °C.
- Electrical Safety: Class II - Double Insulated Appliance, meaning it does not require a safety connection to electrical earth (ground). Bears the RCM Mark, indicating compliance with ACMA guidelines and government requirements for electrical device safety.
Usage Features
Control and Operation:
The fan can be operated using either the control panel on the unit or the included remote control. Both offer the same functions. When using the remote control, it should be pointed towards the fan's display from a distance of no more than 5 meters, ensuring no obstructions.
Powering On/Off:
- Place the assembled fan on a dry, level, and stable surface.
- Insert the plug into a 220–240 V~ electrical socket and switch on the power at the outlet.
- Press the POWER button (on the control panel or remote) to turn the fan on or set it to stand-by.
Fan Speed Adjustment:
- Press the SPEED button repeatedly to cycle through low, medium, and high-speed settings. The corresponding indicator on the LED display will illuminate.
Operation Modes:
- Press the MODE button to select one of three operation modes:
- Normal: The default mode, where the fan operates at a constant speed. No indicator light is displayed for this mode.
- Natural: Simulates a natural breeze by cycling through various speeds.
- Sleep: Gradually reduces the fan speed to a low setting, ideal for resting, if initially set to high or medium.
Oscillation:
- Press the OSC button to start or stop the fan's oscillation function, which moves the fan head from side to side to distribute air more broadly.
Timer Function:
- The timer allows setting an automatic off-time from 0.5 hours up to 7.5 hours, in half-hourly increments.
- Press the TIMER button to adjust the desired off-time.
- Indicator lights corresponding to the selected time will illuminate (e.g., for 6.5 hours, the 4, 2, and 0.5 hour indicators will light up). These lights remain constant during the set time.
- Once the timer expires, the fan automatically switches to stand-by.
Remote Control Battery Replacement:
- The remote control uses 2 AAA batteries.
- To replace, press down and slide the detachable cover outwards.
- Insert new AAA batteries, observing the correct polarity markings.
- Slide the cover back into the closed position.
- Battery Precautions: Do not open or short-circuit batteries. Do not mix different types of batteries. Remove empty batteries and batteries if the remote is not used for long periods to prevent leakage. Dispose of fully discharged batteries according to statutory regulations, not in household waste. Do not throw batteries into fire or expose them to high temperatures.
Maintenance Features
Cleaning and Maintenance:
- Safety First: Always switch off and unplug the fan from the wall outlet before cleaning, maintenance, or moving it.
- Avoid Liquids: Do not immerse the fan, cord, or plug in water or other liquids. Do not spray liquids directly onto the fan. Prevent water from dripping onto or into the motor housing.
- Avoid Harsh Cleaners: Never use petrol, solvents, harsh detergents, or abrasive/alkaline cleaners on the fan.
- No Disassembly: Never attempt to remove the front or rear grille (guard) for cleaning.
- Dusting: Periodically clean the fan by lightly running a vacuum cleaner nozzle (with a soft brush) over the front and rear grilles to remove accumulated dust or dirt. Alternatively, use a soft, dry cloth.
- Stubborn Stains: For stubborn stains on plastic parts, use a slightly damp, soapy cloth. Ensure the cloth is not too wet and exercise caution around air openings to prevent water exposure to electrical components. Thoroughly dry the unit with a soft cloth before reuse.
- Free Airflow: Ensure nothing blocks the air outlet and intake. Do not insert objects into openings to prevent electric shock or fire hazards.
Storage:
- Store the clean and dry fan in a safe, dry, dust-protected location.
- The original carton is recommended for storing the disassembled product. To disassemble, reverse the base assembly instructions.
- If storing the fan fully assembled, cover it with a plastic bag or material for dust protection.
Service, Repair, and Spare Parts:
- The appliance requires no maintenance other than occasional battery replacement for the remote control. It contains no user-serviceable parts.
- Do not attempt to disassemble, repair, or modify the fan.
- If the appliance is damaged or malfunctions, do not operate it. Contact the after-sales support center for advice on repair or replacement by trained personnel.
- Spare remote controls are available from the after-sales support center (tempo.org/support or 1300 886 649).
Assembly (Base Stand):
The fan's base stand is supplied unattached and must be assembled before use.
- The stand consists of two sections (upper and lower), with the lower section including a guide for the power cable.
- Lay the tower fan on a flat, stable surface (e.g., on its top surface, protected by a soft material like a towel) to assemble the base.
- Place the upper half of the stand onto the fan's base, aligning it with three fixing pillars.
- Place the lower half of the base over the upper half, ensuring the power cable is not trapped.
- Secure the stand to the fan using the four long screws.
- Use the two short screws to fix the two halves of the stand together.
- Tuck the power cord into the guide so it is held close to the underside and exits through the slot in the side of the stand.
- WARNING: Never use the fan until it is properly assembled and securely affixed to the base. The fan must only be operated in an upright position.