EasyManua.ls Logo

EVERSPRING SE203 - User Manual

EVERSPRING SE203
6 pages
Print Icon
To Next Page IconTo Next Page
Loading...
SE203
OUTDOOR SIREN
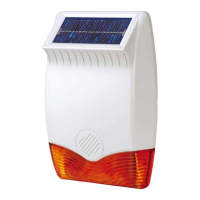
General Introduction
The SE203 is an outdoor siren powered by DC adaptor or battery. By its visible
presence, the external siren indicates that an alarm system is installed and deters
intruders. In case of intrusion, it emits a high-decibel piercing sound to alert the
neighborhood coupled with flashing red light.
It integrates a tamper protection switch for its own protection and will generate a full
alarm should there be any unauthorized attempt to remove it from its location or
open its cover.
Main features:
● IP44 approved for outdoor installation;
● Buzzer sound can be set low (85dB) or high (100dB) sound.
Alarm duration can be adjusted from control panel.
● Configurable arm/disarm and entry/exit delay beep sound
Informs about alarm, exit/entry delays and status changing
Tamper switch to detect removal of its cover
● Power Supply: 9V~12V/1A power adaptor or 4 * 1.5V LR14 batteries
Product Overview
Pairing to Controller
1. Insert 4* LR14 (C-cell) batteries into the battery compartment.
2. Log into the VIAS account from the APP, and enter the controller to system
main control page.
3. Select Menu List>System Setup>ADD DEVICE>choose SE203 Outdoor
Battery Siren.
4. Please follow and complete the instruction on the APP to pairing with central
controller.
5. Locate the learning button. Do not activate pairing on the controller yet.
6. Press and hold the learning button for more than 3 seconds until the LED start
blinking.
7. Quickly activate pairing on the controller. The LED should stop blinking
indicating the pairing process is complete.
Mounting the Outdoor Siren
Choosing a location
The Siren should be mounted:
as high as possible in a prominent position so that it can be easily seen and
heard.
on a flat surface so that the rear tamper switch is not easily activated. Ensure
also that the tamper switch does not fall into the recess between brick
courses as this could prevent the switch from closing and give a permanent
tamper signal.
ideally on a south facing wall to receive optimum amount of sunlight, but an
east or west facing wall will also suffice. Avoid mounting on a north facing
wall, and avoid shadows cast by neighboring walls, trees, and roof
overhangs.
at least 1 meter away from any external or internal metalwork which can affect
its radio transmission.
Installation
1. To install the siren on the wall, first affix its back cover on the wall and then
followed by mounting its main body onto the back cover.
2. Remove the back cover again. Using the back cover itself as a template,
position the back cover on the wall and mark the positions of four mounting
holes.
3. Drill four 6mm holes and insert the wall plugs.
4. Fit two 30mm fixing screws in the top holes leaving approximately 10mm of the
screw protruding.
5. Place the top keyhole slots of the back cover over the screw heads. Adjust the
back cover position and adjust the screws until they form a neat fit with minimal
movement.
6. Secure the back cover in position using the two 25mm fixing screws at the
bottom.
FRONT VIEW
INSIDE VIEW OF SIREN MAIN BODY
(BACK COVER REMOVED)
Strobe light & red LED
1.5V LR14*4
Battery
Learning Button
Tamper Switch
Adaptor Connector
Question and Answer IconNeed help?

Do you have a question about the EVERSPRING SE203 and is the answer not in the manual?

Overview

The SE203 is an outdoor siren designed to enhance the security of an alarm system. Its primary function is to deter intruders through its visible presence and, in the event of an intrusion, to alert the neighborhood with a high-decibel piercing sound and a flashing red light. The siren is powered by either a DC adaptor or four 1.5V LR14 batteries.

Function Description:

The SE203 serves as an external deterrent and alert mechanism for alarm systems. When an alarm is triggered, it activates its siren and strobe light for a default duration of 3 minutes. It incorporates a tamper protection switch that triggers a full alarm if there's any unauthorized attempt to remove the siren from its location or open its cover. This ensures the siren's own security and integrity within the alarm system. The device is also capable of informing users about alarm events, exit/entry delays, and status changes through configurable beep sounds.

Important Technical Specifications:

  • Operating Temperature: -20°C to 50°C
  • Main Power Supply: 9V~12V/1A power adaptor
  • Optional Power Supply: 4 x 1.5V LR14 (C-cell) batteries
  • Battery Life: Up to 4 years (assuming alarm triggers once per month)
  • RF Range:
    • EU: Up to 800 meters line of sight
    • US: Up to 400 meters line of sight
  • Alarm Sound:
    • High: 100dBA@1m
    • Low: 85 dBA@1m
  • Protection Class: IP44 (approved for outdoor installation)
  • Frequency Range:
    • EU: 868 MHz
    • US: 923 MHz

Usage Features:

  • Pairing to Controller:
    1. Insert batteries into the compartment.
    2. Log into the VIAS account via the APP and navigate to the system main control page.
    3. Select Menu List > System Setup > ADD DEVICE > choose SE203 Outdoor Battery Siren.
    4. Follow APP instructions for pairing.
    5. Locate the learning button on the siren.
    6. Press and hold the learning button for more than 3 seconds until the LED starts blinking.
    7. Quickly activate pairing on the controller; the LED will stop blinking, indicating successful pairing.
  • Mounting:
    • The siren should be mounted as high as possible in a prominent position for visibility and audibility.
    • It should be on a flat surface to prevent accidental activation of the rear tamper switch. Ensure the tamper switch does not fall into recesses between brick courses.
    • Ideally, mount on a south-facing wall for optimal sunlight exposure, but east or west walls are also suitable. Avoid north-facing walls and areas with shadows from neighboring structures.
    • Maintain at least 1 meter distance from any external or internal metalwork to prevent radio transmission interference.
    • Installation involves first affixing the back cover to the wall using four mounting screws (two 30mm screws for top keyhole slots, two 25mm screws for bottom). The main body is then mounted onto the back cover.
    • Ensure the waterproof cover of the Control box is secured before mounting the main body.
    • When mounting the main body, hinge the front cover tabs over the top edge of the back cover and push the base into place. Secure the main body by refitting the fixing screw at the bottom edge.
    • Crucially, ensure the rear tamper switch is closed (audible click) when the main body is fitted. If not, adjust the screw on the back cover tamper plunger.
  • Configurable Settings (via APP):
    • Siren Sound Level: Can be set to High (100dB) or Low (85dB).
    • Entry/Exit Delay Beep Sound: Enable or Disable.
    • Siren Alarm Sensor Tamper during Disarm: Enable or Disable.
    • Beep Sound when Arm/Disarm: Enable or Disable.
    • Strobe Light during Alarm: Enable or Disable.
    • LED Periodic Blink when Arm: Enable or Disable.
    • Alarm Advanced Settings:
      • Entry Delay/Exit Delay time: 5-180 seconds.
      • Enable/disable Intruder Siren when alarm; duration: 5-180 seconds.
      • Enable/disable Tamper Siren when alarm; duration: 5-180 seconds.
      • Enable/disable Panic Siren when alarm; duration: 5-180 seconds.
      • Enable/disable Flood Siren when alarm; duration: 5-180 seconds.
      • Enable/disable Smoke Siren when alarm; duration: 5-180 seconds.
      • Enable/disable SOS Siren when alarm; duration: 5-180 seconds.
  • Status Indication (LED and Beep):
    • No ID code: LED flashes every 2 seconds.
    • About to learn ID code (pressing learning button within 3s): LED illuminates.
    • About to learn ID code (pressing learning button for >3s): LED flashes every 0.5 seconds.
    • Under learning ID code: LED flashes every 0.5 seconds repeatedly.
    • Success in learning ID code: LED illuminates for 0.5 seconds then extinguishes.
    • Failure learning ID code: LED flashes 3 times rapidly (0.1s on/0.1s off).
    • Clear ID code: LED illuminates when pressing learning button, then extinguishes after successful clearance.
    • Standby (Arm mode): LED flashes once every 15 seconds.
    • Entry/Exit Delay: LED flashes with beep sounds. Beep patterns vary based on remaining time (e.g., once per second for T>5s, twice per second for T<6s, rapid beeps in final 5s). "0" means quiet.
    • Fully Arm/Partial Arm the system: Flash 1 time, Long Beep one time.
    • Disarm the system: Flash two times, Beep-Beep two sounds.
    • Alarm: LED & Strobe flashes, 180 seconds (default).
    • Low battery: LED flashes 20 times.
  • Reset to Factory Default:
    1. Press and hold the learning button for more than 3 seconds, then release (RED LED flashes repeatedly).
    2. Press and hold the learning button again for more than 6 seconds, then release. The siren will reset to factory default.

Maintenance Features:

  • Low Battery Indication: When battery level is low, the siren reports to the controller, and the LED flashes 20 times. (In disarm mode, only the LED flashes, no beep sound).
  • Power Loss Reporting: Upon mains power loss, the siren reports to the controller and switches to backup batteries.
  • Software Reporting Commands:
    • Auto report: Reports tamper/battery/siren and DC adaptor condition every hour (after 2 minutes of battery insertion).
    • Status change: Tamper switch release reports to the controller and activates alarm sound.
    • Temperature report: Reports to the controller every half hour.
    • Power Supply report: Reports power source to the controller after 2 minutes of first power-on, then every hour.
  • Troubleshooting: The manual provides a table of common symptoms, possible causes (e.g., improper battery connection, siren out of order, failure to learn ID code, radio channel interference, binding process failed, communication issues), and recommended solutions (e.g., check battery insertion, send for repair, resume learning process, wait, re-pair, place siren closer to controller).

EVERSPRING SE203 Specifications

General IconGeneral
BrandEVERSPRING
ModelSE203
CategorySecurity System
LanguageEnglish