32
www.evolutionpowertools.com
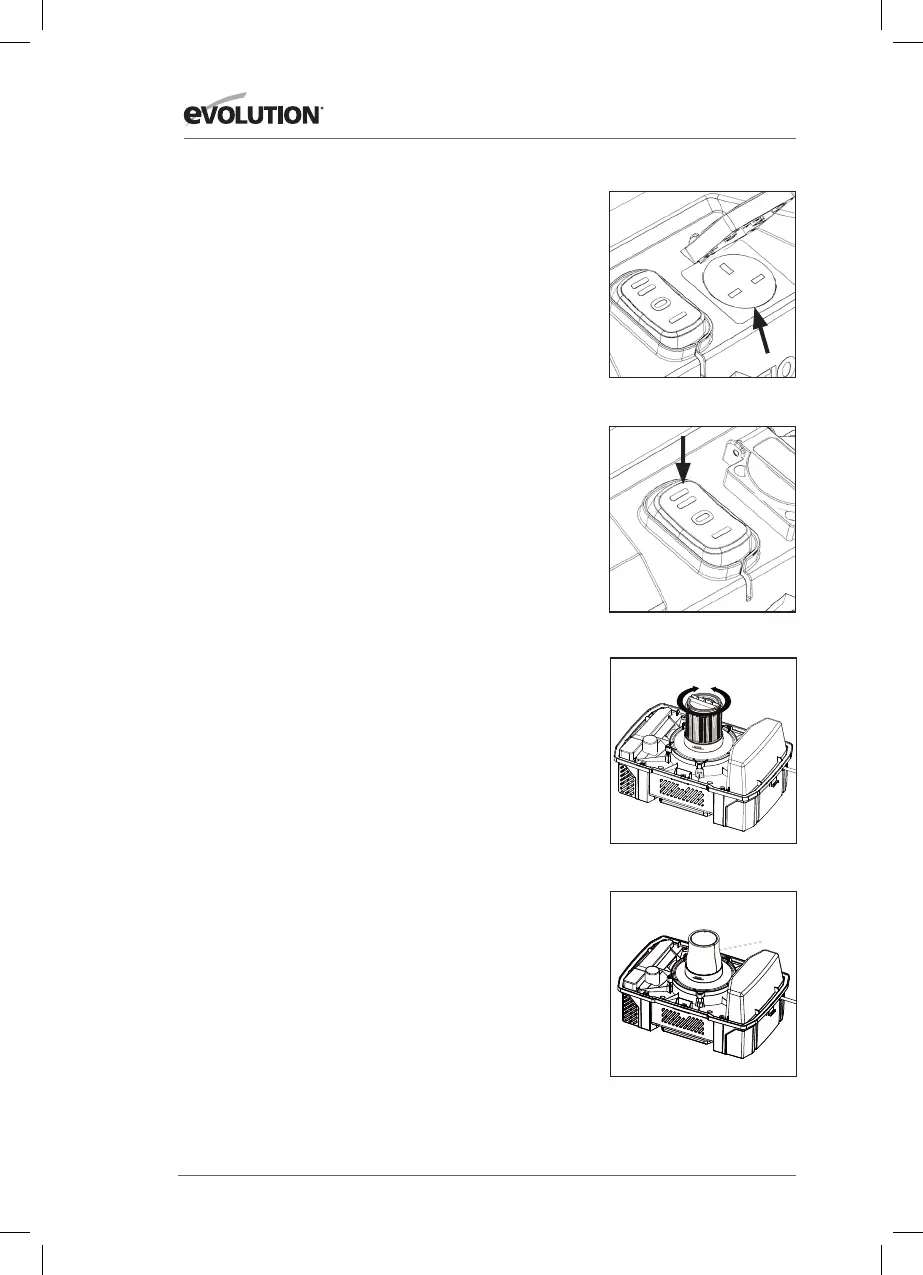
FIG. 1
FIG. 4
FIG. 3
INSTRUCCIONES DE FUNCIONAMIENTO
ADVERTENCIA: Para reducir el riesgo de incendio o explosión,
no utilice este aspirador en zonas con gases y vapores inflamables
o polvo explosivo en el aire. Los gases y vapores inflamables
incluyen, sin limitación: líquido inflamable, limpiadores tipo
disolvente, pinturas al óleo, gasolina, alcohol o sprays aerosoles.
Los polvos explosivos incluyen, sin limitación: carbón, magnesio,
aluminio y polvo de cereal o pólvora. No aspire polvo explosivo o
líquidos inflamables o combustibles ni cenizas calientes. No utilice
este aspirador para rociar líquido inflamable o combustible. Para
reducir el riesgo de peligros para la salud por vapores o polvos, no
aspire materiales tóxicos.
PRECAUCIÓN: Para reducir el riesgo de daños auditivos, utilice
protección auditiva al usar este aspirador durante periodos
prolongados o si lo utiliza en una zona ruidosa. Este aspirador
en seco y húmedo de 15l está montado de fábrica y listo para
usar al sacarlo del embalaje. La unidad está lista para aspirar en
seco o soplar. Después de enchufar el cable de alimentación en la
toma de corriente, encienda la unidad desplazando el interruptor
de la posición «O» a la posición «I». La «O» es la posición «OFF»
(apagada) y la «I» es la posición «ON» (encendida).
FUNCIÓN TOMA DE FUERZA
ADVERTENCIA: Peligro de lesiones y daños!
Interruptor de toma de fuerza para vacío automático. Esta función
permite al limpiador aspirador encenderse cuando se enciende
la herramienta eléctrica, así la unidad no está funcionando entre
cortes.
NOTA: La toma de enchufe es la única conexión de la herramienta
eléctrica al limpiador aspirador. Cualquier otro uso de la toma de
enchufe no está permitido.
• Conecte la manguera de polvo abierta desde el limpiador
aspirador hasta el colector de polvo de la herramienta
eléctrica.
• Conecte el enchufe de red de la herramienta eléctrica a
la toma de enchufe del limpiador aspirador en el cuerpo
principal. (Fig. 1)
• Conecte el cable del limpiador aspirador al interruptor de
red en la toma de corriente.
• Ahora coloque el interruptor basculante en el ajuste II: el
limpiador aspirador está en el modo de standby. (Fig. 2)
• Cuando se encienda la herramienta eléctrica, el aspirador
se encenderá automáticamente: utilice la herramienta tal y
como se especifica para completar el trabajo.
• Cuando se apague la herramienta eléctrica, el limpiador
aspirador se detendrá automáticamente.
• El ajuste II de la toma de fuerza no es apto para
transformadores de 110V.
7
WARNING!
To reduce the risk of injury from accidental starting, unplug power cord before emptying
the dust tank.
1. Remove the power head assembly of the wet/dry vac by pulling outward on the lid
clips located on each side of the vac. Lift off the power head assembly.
2. Dump the tank contents into the proper waste disposal container.
INSTALLING ACCESSORY BRACKET
1.Push the accessory bracket (A) in the recess.
2.Secure in place using the screws (B).
A
B
WET PICK-UP
1. Remove cartridge filter and replace it with foam filter when you do wet pickups.
2. This wet/dry vac is equipped with a float mechanism which will rise automatically
to cut off the airflow when the liquid in the tank reaches a predetermined level. When
this happens, turn off vac, unplug the power cord, and empty the dust tank. You will
know that the float has shut the airflow off because the suction ceases and the motor
noise becomes higher in pitch due to increased motor speed. The liquid capacity may
vary with the rate of pickup.
EMPTY THE TANK
Foam filter
Float in raised position
BLOQUEAR DESBLOQUEAR
FIG. 2
 Loading...