33
www.evolutionpowertools.com
ES
FIG. 5
FIG. 6
FIG. 7
Your vac contains a blowing feature. It has the capability to blow sawdust and other
debris. It can be used to blow dust and debris out of garages or off patios and
driveways. Follow the steps below to use your vac as a blower.
1. Locate blowing port on your vac.
2. Insert one end of the 1-1/4 in. x 6 ft. hose into the blowing port.
3. Turn vac “ON”.
8
WARNING: To reduce the risk of injury from accidental starting, unplug power
cord before changing
WARNING: To avoid injury to bystanders, keep them clear of blowing debris.
CAUTION: Wear a dust mask if blowing creates dust which might be inhaled.
CAUTION: To reduce the risk of hearing damage, wear ear protectors when
using the vac/blower for extended hours or when using it in a noisy area.
CARE AND MAINTENANCE
FILTER REPLACEMENT
WARNING!
To reduce the risk of injury from accidental starting, unplug power cord before changing
or cleaning filter.Your filter should be cleaned often to maintain peak vacuum
performance.
IMPORTANT
To avoid damage to the blower wheel and motor, always reinstall the reusable dry filter
before using the vacuum for dry pickups and always reinstall the foam filter before
using the vacuum for wet pickups.
IMPORTANT
After cleaning, check the filter for tears or small holes. Do not use a filter with holes or
tears in it. Even a small hole can cause dust to come out of your vacuum.
Replace it immediately.
NOTE
Before installing the filter on the vacuum, clean the area of the lid so that the clamp ring
will seal the bag against the lid and stop small particles from bypassing the filter bag. If
the filter is clean and not damaged, replace it on the filter cage. If it cannot be reused,
place a new filter over the filter cage.
NOTE
Clean the filter in an open area.
BLOWING OPERATION
7
WARNING!
To reduce the risk of injury from accidental starting, unplug power cord before emptying
the dust tank.
1. Remove the power head assembly of the wet/dry vac by pulling outward on the lid
clips located on each side of the vac. Lift off the power head assembly.
2. Dump the tank contents into the proper waste disposal container.
INSTALLING ACCESSORY BRACKET
1.Push the accessory bracket (A) in the recess.
2.Secure in place using the screws (B).
A
B
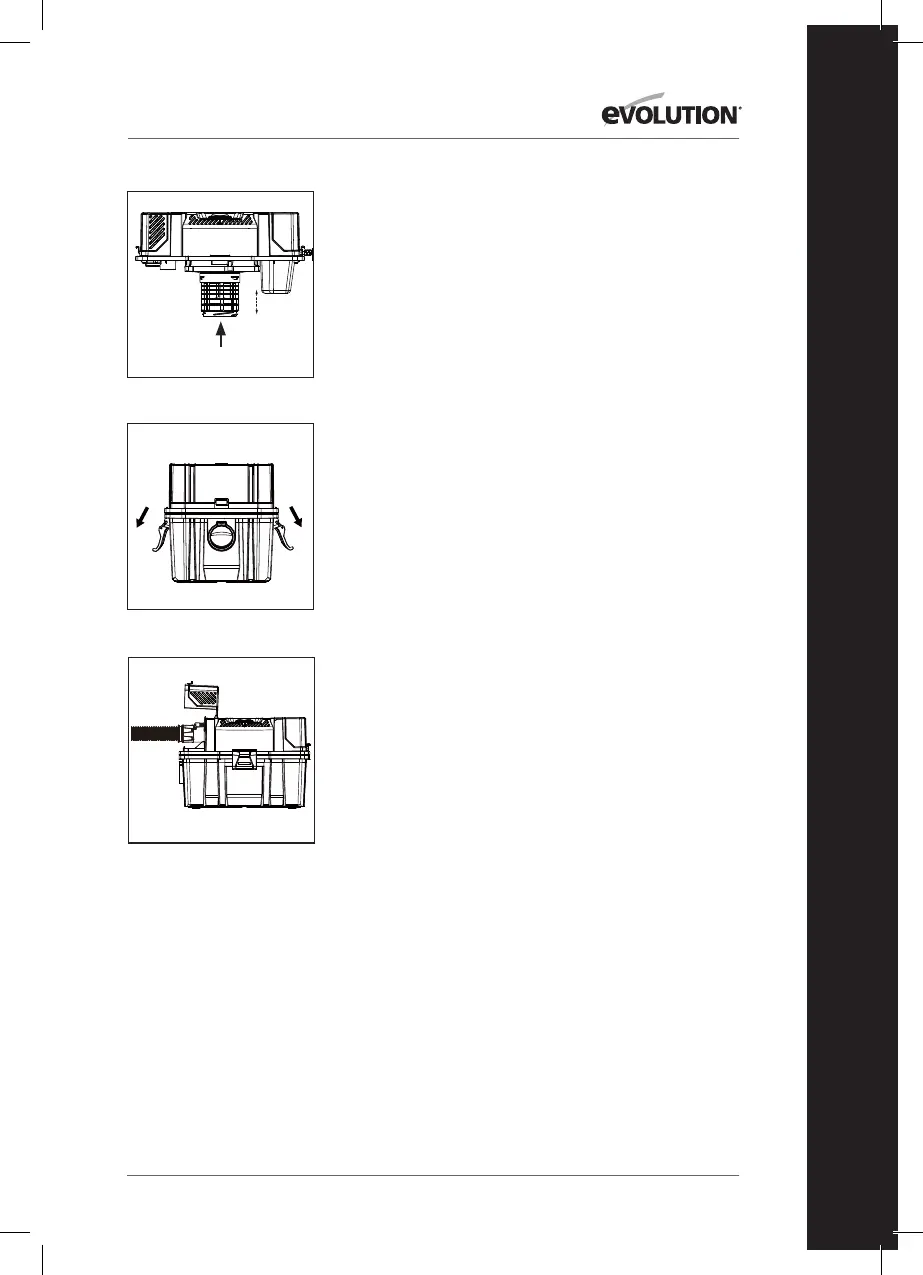
WET PICK-UP
1. Remove cartridge filter and replace it with foam filter when you do wet pickups.
2. This wet/dry vac is equipped with a float mechanism which will rise automatically
to cut off the airflow when the liquid in the tank reaches a predetermined level. When
this happens, turn off vac, unplug the power cord, and empty the dust tank. You will
know that the float has shut the airflow off because the suction ceases and the motor
noise becomes higher in pitch due to increased motor speed. The liquid capacity may
vary with the rate of pickup.
EMPTY THE TANK
Foam filter
Float in raised position
7
WARNING!
To reduce the risk of injury from accidental starting, unplug power cord before emptying
the dust tank.
1. Remove the power head assembly of the wet/dry vac by pulling outward on the lid
clips located on each side of the vac. Lift off the power head assembly.
2. Dump the tank contents into the proper waste disposal container.
INSTALLING ACCESSORY BRACKET
1.Push the accessory bracket (A) in the recess.
2.Secure in place using the screws (B).
A
B
WET PICK-UP
1. Remove cartridge filter and replace it with foam filter when you do wet pickups.
2. This wet/dry vac is equipped with a float mechanism which will rise automatically
to cut off the airflow when the liquid in the tank reaches a predetermined level. When
this happens, turn off vac, unplug the power cord, and empty the dust tank. You will
know that the float has shut the airflow off because the suction ceases and the motor
noise becomes higher in pitch due to increased motor speed. The liquid capacity may
vary with the rate of pickup.
EMPTY THE TANK
Foam filter
Float in raised position
RECOGIDA EN SECO
NOTA: Si el filtro de espuma está colocado encima de la rejilla del
filtro, se debe retirar antes de instalar el filtro del cartucho. El filtro
del cartucho se puede utilizar para la recogida en seco o húmedo;
la instalación es igual para ambos. Si recoge grandes cantidades
de líquido, consulte la sección Operación de recogida en húmedo
de este manual. Utilice el filtro del cartucho colocado sobre la
rejilla del filtro
para la recogida de la mayoría de material general seco.
• Con el cabezal de potencia boca abajo, deslice el filtro del
cartucho hacia abajo sobre la rejilla del filtro y presione los
sellos del filtro contra el cabezal de potencia.
• Coloque el retén del filtro en la parte superior del filtro del
cartucho, sujete el cabezal de potencia con una mano y gire
el asa del retén del filtro en sentido de las agujas del reloj
para apretar, bloqueando el filtro en posición. (Fig. 3)
• Para retirar el filtro del cartucho para la limpieza, sujete de
nuevo el cabezal de potencia y gire el retén del filtro en
sentido contrario a las agujas del reloj para aflojar y retire,
deslizando el filtro del cartucho fuera de la rejilla del filtro.
• Para limpiar el filtro del cartucho, elimine el exceso de
suciedad agitando o con un cepillo o aclárelo (desde
el interior del filtro) con agua, séquelo completamente
(aproximadamente 24horas) y vuelva a instalarlo.
RECOGIDA EN HÚMEDO
• Retire el filtro del cartucho y sustitúyalo por el filtro de
espuma si hace recogidas en húmedo. (Fig. 4)
• Este aspirador en seco y húmedo dispone de un mecanismo
de flotación que se elevará automáticamente para cortar el
flujo de aire cuando el líquido del depósito supere un nivel
predeterminado. Cuando esto suceda, apague el aspirador,
desenchufe el cable de alimentación y vacíe del depósito
de polvo. Sabrá que el flotador ha cerrado el flujo de aire si
la la succión cesa y el ruido del motor se vuelve más agudo
debido a la mayor velocidad del motor. La capacidad de
líquido puede variar con la tasa de recogida. (Fig. 5)
VACIADO DEL DEPÓSITO
ADVERTENCIA: Para reducir el riesgo de lesiones por arranque
accidental, desenchufe el cable de alimentación antes de vaciar el
depósito de polvo.
• Retire el conjunto del cabezal de potencia del aspirador en
seco y húmedo tirando hacia arriba sobre los clips de la tapa
a cada lado del aspirador. Retire el conjunto del cabezal de
potencia. (Fig. 6)
• Vacíe el contenido del depósito en un contenedor de
eliminación de residuos adecuado.
FUNCIONAMIENTO DE SOPLADO
ADVERTENCIA: Para reducir el riesgo de lesiones por arranque
accidental, desenchufe el cable de alimentación antes del cambio.
Para evitar lesiones a los presentes, manténgalo alejado de los
residuos soplados.
FLOTADOR EN
POSICIÓN ELEVADA
 Loading...