56
www.evolutionpowertools.com
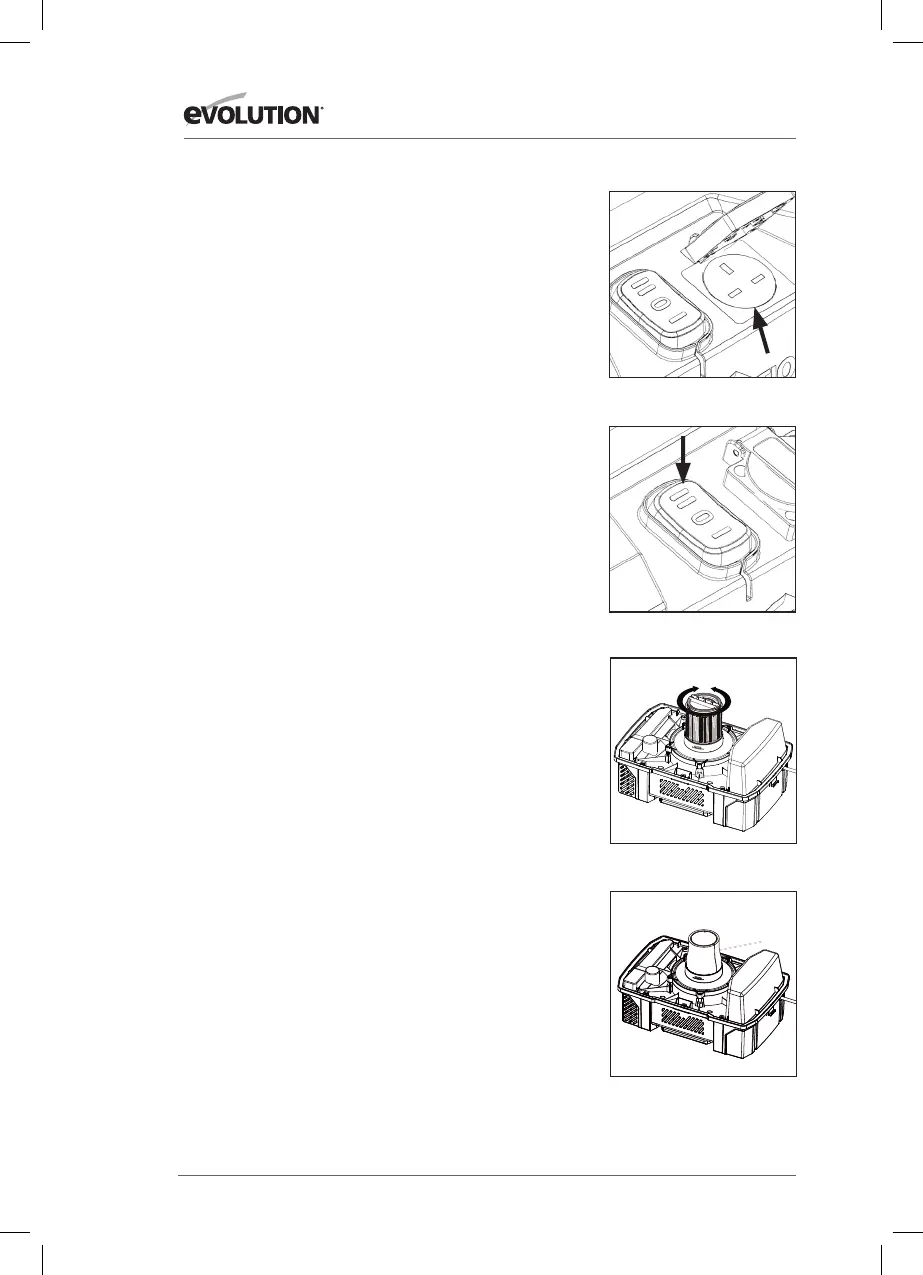
FIG. 1
FIG. 4
FIG. 3
ISTRUZIONI DI FUNZIONAMENTO
ATTENZIONE: Per limitare il rischio di incendio o esplosione,
non azionare il presente aspiratore in aree con gas infiammabili,
esalazioni o polveri esplosive nell’aria. Gas ed esalazioni
infiammabili includono a titolo non esaustivo: fluidi acceleranti,
detergenti tipo solventi, pitture a base d’olio, benzina, alcol
o spray vaporizzati. Polveri esplosive includono a titolo non
esaustivo: carbone, magnesio, alluminio e polvere da sparo, anche
in grani. Non aspirare polveri esplosive, infiammabili, liquidi
combustibili o ceneri calde. Non utilizzare il presente aspiratore
come spruzzatore di liquidi infiammabili o combustibili. Per
limitare il rischio di pericoli per la salute causati da esalazioni o
polveri, non aspirare materiali tossici.
ATTENZIONE: Per limitare il rischio di danni all’udito, indossare
protezioni auricolari durante l’utilizzo prolungato dell’aspiratore
o durante il suo utilizzo in aree rumorose. Il presente aspiratore
a umido/a secco da 15 L è assemblato in fabbrica ed è pronto
all’uso una volta estratto dall’imballaggio. L’unità è pronta per
l’aspirazione a secco e per la soffiatura. Dopo aver inserito la spina
nella presa a muro, avviare l’unità (ON) premendo l’interruttore
dalla posizione “O” alla posizione “I”. “O” è la posizione “OFF” e “I”
è la posizione “ON”.
FUNZIONE PRESA DI FORZA
ATTENZIONE: Rischio di lesioni e danni!
Interruttore di presa di forza per aspirazione automatica.
Tale funzione permette all’aspiratore di avviarsi al momento
dell’accensione del vostro utensile, in maniera tale che esso non
sia in funzione tra un taglio e l’altro.
NOTA: La presa d’uscita è esclusivamente per il collegamento
all’aspiratore di utensili elettrici. Qualunque altro utilizzo della
presa d’uscita non è consentito.
• Collegare l’estremità libera del tubo per la polvere
dall’aspiratore all’attacco di aspirazione del vostro utensile
elettrico.
• Collegare la spina di alimentazione dell’utensile elettrico alla
presa d’ingresso sul corpo principale dell’aspiratore. (Fig. 1)
• Collegare il cavo dell’aspiratore all’interruttore di
alimentazione sulla presa a muro.
• In seguito, portare l’interruttore a bilanciere
sull’impostazione II - L’aspiratore si trova nella modalità di
standby. (Fig. 2)
• All’accensione del vostro utensile elettrico, l’aspiratore
si avvierà automaticamente – utilizzare l’utensile come
necessario per completare il lavoro.
• Allo spegnimento dell’utensile elettrico, l’aspiratore si
arresterà automaticamente.
• L’impostazione II della presa di potenza non è idonea per i
trasformatori da 110 V.
7
WARNING!
To reduce the risk of injury from accidental starting, unplug power cord before emptying
the dust tank.
1. Remove the power head assembly of the wet/dry vac by pulling outward on the lid
clips located on each side of the vac. Lift off the power head assembly.
2. Dump the tank contents into the proper waste disposal container.
INSTALLING ACCESSORY BRACKET
1.Push the accessory bracket (A) in the recess.
2.Secure in place using the screws (B).
A
B
WET PICK-UP
1. Remove cartridge filter and replace it with foam filter when you do wet pickups.
2. This wet/dry vac is equipped with a float mechanism which will rise automatically
to cut off the airflow when the liquid in the tank reaches a predetermined level. When
this happens, turn off vac, unplug the power cord, and empty the dust tank. You will
know that the float has shut the airflow off because the suction ceases and the motor
noise becomes higher in pitch due to increased motor speed. The liquid capacity may
vary with the rate of pickup.
EMPTY THE TANK
Foam filter
Float in raised position
FIG. 2
BLOCCO
SBLOCCO
 Loading...