8
www.evolutionpowertools.com
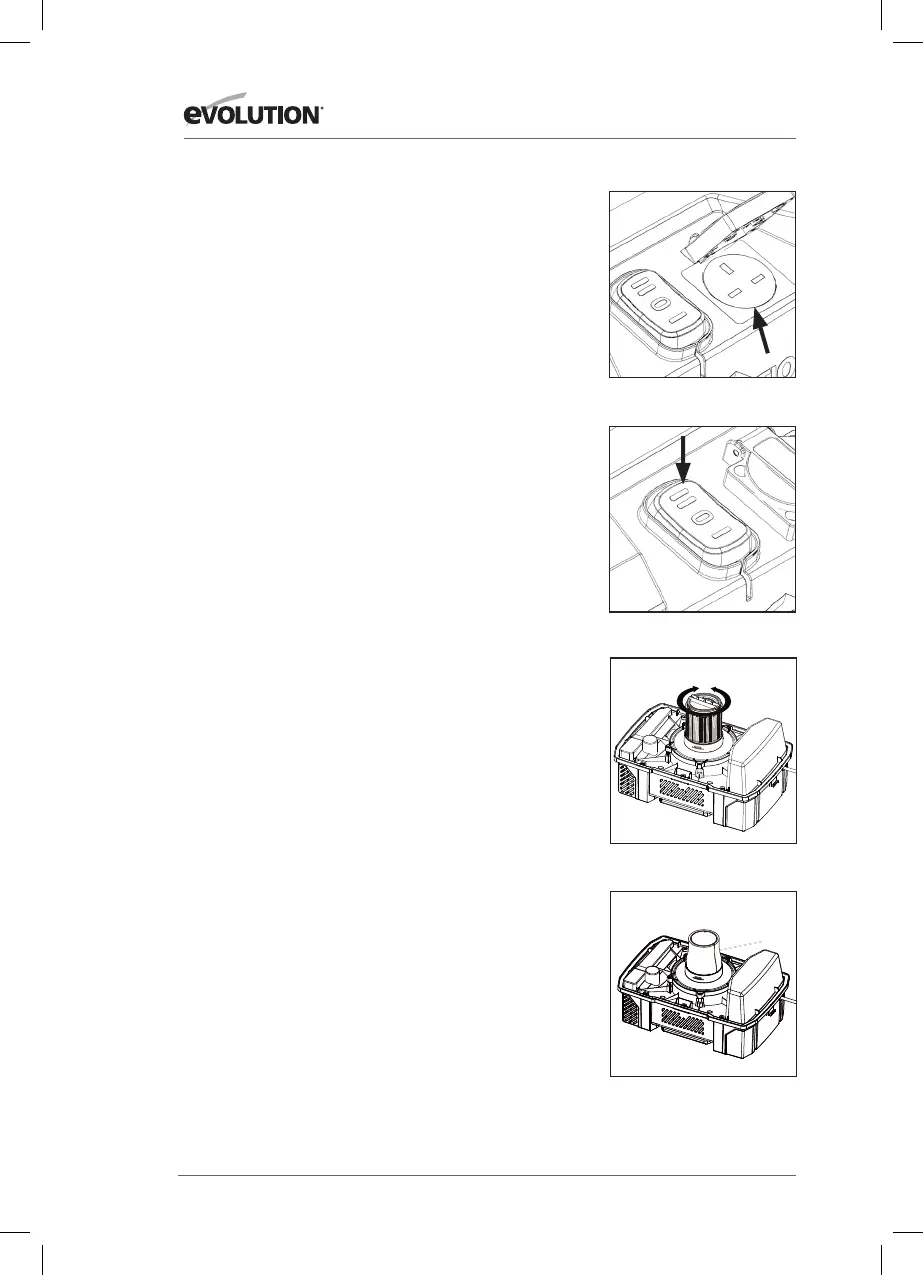
FIG. 1
FIG. 4
FIG. 3
OPERATING INSTRUCTIONS
WARNING: To reduce the risk of fire or explosion, do not operate
this vac in areas with flammable gases, vapors or explosive dust
in the air. Flammable gases or vapors include but are not limited
to: lighter fluid, solvent-type cleaners, oil-based paints, gasoline,
alcohol or aerosol sprays. Explosive dusts include but are not
limited to: coal, magnesium, aluminium, and grain or gun powder.
Do not vacuum explosive dust, flammable or combustible liquids
or hot ashes. Do not use this vac as a sprayer for any flammable
or combustible liquid. To reduce the risk of health hazards from
vapors or dusts, do not vacuum toxic materials.
CAUTION: To reduce risk of hearing damage, wear ear protectors
when using the vac for extended hours or when using it in a noisy
area. This 15L wet/dry vac is assembled at the factory and ready
for use when you remove it from the packaging. The unit is ready
for dry vacuuming or blowing. After you plug the power cord into
the wall receptacle, turn the unit “ON” by pushing the switch from
position “O” to position “I”. The “O” is the “OFF” position and the
“I” is the “ON” position.
POWER TAKE OFF FUNCTION
WARNING: Danger, Risk of injury and damage!
Power take off switch for automatic vacuum. This function allows
for the vacuum cleaner to turn on when you turn on your power
tool, so the unit is not running in between cuts.
NOTE: The socket outlet is only for the connection of power tools
to the vacuum cleaner. Any other use of the socket outlet is not
permitted.
• Connect the open dust hose from the vacuum cleaner to the
dust port of your power tool.
• Connect the mains plug of the electric power tool to the
vacuum cleaner plug socket on the main body. (Fig. 1)
• Connect vacuum cleaner cable to the main switch on wall
socket.
• Now switch the rocker switch to setting II - Vacuum cleaner
is in the standby mode. (Fig. 2)
• When you turn on your power tool the vacuum will
automatically start up – use the tool as intended to
complete the job.
• When you turn off the power tool the vacuum clearer will
automatically stop.
• Setting II power take off is not suitable for 110V
transformers.
7
WARNING!
To reduce the risk of injury from accidental starting, unplug power cord before emptying
the dust tank.
1. Remove the power head assembly of the wet/dry vac by pulling outward on the lid
clips located on each side of the vac. Lift off the power head assembly.
2. Dump the tank contents into the proper waste disposal container.
INSTALLING ACCESSORY BRACKET
1.Push the accessory bracket (A) in the recess.
2.Secure in place using the screws (B).
A
B
WET PICK-UP
1. Remove cartridge filter and replace it with foam filter when you do wet pickups.
2. This wet/dry vac is equipped with a float mechanism which will rise automatically
to cut off the airflow when the liquid in the tank reaches a predetermined level. When
this happens, turn off vac, unplug the power cord, and empty the dust tank. You will
know that the float has shut the airflow off because the suction ceases and the motor
noise becomes higher in pitch due to increased motor speed. The liquid capacity may
vary with the rate of pickup.
EMPTY THE TANK
Foam filter
Float in raised position
LOCK
UNLOCK
FIG. 2

 Loading...