This document provides installation and operating instructions for an ExBrite LED Lighted Medicine Cabinet.
Function Description
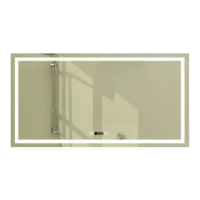
The ExBrite LED Lighted Medicine Cabinet is a wall-mounted or embedded cabinet featuring integrated LED lighting, a defogger, and a clock with temperature display. It is designed to provide storage, illumination, and additional functionalities for a bathroom environment. The LED lighting offers adjustable color temperatures (CCT) and dimming capabilities, controlled via touch switches on the mirror surface. The defogger helps maintain a clear mirror, and the clock displays time and indoor temperature. The cabinet is available in various sizes, with the specific model DHJSMC3630V3DKXXX having dimensions of W36"xH30".
Important Technical Specifications
- Model: DHJSMC3630V3DKXXX
- Dimensions: W36"xH30" (915mm x 760mm)
- Minimum Clearances: 3" (76mm) from the bottom edge of the cabinet to the countertop.
- Light Source: Non-changeable light diodes (LED).
- Electrical Connection: Requires connection to White wire (Neutral), Ground wire, and Black wire (Hot) using a 3-connection cap.
- Power Outlet: Includes a UL socket with USB for additional power needs.
- Clock/Temperature Modes:
- Mode A: 12C/12F (Fahrenheit and 12-hour format)
- Mode B: 24C/24F (Celsius and 24-hour format)
- Default Mode: 12C/12F
- Defogger Auto-Off: Automatically stops after 60 minutes of continuous operation to prevent damage from prolonged high temperature.
Usage Features
- Touch Switch Control: The mirror features touch switches for controlling various functions.
- Light On/Off: A short touch of the designated button turns the mirror light on or off.
- Color Temperature Adjustment (CCT): A long touch of the light button allows adjustment of color temperatures between warm white and cool white. The setting is finalized by withdrawing the finger when the desired color is reached.
- Dimming Function: A long touch of the dimming button adjusts the brightness of the LED light. The brightness level is set by withdrawing the finger when the desired level is reached.
- Wall Switch Compatibility: The lighting can be wired to a wall switch, offering an ON/OFF memory function.
- Defogger Activation: Pressing the defogger button activates the anti-fog function. Pressing it again deactivates it.
- Clock and Temperature Display: The cabinet includes a digital display for time and indoor temperature.
- Clock/Temperature Mode Selection: With the light off, a long touch of button 2 allows selection between 12C/12F and 24C/24F modes.
- Clock Setting: With the light off, a long touch of button 1 makes the hour flash. Short touches of buttons 1 and 2 adjust the hour. After a few seconds, the minute will flash, and short touches of buttons 1 and 2 adjust the minute. The time is saved automatically after setting.
- Temperature Sensor: The cabinet automatically displays indoor temperature via an auto-sensing temperature sensor. It is crucial not to cover this sensor.
- Display Cycle: The clock displays for 5 seconds, then shifts to temperature for 2 seconds, and then returns to the clock display.
- Touch Switch Backlight: In default mode, the touch switches have a blue background light. A long touch of button 3 can turn this blue background light on or off.
Maintenance Features
- Regular Inspection: Regularly check the cord, transformer, and all other parts for damage. If any part is damaged, the product should not be used.
- Safety Precautions: Always switch off the electrical supply at the main circuit board BEFORE installation and maintenance.
- LED Light Source: The light source consists of non-changeable light diodes (LEDs). Users should not disassemble the product, as this can cause eye damage.
- Cleaning: While not explicitly detailed, general mirror and cabinet cleaning practices would apply, ensuring no harsh chemicals or abrasive materials are used on the mirror surface or electrical components.
- Defogger Protection: The defogger has an automatic shut-off after 60 minutes to prevent damage from prolonged high temperatures, contributing to the product's longevity.
Installation Instructions (Summary)
The installation process involves several steps, whether for hanging wall installation or embedded installation.
For Hanging Walls:
- Verify Clearances: Ensure minimum clearances are met (e.g., 3" from the countertop).
- Mark and Drill: Mark hole locations on the wall, drill holes, and insert anchors.
- Secure Z-Bar: Secure the Z-bar to the wall using round-head screws.
- Install Side Panels (if applicable): Align slots and press down side panels until they are clamped tightly with the cabinet. (Note: Side panels are not needed for embedded installation).
- Electrical Connection: Connect the White (Neutral), Ground, and Black (Hot) wires using a 3-connection cap.
- Mount Cabinet: Lift the cabinet onto the mounting bar, ensuring the hooks engage.
- Secure Support Angle: Place the support angle on the bottom of the cabinet, mark the hole, drill, insert an anchor, and fix the support angle with a screw.
- Insert Glass Shelves: Place glass shelves between the layer board clips.
- Assemble Doors: Insert hinges into the base, then connect the doors to the cabinet. Adjust hinge screws to align doors and ensure smooth operation. Insert the door wire into the cabinet terminal and tighten the screw.
For Embedded Installation:
- Determine Opening Size: Measure and prepare the wall opening according to the cabinet dimensions.
- Electrical Connection: Connect the White (Neutral), Ground, and Black (Hot) wires using a 3-connection cap.
- Mount Cabinet: Insert the cabinet into the prepared opening.
- Insert Glass Shelves: Place glass shelves between the layer board clips.
- Assemble Doors: Insert hinges into the base, then connect the doors to the cabinet. Adjust hinge screws to align doors and ensure smooth operation. Insert the door wire into the cabinet terminal and tighten the screw.
Required Tools: Pencil, level, safety glasses, gloves, drill, tape measure, screwdriver.
Parts Supplied: Z-Bar, Z-Hook, matching screws, layer board supports, wire caps, anchors, round head screws, mirror panel, side panels, side panel lids, matching screws for lids.
Safety Warnings:
- Always consult a qualified electrician if in doubt about wiring regulations.
- Switch off electrical supply before installation and maintenance.
- Suitable for indoor use only; keep away from curtains and fabrics.
- Do not cover the mirror.
- Handle glass components with care.
- Check for hidden pipes or cables before drilling.
- Wear eye protection when drilling.
- Do not disassemble the product due to non-changeable LED light diodes.
- Do not install in hazardous locations.