EN
IT
DE
FR
ES
GETTING STARTED
POWER SUPPLY
1. Insert the Micro USB Charging cable (included)
to the DC 5V input port located at the rear of the
unit. Insert the other end into a suitably rated
wall outlet.
2. Push the Power switch to the ON position to
turn on the device. The time will be displayed.
3. Press and hold the [ ] to enter or exit standby
status.
NOTE: To turn off the device and the screen, push
the Power switch to OFF position.
INTERNAL BATTERY
The speaker contains 2 sets of 2200mAh batteries
in the speaker. When fully charged, the speaker
can operate without a power supply and become
portable.
NOTE: The charge time is around 3 hours.
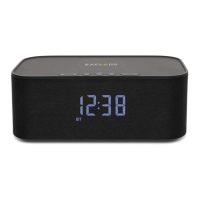
PLAYING MUSIC
PAIRING / DISCONNECTING VIA BLUETOOH
1. Place your device nearby. Press the [ ] till
the [ ] flashes.
2. Search for Bluetooth according to your device’s
instructions.
3.The speaker is named “BCC1001”, enter the
PIN “0000” if needed.
4. The speaker will beep when complete pairing.
The [ ] stays on.
NOTE: To disconnect the Bluetooth, press and
hold [ ].
AUX
1. Plug the 3.5mm audio cable into the audio input
connector and automatically switch from
Bluetooth mode to AUX mode. To switch the
mode manually, press [ ] to switch between
AUX and Bluetooth mode.
2. Unplug the 3.5mm audio cable from AUX and
the speaker returns to Bluetooth status auto-
matically.
BRIGHTNESS ADJUSTMENT
1.Press [ ] once, all icons will flash.
2.To set the brightness of display, short press
[ ] or [ ].
3.Wait for 3 seconds. The brightness you set
would be saved automatically and exit bright-
ness setting.
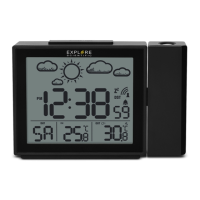
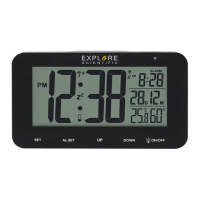
CLOCK
SET AUTOMATICALLY
The time will be automatically adjusted by the
Bluetooth connection of an iPhone.
NOTE: Not applicable to Android phone.
SET THE CLOCK MANUALLY
1. Press [ ] twice to enter time setting mode.
2. The setting parameter will flash.
3. Press and hold [ ] button to confirm setting
and enter to next parameter.
4. Press [ ] or [ ] to set the required data.
5. Sequence of setting: Hour -> Minute ->
24Hr/12Hr
6. If there is no action in 3 seconds, the setting
will be saved and will exit the setting mode.
5
WIRELESS CHARGING
1. Place the equipment to be charged on the top
circle of the stereo.
2. Device will now start charging.
NOTE: Please make sure your device supports
wireless charging.
USB CHARGING
1. To charge a device, connect with a USB charging
cable to this USB charging port [ ] at the
rear.
2. Device will now start charging.
NOTE: When using the wireless charging and USB
charging at the same time, USB charging would be
disabled for the purpose of keeping the maximum
output capacity within safe level.