EasyManua.ls Logo

Extech Instruments RH200W-T - User Manual

Extech Instruments RH200W-T
2 pages
Print Icon
To Next Page IconTo Next Page
Loading...
USER MANUAL for MODEL RH200W
Wireless Hygro-Thermometer
Thank you for selecting the Extech RH200W Wireless Hygro-Thermometer with
Self-Calibration & Auto Night Light. This device is shipped fully tested and
calibrated and, with proper use, will provide years of reliable service.
DESCRIPTIONS
MAIN UNIT
1. Backlight key
In normal mode, short press for 5 seconds
of backlighting. Pressing other keys will reset the
5-second timer
2. OUT (CHANNEL) / + key
In calibration mode, short press to increase the
value
In normal mode, short press to switch between
INDOOR, Channel 1~8
In normal mode, long press to enter
auto-cycle (Channel 1~8 and INDOOR
readings will alternately display at 4-
second intervals and the icon will
display). From auto-cycle mode, short
press to return to normal mode.
3. M (MODE) key
In calibration mode, short press for
options.
In calibration mode, long press to clear data
4. MIN-MAX / - key
In calibration mode, short press to decrease value
In normal mode, short press to check maximum/minimum temperature and
humidity records. Short press to return to normal mode
With MAX or MIN displayed, long press to reset the displayed values
5. CAL key
In normal mode, long press to enter calibration mode
In calibration mode, long press to return to normal mode
6. Auto night-light switch
Slide to ON position to activate night-light (the light will automatically turn
on in dark areas). The brightness is weaker than normal backlight. Slide to
OFF position to turn off the night-light function
7. °C / °F key - Short press to toggle temperature units °C/°F
8. SENSOR key
In normal mode, short press to activate the receiver for the current channel.
The unit will receive signals for 5 minutes
9. RESET key
Short press for a factory default reset. Perform a reset if the display freezes
or the unit otherwise malfunctions.
WIRELESS SENSOR
1. Transmission status LED (flashes
when sensor is transmitting)
2. Wall mount
3. CHANNEL slide switch (assign
sensor to Channel 1 ~ 8)
4. RESET key (short press to reset
the sensor)
5. Battery compartment (2 x AA
batteries)
OPERATION
POWERING THE WIRELESS SENSOR
1. Remove the battery door of the sensor
2. Insert 2 ‘AAbatteries, observing correct polarity
3. Close the battery door
Notes: Once a sensor is assigned a channel using the channel slide switch, you
can only re-assign a channel by removing the batteries or resetting the unit.
Avoid placing the sensor in direct sunlight or inclement weather.
POWERING THE MAIN UNIT
1. Remove the battery door of the main unit
2. Install 4 AA batteries observing correct polarity; then use a paper clip to
press the RESET key
3. Close the battery door
4. All LCD segments will switch on
Note: To avoid a pairing failure, power up the sensor first, and then press the
RESET key on the main unit only.
INDOOR TEMPERATURE/RELATIVE HUMIDITY
1. Short press OUT until ‘IN” is displayed. The unit is now displaying indoor
temperature °C / °F and Relative Humidity %.
2. Short press °C / °F to switch between °C and °F
3. When the temperature is <-40°F/°C or > 158°F (70°C), Lo or HI will be
displayed respectively. The humidity display will show dashes:
4. When the humidity is < 1% or > 99%, Lo or HI will be displayed:
COMFORT INDICATION
The comfort indication feature is an icon-based system showing comfort level
based on indoor air temperature and humidity ranging from Excessive Cold (left
icon below) to Comfortable (center icon) to Excessive Heat (right icon).
Note: Comfort indication can vary even when measuring the same
temperature because of the strong effect humidity has on comfort. There is no
comfort indication when temperature is < 0°C (32°F) or > 60°C (140°F).
TEMPERATURE AND HUMIDITY TRENDING ARROWS
The temperature and humidity trend indicator illustrates the temperature and
humidity change over time. Arrows indicate rising (left icon shown below),
steady (center icon), or falling temperatures (right icon).
MAX/MIN RECORDING
View the MAX/MIN temperature and humidity readings since the last reset.
1. In normal mode, short press MIN-MAX to show the current maximum
temperature and humidity values (diagram on left below); press again to
show the minimum values (diagram in center); press again to exit the mode
(the unit automatically exits the mode after approximately 5 seconds).
2. Perform a manual reset (clear MAX/MIN readings) by long pressing MIN-
MAX when the unit is displaying the MAX/MIN records (diagram on right).
w ww. . com
information@itm.com1.800.561.8187
Question and Answer IconNeed help?

Do you have a question about the Extech Instruments RH200W-T and is the answer not in the manual?

Summary

DESCRIPTIONS

MAIN UNIT

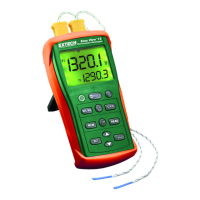
Detailed description of the components and functions of the main hygro-thermometer unit.

Backlight key

Controls the main unit's backlight function for 5 seconds.

OUT (CHANNEL); + key

Switches channels or increases values in calibration mode.

M (MODE) key

Selects modes for calibration or clears data.

MIN-MAX; - key

Displays min/max readings or decreases values in calibration.

CAL key

Enters or exits calibration mode for the unit.

Auto night-light switch

Activates or deactivates the automatic night-light feature.

C;F key

Toggles temperature display between Celsius and Fahrenheit.

SENSOR key

Activates the wireless sensor receiver for 5 minutes.

RESET key

Performs a factory default reset if the unit freezes.

WIRELESS SENSOR

Description of the components and features of the wireless sensor.

Transmission status LED

Indicates when the wireless sensor is transmitting data.

Wall mount

Feature for mounting the wireless sensor on a wall.

CHANNEL slide switch

Assigns the sensor to a specific channel (1-8).

RESET key

Resets the wireless sensor to its factory default settings.

Battery compartment

Houses the 2 AA batteries for the wireless sensor.

OPERATION

POWERING THE WIRELESS SENSOR

Instructions for installing batteries and powering the wireless sensor.

POWERING THE MAIN UNIT

Steps for installing batteries and resetting the main unit.

INDOOR TEMPERATURE;RELATIVE HUMIDITY

How to view and interpret indoor temperature and humidity readings.

COMFORT INDICATION

Explains the icon-based system for indicating comfort levels.

TEMPERATURE AND HUMIDITY TRENDING ARROWS

Illustrates temperature and humidity change trends over time.

MAX;MIN RECORDING

How to view and reset maximum/minimum temperature and humidity records.

RECEIVING WIRELESS SENSOR SIGNALS

Procedure for establishing and maintaining a connection with wireless sensors.

LOW TEMPERATURE ICON

Indicates when the outdoor temperature drops below a specific threshold.

LOW BATTERY CONDITION

Alerts for low battery levels in the main unit or wireless sensors.

TEMPERATURE;HUMIDITY CALIBRATION

Step-by-step guide for calibrating temperature and humidity readings.

IMPORTANT NOTES

SPECIFICATIONS

Technical details and performance specifications for the main unit and sensor.

Overview

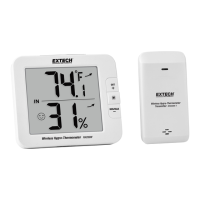
The Extech RH200W Wireless Hygro-Thermometer is a device designed for monitoring indoor and outdoor temperature and relative humidity. It features a main unit and a wireless sensor, allowing for remote data collection and display.

Function Description

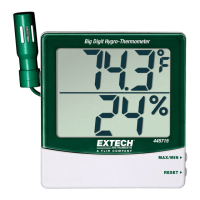
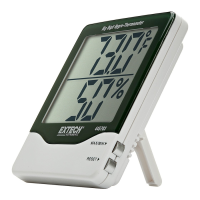
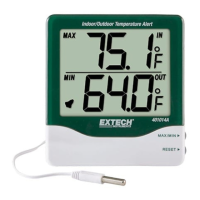
The main unit displays indoor temperature and relative humidity, as well as readings from up to eight wireless sensors. It can show temperature in either Celsius or Fahrenheit and relative humidity as a percentage. The device also provides comfort indications based on temperature and humidity levels, categorizing them as excessive cold, comfortable, or excessive heat. Trend indicators for temperature and humidity show whether these values are rising, steady, or falling. The main unit also records and displays maximum and minimum temperature and humidity values since the last reset.

The wireless sensor measures outdoor temperature and humidity and transmits this data to the main unit. It is designed to be placed outdoors, away from direct sunlight or inclement weather, and can transmit signals up to 30 meters (98.4 ft.) in an open area.

Usage Features

Main Unit Operation:

  • Backlight: A short press of the backlight key activates the backlight for 5 seconds. Pressing other keys will also reset this 5-second timer.
  • Channel Selection and Auto-Cycle: The "OUT (CHANNEL) / +" key allows you to switch between indoor readings and up to eight outdoor channels. A long press of this key activates auto-cycle mode, which alternately displays readings from active channels and the indoor unit at 4-second intervals. A short press exits auto-cycle mode.
  • Mode Selection (M key): In calibration mode, this key is used to select options.
  • MIN-MAX Records: A short press of the "MIN-MAX / -" key displays the maximum temperature and humidity records, followed by the minimum records. Another short press exits this mode. The unit automatically exits this mode after approximately 5 seconds.
  • Temperature Units: The "°C/°F" key toggles between Celsius and Fahrenheit display.
  • Sensor Activation: A short press of the "SENSOR" key activates the receiver for the current channel, allowing the unit to receive signals for 5 minutes.
  • Auto Night-Light: A slide switch on the main unit activates an auto night-light function, which automatically turns on in dark areas with a weaker brightness than the normal backlight. Sliding the switch to OFF disables this feature.

Wireless Sensor Operation:

  • Channel Assignment: The wireless sensor has a CHANNEL slide switch to assign it to one of eight available channels (1-8). Once assigned, the channel can only be re-assigned by removing the batteries or resetting the unit.
  • Transmission Status: A transmission status LED on the sensor flashes when it is transmitting data.

Receiving Wireless Sensor Signals:

  • To initiate data reception, short press the "SENSOR" key on the main unit. A flashing signal icon indicates reception in progress. If reception fails after 5 minutes, the icon disappears.
  • Upon successful reception, a solid signal icon appears, and the selected channel number is displayed.
  • If a channel signal is lost and not recovered within 1 hour, "Er" will be displayed for that channel, and the signal icon will disappear. If not recovered within 48 hours, the sensor's batteries should be replaced, and the main unit should be re-paired with the sensor.
  • The main unit can display "Lo" for outdoor temperatures below 37.4°F (3.0°C).

Powering the Devices:

  • Wireless Sensor: Requires two 'AA' batteries. Ensure correct polarity when inserting.
  • Main Unit: Requires four 'AA' batteries. After inserting batteries, a paper clip should be used to press the RESET key. All LCD segments will switch on. To avoid pairing failures, power up the sensor first, then press the RESET key on the main unit.

Maintenance Features

Calibration:

  • Entering Calibration Mode: A long press of the "CAL" key on the main unit enters calibration mode. The current outdoor channel or "IN" icon will flash. Use the "OUT" key to select either "IN" or a specific channel (1-8).
  • Calibration Adjustments: Once in calibration mode, use the "M" key to cycle through temperature, humidity, and channel selection modes. In temperature or humidity calibration mode, use the "+" and "-" keys to adjust values in 0.1-degree or 0.1-percentage steps, respectively. A long press allows for quick scrolling.
  • Reverting Calibration: A long press of the "M" key at the temperature or humidity calibration screens will revert to the previous calibration value for the selected channel.
  • Exiting Calibration Mode: A long press of the "CAL" key or waiting 60 seconds will exit calibration mode and return to normal mode.
  • Note on Calibration: Adjustment is not possible if the selected channel is displaying dashes or HI/Lo indicators.

Reset Functions:

  • Main Unit Reset: A short press of the "RESET" key on the main unit performs a factory default reset. This is useful if the display freezes or the unit malfunctions.
  • Sensor Reset: A short press of the "RESET" key on the wireless sensor resets the sensor.
  • MAX/MIN Record Reset: When the main unit is displaying MAX/MIN records, a long press of the "MIN-MAX" key will clear these values.

Low Battery Indication:

  • A low battery icon will display on the main unit when the batteries of either the main unit or a connected sensor are low. This icon will only appear when the corresponding channel (or indoor unit) is displayed.

Important Notes:

  • Dispose of batteries and the unit in an ecologically safe manner.
  • Keep the unit away from interfering sources like monitors, computers, and other appliances.
  • Avoid placing the unit on or next to metal plates or surfaces.

Extech Instruments RH200W-T Specifications

General IconGeneral
Measurement Range0 to 100% RH
Humidity Resolution0.1% RH
DisplayLCD
Data LoggingYes
Accuracy Humidity±3% RH
Temperature Range-10 to 60°C
Temperature Resolution0.1°C
Wireless Rangeup to 100 ft
Accuracy Temperature±1°C

Related product manuals