9 RH520A-en-GB_v4.8 6/19
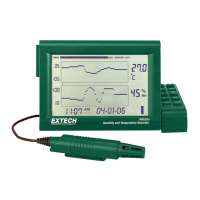
SETTING THE VERTICAL RESOLUTION FOR THE RH GRAPHIC DISPLAY
1. Press the SET, RH, and UP arrow buttons simultaneously
2. The upper RH range indicator will flash, and the SET icon will appear
3. Use the UP-DOWN buttons to change the upper RH value in 10% increments
4. Press the RH button and the lower RH range indicator will flash
5. Use the UP-DOWN buttons to change the lower RH value in 10% increments
6. Note that the upper and lower RH values cannot overlap
7. Press the RH button to toggle upper and lower range values
8. Press the SET button at any time to store a value and return the instrument to the Standard
View
9. Press VIEW at any time to return to the Standard View
SETTING THE RECORDING SAMPLE RATE
The Sampling Rate is the rate at which the RH520A automatically records measurements
1. Press the SET, VIEW, and TIME arrow buttons simultaneously from the Standard View
2. The current Sample Rate (in minutes) will appear in the numerical temperature display area
3. The whole minutes area of the numeric display will flash
4. The MIN and the SET icons will switch on. All other TEMP and RH indicators and numeric
displays will switch off
5. The projected TIME and DAYS representing the moment the internal memory will be full
(based on the sample rate) is displayed in the TIME and DATE display areas.
6. Use the UP-DOWN arrow buttons to increment/decrement the rate. Use the LEFT-RIGHT
arrow buttons to step through the units of time
7. Sample rates can be set from 0.1 minutes (6 seconds) up to 199.9 minutes
8. Press the SET button at any time to save changes and return to the Standard View
9. Press VIEW at any time to return to the Standard View without saving the changes
SETTING THE TEMPERATURE ALARM LIMITS
1. Press the SET, TEMP, and ALARM buttons simultaneously from the Standard View
2. The ALARM, SET, and MAX indicators will switch on. All of the RH indicators will switch off
3. Use the UP-DOWN arrow buttons to increment/decrement the HIGH temperature alarm
limit. Use the LEFT-RIGHT arrow buttons to step through the decades
4. Press the ALARM button. The MIN (low alarm) indicator will switch on
5. Use the UP-DOWN arrow buttons to increment/decrement the LOW temperature alarm
limit. Use the LEFT-RIGHT arrow buttons to step through the decades
6. The HIGH and LOW alarm limits cannot overlap
7. Use the ALARM button to toggle between the HIGH and the LOW alarm limits
8. Press the SET button at any time to save changes and return to the Standard View