EasyManua.ls Logo

EYELA LTI- 400E - User Manual

EYELA LTI- 400E
62 pages
Print Icon
To Next Page IconTo Next Page
Loading...
R03
This manual is designed to use the product efficiently and safely with keeping its
best performance.
Please keep this manual in a place easily accessible to every user.
Be sure to read "Safety precautions
before use.
取扱説明書
Instruction
Manual
LTI- 400E
700E
1200E
Low temp. Incubator
Tokyo Rikakikai Co., Ltd.
IMPORTAN
T

Questions and Answers

  • A
    Anthony JensenSep 10, 2025
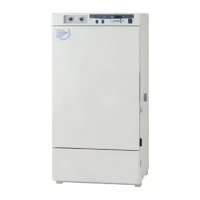
    Why is the temperature not stable in my EYELA Accessories?
    • M
      Mark EsparzaSep 10, 2025
      Temperature instability in your EYELA Accessories can be caused by constant changes in room temperature due to the influence of an air conditioner. Ensure the unit is placed where the air conditioner's airflow does not directly affect it.
  • R
    Regina WattsAug 23, 2025
    What should I do if the EYELA LTI- 400E Accessories refrigeration unit does not work properly?
    • T
      Todd RiceAug 23, 2025
      If the refrigeration unit of your EYELA Accessories does not work properly, reduce the load. For the settings for under cooling protector, set the temperature -10° lower than setting temperature of temperature controller. In case the setting temperature is too high, set the value up to 40°.
  • L
    Lori RoachAug 25, 2025
    What to do if no display is shown on the indicator of EYELA LTI- 400E when turning on power switch?
    • J
      John ZavalaAug 25, 2025
      If there's no display when you turn on the power switch of your EYELA Accessories, first, turn off the residual current device and power switch, then ensure the power plug is securely connected to the outlet. Also, check if the breaker of distribution board is on. Ensure the residual current device is turned on. If the residual current device is impaired, immediately stop running the product and contact your local agency or the closest customer service center.
  • F
    fsilvaAug 27, 2025
    What should I do if the temperature of my EYELA LTI- 400E does not rise up to the setting value?
    • C
      courtneysmithAug 27, 2025
      If the temperature of your EYELA Accessories unit does not rise to the set value, reduce the number of sample and vessel. For the settings for under cooling protector, set the temperature 10° higher than setting temperature of temperature controller. In case the setting temperature is too low, set the value higher than 30°. If the ambient temperature is too low, set the temperature higher than 5°.
  • K
    Kathy DeleonAug 28, 2025
    Why can't my EYELA Accessories unit be temperature controlled?
    • L
      Louis FrenchAug 28, 2025
      If your EYELA Accessories unit cannot be temperature controlled, it may be because the heater is disconnected or the refrigeration unit is impaired. If the heater is disconnected, immediately stop running the product and contact your local agency or the closest customer service center.
  • C
    czimmermanAug 29, 2025
    What causes the upper temperature limit alarm to activate on my EYELA LTI- 400E Accessories?
    • J
      Jennifer BakerAug 29, 2025
      The upper temperature limit alarm on your EYELA Accessories can activate if too many samples and vessels in the chamber prevents the convection flow of the heat. Reduce the number of sample or vessel to resolve this.
  • H
    harrisonmichealSep 18, 2025
    Why is there a difference between the displayed and actual temperature on my EYELA Accessories?
    • A
      Aaron HarperSep 18, 2025
      The difference between displayed and actual temperature on your EYELA Accessories is because of the different accuracy of the temperature controller and sensor. Set the setting for calibrating displayed temperature.
  • I
    isaaclesterSep 12, 2025
    What should I do if the door alarm, temperature control failure alarm, or temperature not rising alarm is activated on my EYELA LTI- 400E?
    • R
      Ryan HunterSep 12, 2025
      If the door alarm, temperature control failure alarm, or temperature not rising alarm is activated on your EYELA Accessories, it's likely that the door is not closed completely. Ensure the door is fully closed.
  • C
    christophermooreSep 8, 2025
    What causes the lower temperature limit alarm to activate on my EYELA Accessories?
    • D
      Darren JonesSep 8, 2025
      The lower temperature limit alarm on your EYELA Accessories can activate if too many samples and vessels in the chamber prevents the convection flow of the heat, or if the heater is disconnected. Reduce the number of sample or vessel. If the heater is disconnected, immediately stop running the product and contact your local agency or the closest customer service center.
  • V
    Victor WilliamsSep 5, 2025
    Why is there dew condensation on the wall of the EYELA Accessories chamber?
    • A
      Andrew SmithSep 5, 2025
      Dew condensation on the wall of the EYELA Accessories chamber can occur depending on the settings, ambient temperature, or humidity in the chamber. Wipe the dew off with a soft cloth.

Summary

Safety precautions

Signal word for warning

Explains warning signals and their meanings.

Outline of the product

Application

Describes the product's intended use.

Specification

Options

Shelf board for shaker

Accessory for shaker, incubator, or stirrer.

Counter

Counter with caster for additional equipment.

Clamp for piling two models

Clamp for stacking two LTI-400E units.

Fluorescent lamp

10W lamp for chamber illumination.

Fluorescent lamp unit

Unit for day-and-night operation.

Output terminal for recorder

Outputs measured temperature data for recording.

Output terminal for alarm

Outputs abnormal conditions via contact points.

Description of operating portion

Control panel

Details the components and functions of the control panel.

Stationary operation and timer mode

Stationary operation

Continuous operation at a set temp. Can be started/stopped with Run/Stop key.

Timer mode

Allows timed operations: auto stop, auto start, 1-step.

Adjustment mode

Calibrating displayed temperature

Calibrates displayed temp. to match a standard gauge.

Upper temperature limit alarm

Sets the upper limit for temperature alarms.

Lower temperature limit alarm

Sets the lower limit for temperature alarms.

Power recovery

Selects unit behavior after power interruption.

Buzzer setting

Configures buzzer behavior for auto stop completion.

Time setting for displaying total operation hours

Sets time for total operation hours display.

Resetting total operation hours

Resets total operation hours for maintenance timing.

Safety and alarm functions

Upper temperature limit alarm

Activates if chamber temp. exceeds set threshold.

Lower temperature limit alarm

Activates if chamber temp. drops below set threshold.

Door alarm

Activates if the door is not properly closed.

Alarm for malfunction of temperature control

Triggers if temp. control deviates significantly.

Power failure alarm

Activates upon power interruption or improper shutdown.

Sensor alarm

Activates if the temp. sensor is disconnected.

Over load alarm for refrigeration unit

Activates if the refrigeration unit experiences overload.

Watch dog

Resets microcomputer if abnormal conditions arise.

Over heat alarm

Activates when heater temp. exceeds limits.

Over cool alarm

Activates when refrigeration unit temp. drops too low.

Warning function

Warning for elapsing total operation hours

Warns when total operation hours exceed the set time.

Installation

Installation environment

Specifies suitable environmental conditions for installation.

Conditions

Details necessary clearances and handling precautions.

Precautions for charting the unit

Specific precautions for moving and leveling the LTI-1200E.

Fixing the product

Instructions on how to secure the unit to the floor.

Utility connection

Setting optional accessories

Setting shelf for shaker

Instructions for installing a shelf for shaker use.

Operation

Preparation

Covers initial setup steps before operation.

Setting rubber plug for drain port

Instructions for setting the drain port plug.

Removing and using cap for outlet

How to remove and use outlet caps.

Setting shelf board

Instructions for installing shelf boards.

Setting sample and vessel in the chamber

Cable port

Instructions for using the cable port.

Setting hatch clip with key hole

Instructions for setting the hatch clip with key.

Connecting power plug

Steps for connecting the power plug to the outlet.

How to operate the unit

Setting over heat cool protector

Configures the over heat and over cool protection settings.

Setting refrigeration unit and blower in the chamber

Selects refrigeration mode and controls blower operation.

Setting, running and stopping constant number operation

Details for setting, starting, and stopping constant number operation.

Setting, running and stopping Timer Mode

Guides for setting, running, and stopping various timer modes.

Starting and stopping Auto Stop

Instructions for starting and stopping the Auto Stop timer mode.

Starting and stopping Auto Start Operation

Instructions for starting and stopping the Auto Start timer mode.

Setting, starting and stopping 24-hour cycle operation

Guides for setting, starting, and stopping the 24-hour cycle operation.

How to operate adjustment mode

Calibrating temperature mode

Calibrates displayed temp. to match a standard gauge.

Upper temperature limit alarm

Adjusts the setting for the upper temperature limit alarm.

Lower temperature limit alarm

Adjusts the setting for the lower temperature limit alarm.

Power recovery setting

Configures unit's behavior after power recovery.

Buzzer setting

Configures buzzer behavior for auto stop completion.

Total operation hours display

Configures the display for total operation hours.

Total operation hours display reset

Resets total operation hours for maintenance timing.

Manual Defrosting (Forced defrosting)

Starting manual Defrosting

Initiates manual defrosting by pressing the Def key.

Temperature change during manual Defrosting

Describes temp. changes during manual defrosting.

Stopping Defrosting manually

Allows manual interruption of defrosting.

Troubleshooting

Maintenance checking

Operation test for residual current device

Procedure for testing the residual current device.

Cleaning and caring the product

Guidelines for cleaning and maintaining the unit.

Replacing fuse

Replacing fluorescent tube

Changing opening side of the door

Structure of the door

Details the components and structure of the door.

How to change the opening side of the door

Changing opening side of inner door

Disposal of the product

After-sales

EYELA LTI- 400E Specifications

General IconGeneral
BrandEYELA
ModelLTI- 400E
CategoryAccessories
LanguageEnglish

Related product manuals