20
USING THE RADIO CONTROL
WARNINGS!:
Place the hood away from sources of electromagnetic waves (e.g.
microwave ovens), which could interfere with the radio control
and with the hood electronics. The maximum operating distance is 5 me-
tres, that may vary according to the presence of electromagnetic interfer-
ences.
Radio control operated at 433.92MHz.
The radio control consists of two parts:
- the receiver built into the hood;
- the transmitter shown here in the gure.
DESCRIPTION OF TRANSMITTING COM-
MANDS
UP
Motor switch-on and speed increase
from 1 to 4. Speed 4 is only active for a
few minutes.
DOWN
Speed decrease and motor switch-o.
Light ON-OFF
TIMER ON: The motor automatically
switches o after 15 min.
The function is automatically disabled if
the motor is switched o (
key)
Command transmission active
ACTIVATION PROCEDURE
Before using the radio control, follow the procedure below on the hood push-
button panel:
• Press LIGHT (
) and TIMER ( ) simultaneously until all LEDs start ashing.
• Release the two keys and press LIGHT (
) again until all LEDs are lit up.
• Release LIGHT (
): now the receiver is active.
This procedure is also used to deactivate the receiver.
RADIO CONTROL CODE CHANGE
With only one radio control, go directly to point 2.
With several radio controls in the same room, a new code can be created by
following the procedure below.
Disconnect the power to the hood before starting the procedure.
1 CREATE A NEW CODE
The procedure is to be carried out on the radio control.
• Press LIGHT
and TIMER simultaneously until the display starts ashing.
• Press DOWN
on the radio control: saving is conrmed by three brief
ashes of the display. The new code cancels and replaces the previous de-
fault code.
Reconnect the hood to the electrical power supply, making sure
that the lights and motor are o.
2A ASSOCIATING THE RADIO CONTROL WITH THE HOOD
USING THE ELECTRONIC PUSHBUTTON PANEL
press TIMER ( ) on the hood pushbutton panel for 2 seconds:
the red LED lights up.
press any key on the radio control within 10 seconds.
RESTORING DEFAULT CODE
the procedure is to be carried out if the hood is disposed of, sold or transferred.
Disconnect the power to the hood before starting the procedure.
In this version the check valve must not be assembled: remove it
if it is on the air outlet tting of the motor.
ASSEMBLY INSTRUCTIONS
only intended for personnel qualied
The hood can be installed in various congurations.
The generic assembly steps apply to all installations; for each case,
follow the specic steps provided for the required installation.
OPERATION
WHEN TO TURN ON THE HOOD?
Switch on the hood at least one minute before starting to cook to direct fumes
and vapours towards the suction surface.
After cooking, leave the hood operating until complete extraction of all vapours
and odours. By means of the Timer function, it is possible to set auto switch-o
function which will allow the hood to turn o automatically after 15 minutes of
operation.
WHICH SPEED IS TO BE SELECTED?
1st speed: maintains the circulation of clean air with low electricity consumption.
2nd speed: normal conditions of use.
3rd speed: presence of strong odours and vapours.
4th speed: rapid disposal of odours and vapours.
WHEN SHOULD THE FILTERS BE WASHED OR REPLACED?
The metal lters must be cleaned every 30 hours of operation.
The active carbon lters must be replaced every 3-4 months, depending on the
use of the hood.
For further details see the “MAINTENANCE” chap.
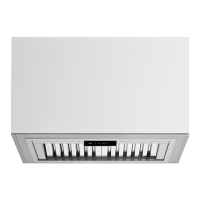
ELECTRONIC PUSHBUTTON PANEL
Motor ON/OFF
Upon start-up, the speed is that stored at the previous operation.
Increase speed from 1 to 4
Speed 4 is only active for a few
minutes, then speed 3 activates.
The speeds are indicated by the
LEDs on the keys:
Speed 1
Speed 2
Speed 3
Speed 4
("+" LED ashing)
Reduce speed from 4 to 1
Light on/o
TIMER (red LED ashing)
Auto switch-o after 15 min.
The function deactivates (red LED o) if:
- The TIMER key (
) is pressed again.
- The ON/OFF key (
) is pressed.
If the pushbutton panel is completely inactive, before contacting
the Technical assistance service, disconnect power temporarily to
the appliance (about 5“), possibly by acting on the main switch, to
restore normal operation.
If this measure has no eect, contact the Technical assistance service.
optional from
07-27-2017