06
Ed. 1 - 03/2019Ed. 1 - 03/2019
4
3
2
1
> > > > >
ENGLISH
EN_25
Using power assisted pedalling
4. MOUNTING THE BATTERY
PACK ON ITS SUPPORT
- Insert the battery pack in its specic support
on the chassis by placing the rubber rod (1) on
the fork support (2) (g. “60“).
- Delicately push the battery pack downwards to
lay it in its specic support. (g. “61“).
- Connect the connector to the battery pack (g.
“62“).
- Completely screw the xing screw to lock the
battery (g. “63“ y “64“).
1- Displaying the pedalling assistance level
2- Speed
3- Battery charge level.
4- “Triangle” symbol: push help function ac-
tive.
“Light” symbol: lights condition (if
present).
- The other pages show the following informa-
tion:
1- Page icon.
2- Horizontal browsing position.
3- Page content.
4- Vertical browsing position (it refers to oth-
er pages and shows the current position).
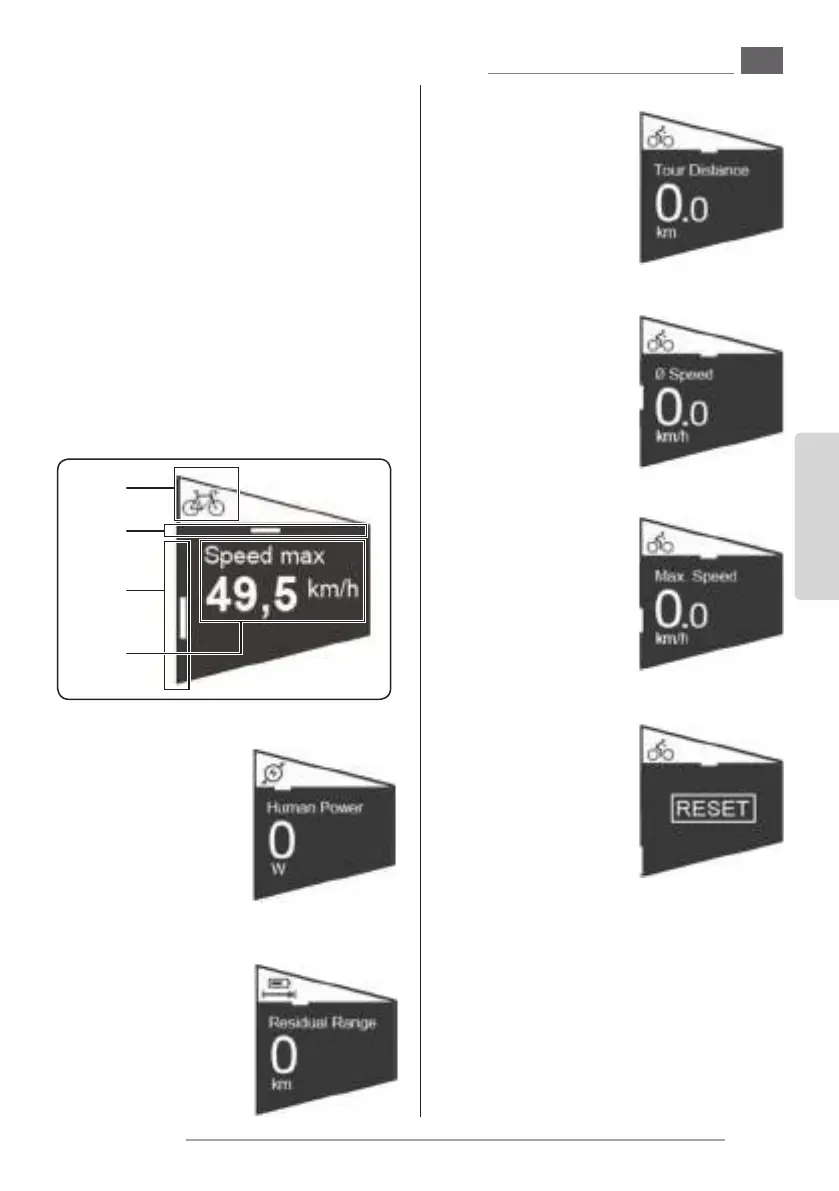
Travelled distance
- Shows the travelled
distance (since the last
zeroing).
This page has subpag-
es.
Travelled distance -> Average speed
- Shows the average
speed referred to the
travelled distance.
Travelled distance -> Maximum speed
- Shows the maximum
reached speed re-
ferred to the travelled
distance.
Travelled distance -> Reset
- Press the joystick “T3”,
the writing “RESET” is
shown.
- Press down the joy-
stick “T3” to select the
writing “RESET” which
changes colour.
- Press the joystick “T3” again to reset all the val-
ues (distance, average and maximum speed) to
“0”.
T4. Decreases the pedalling assistance level
T5. Increases the pedalling assistance level
Keep this button pressed for more than 3 sec-
onds to activate the push help function (max.
6km/h) until the button is released.
Push power
- Shows the power (in
watts) generated by
the cyclist for the as-
sisted pedalling acti-
vation.
Residual range
- Shows the residual
range with the assist-
ed pedalling support.
 Loading...