06
Ed. 1 - 03/2019Ed. 1 - 03/2019
ENGLISH
EN_26
Using power assisted pedalling
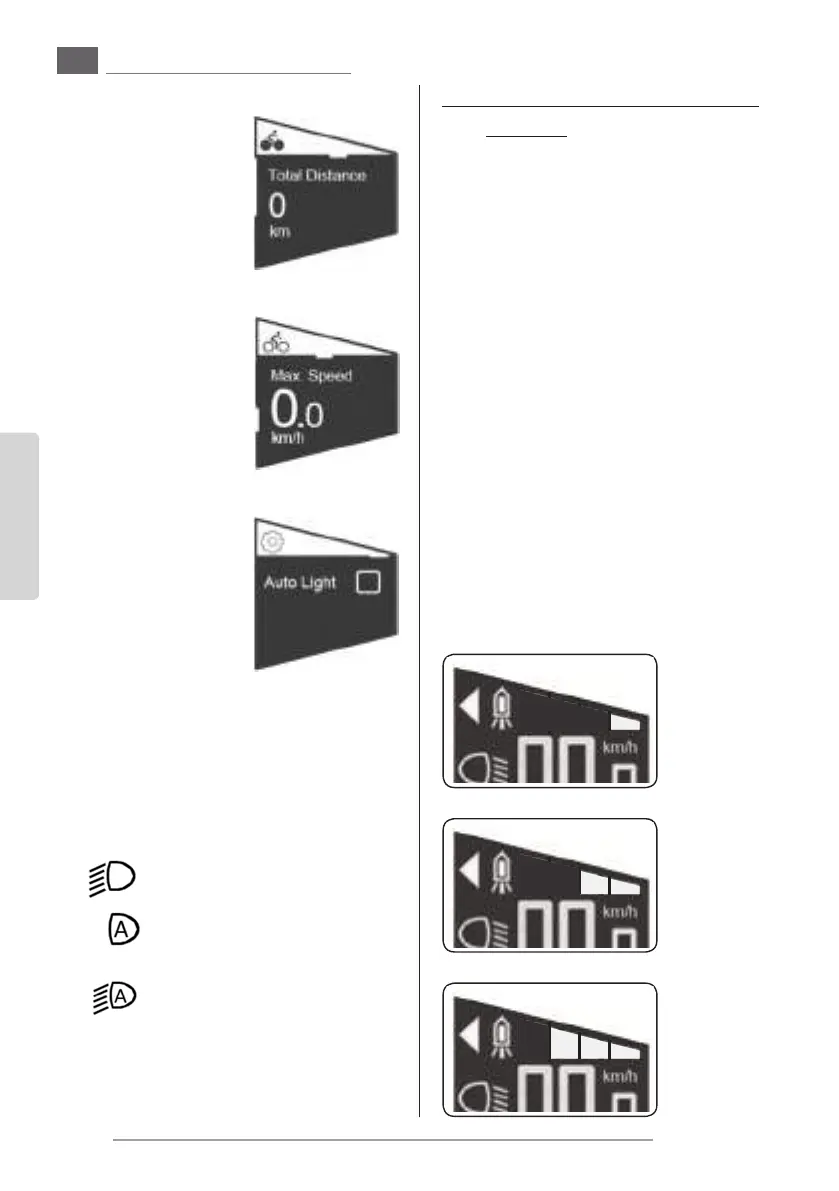
Total distance
- Shows the total trav-
elled distance with the
help of the assisted
pedalling.
This page has subpag-
es.
Total distance -> Maximum speed
- Shows the maximum
reached speed with
the help of the assist-
ed pedalling on the
whole travelled dis-
tance.
Automatic light
(Only usable if the head-
lights are present and con-
nected)
- Use this page to ac-
tivate the light turn-
ing on/o automatic
mode (the light turns
on and o depending
on the surrounding
light level).
- If the automatic mode is active, the “light” sym-
bol on the main page is shown with an “A” in-
side.
-- Light turned o
Light turned on
Automatic mode active - Light
turned o
Automatic mode active - Light
turned on
- It is possible to turn the light on or o whenev-
er it is desired by pressing the button “T2”.
5.c - Pedalling assistance activation
and level
- The assisted pedalling power level depends on
a number of factors.
The table on the right provides an indication of
the maximum assistance level depending on
the selected function.
- The values may be aected by various factors,
such as:
- selected gear ratio
- riding style
- tyre type and pressure
- rider’s age
- type of terrain
- total weight of the bicycle
- condition of the battery pack
- etc.
- To activate the assisted pedalling:
- Turn on the tool by keeping the button “T1”
pressed for more than 2 seconds.
- Press the button “T5” once or more times
to select the pedalling assistance level; the
function activates immediately.
“minimum” pedalling assistance level
“medium” pedalling assistance level
“medium” pedalling assistance level
“maximum” pedalling assistance level
- To shut o the pedalling assistance function
it is enough to press the button “T4” once or
more times until all the marks on the display
are turned o; the function immediately de-
activates.
pedalling assistance “deactivated”
5.c.a - “Push help” function
- This function allows to help the bicycle push in
particular situations (for example: at the start
of a slope, or on an uneven terrain, etc.).
The function can be used both while walking
alongside the bicycle and when riding.
- To activate the function it is necessary to keep
the button “T5” pressed for more than three
seconds; the function deactivates when the
button is released.
- When the function is active, the “triangle” sym-
bol is shown on the main page.
5.d - USB connection
- The tool is equipped with an Usb port protect-
ed by a rubber cover.
 Loading...