This document provides a comprehensive guide for the FAR TI60 INF 444 induction hob, covering its functions, technical specifications, usage, and maintenance.
Function Description
The FAR TI60 INF 444 is an induction cooking hob designed for safe, advanced, efficient, and economical cooking. It operates by generating electromagnetic vibrations that directly heat the cookware, rather than heating the glass surface indirectly. The glass surface only becomes hot as a result of the pan warming it up.
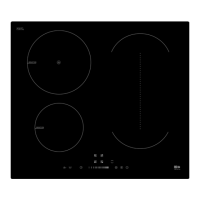
The hob features multiple cooking zones, including a flexible area that can be used as a single large zone or two independent zones. Special functions like "Fry" and "Keep Warm" are available to enhance cooking versatility. A "Boost" function provides maximum power for rapid heating. The hob also includes a timer control that can be used as a minute minder or to automatically switch off cooking zones after a set time. For safety, it has an auto shut-down feature that activates if a cooking zone is left on for an extended period without user interaction.
Important Technical Specifications
- Model: FAR TI60 INF 444
- Voltage: 220-240V ~ 50/60Hz
- Power: 7100W
- Type of hob: Electric
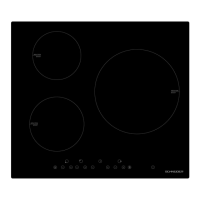
- Number of cooking zones: 2 zones and 1 flexible area
- Heating technology: Induction cooking zone and cooking area
- Diameter of cooking zones:
- Left front: 16.0 cm
- Left rear: 21.0 cm
- Length and width of useful surface area (right):
- Energy consumption per cooking zone electric cooking:
- Left front: 194.4 Wh/kg
- Left rear: 179.1 Wh/kg
- Right: 192.6 Wh/kg
- Energy consumption per hob ECelectric hob: 188.7 Wh/kg
Usage Features
Touch Controls:
The hob features touch controls that respond to the ball of your finger without requiring pressure. A beep confirms each touch. It's crucial to keep the control area clean and dry, as even a thin film of water can hinder operation.
Cookware Selection:
Only use induction-compatible cookware with a flat, smooth base. Look for the induction symbol on the packaging or pan bottom. A magnet test can confirm compatibility; if a magnet is attracted to the pan's base, it's suitable. Alternatively, if water heats up without the "U" symbol flashing on the display, the pan is suitable. Unsuitable materials include pure stainless steel, aluminum, or copper without a magnetic base, glass, wood, porcelain, ceramic, and earthenware. Cookware with jagged edges or curved bases should not be used. For optimal efficiency, the pan's diameter should match the selected cooking zone's graphic. Pans smaller than 140 mm may not be detected. Always center the pan on the cooking zone and lift, rather than slide, pans to avoid scratching the glass.
Starting and Finishing Cooking:
To start, touch the ON/OFF control for three seconds. The hob will beep once, and all displays will show "–" or "– –", indicating standby mode. Place suitable cookware on the desired zone, ensuring the pan and zone are clean and dry. Touch the heating zone selection control, and its indicator will flash. Adjust the heat setting using the slider control. If no heat setting is chosen within one minute, the hob will automatically switch off. Heat settings can be changed at any time during cooking. If the "U" symbol flashes alternately with the heat setting, it indicates unsuitable, misplaced, or too small cookware.
To finish cooking, touch the heating zone selection control for the desired zone, then touch the slider to "0". The display will show "0". To turn off the entire cooktop, touch the ON/OFF control.
Hot Surface Indicator:
An "H" will appear on the display for hot cooking zones, disappearing once the surface has cooled to a safe temperature. This can also be used as an energy-saving function to heat other pans using residual heat.
Boost Function:
To activate, touch the heating zone selection control, then the Boost control. The zone indicator will show "b", and the power will reach maximum. The Boost function is available for all zones and returns to its original setting after 5 minutes (or to 9 if the original setting was "0", or to 7 if the original setting was "F"). The maximum power for the 1st heating zone is 7 if the 2nd zone is on Boost, and for the 2nd heating zone is 8 if the 1st zone is on Boost. To cancel, touch the heating zone selection control, then the Boost control.
Flexible Area:
This area can function as a single large zone or two independent zones. To use as a single large zone, press the dedicated key and adjust the heat setting with the slider. Recommended cookware for the large zone is 250mm or 280mm diameter (square or oval shapes are acceptable). For two independent zones, place one pan on either the upper or lower part of the flexible zone, or place two pans on both parts. Avoid other configurations to prevent heating issues. Note: Do not use cookware larger than 12cm in the independent zones.
Special Functions:
- Fry Function: Available only on cooking zone 2#, this function is designed for frying food. Activate by touching the zone selection control, then the "Fry function" control. The indicator will show "F", and the zone will start frying.
- Keep Warm Function: Available on all zones, this function keeps food warm. Activate by touching the zone selection control, then the "Warm function" control. The indicator will show "U", and the zone will start the warm function.
Locking Controls:
To prevent unintended use (e.g., by children), touch the lock control. The timer indicator will show "Lo", and all controls except ON/OFF will be disabled. To unlock, touch and hold the lock control for a while. In an emergency, the hob can still be turned off with the ON/OFF control even when locked, but it must be unlocked for subsequent operations.
Timer Control:
The timer can be used as a minute minder (up to 99 minutes) without affecting cooking zones, or to automatically turn off one or more cooking zones.
- As a Minute Minder: With no cooking zone selected, turn on the cooktop, touch the timer control ("10" will show, "0" will flash), set the time with the slider, then touch the timer control again ("1" will flash). The timer will count down, and a buzzer will sound for 30 seconds when finished, showing "- -".
- To Turn Off Cooking Zones: Select the desired cooking zone, touch the timer control ("10" will show, "0" will flash), set the time with the slider, then touch the timer control again ("1" will flash). The timer will count down, and a red dot next to the power level indicator will show the zone is selected. The zone will switch off automatically when the timer expires. For multiple zones, the process is similar, with decimal dots indicating relevant zones.
Default Working Times:
The hob has an auto shut-down safety feature. Default working times for different power levels are:
- Power 1-3: 8 hours
- Power 4-6: 4 hours
- Power 7-9: 2 hours
Cooking Guidelines:
- Frying: Exercise caution, especially with PowerBoost, as oil and fat heat quickly and can ignite at high temperatures.
- General Tips: Reduce temperature when food boils, use lids to retain heat and save energy, minimize liquid/fat for shorter cooking times, and start with high power, then reduce.
- Simmering/Rice: Simmering occurs around 85°C. Some rice cooking methods may require higher settings.
- Searing Steak: Bring meat to room temperature, heat a heavy-based frying pan, brush steak with oil, add a small amount of oil to the pan, then place steak. Turn only once. Cooking time varies by thickness and desired doneness (2-8 minutes per side). Rest steak on a warm plate before serving.
- Stir-frying: Use an induction-compatible flat-based wok or large frying pan. Prepare ingredients beforehand. Preheat pan briefly with oil. Cook meat first, set aside to keep warm. Stir-fry vegetables until hot but crisp, then return meat and add sauce. Stir gently and serve immediately.
Detection of Small Articles:
If unsuitable or non-magnetic cookware, or small items (knife, fork, key), are left on the hob, it will automatically go into standby after 1 minute. The fan will continue to run for another minute to cool the hob.
Maintenance Features
Care and Cleaning:
- Everyday Soiling (fingerprints, marks, non-sugary spills): Switch off the cooktop. Apply a cooktop cleaner while the glass is warm (not hot). Rinse and wipe dry with a clean cloth or paper towel. Switch the power back on. Be aware that the cooking zone may still be hot even if the indicator is off. Avoid heavy-duty scourers or abrasive cleaners as they can scratch the glass. Never leave cleaning residue as it can stain the glass.
- Boilovers, Melts, Hot Sugary Spills: Remove immediately with a fish slice, palette knife, or razor blade scraper suitable for induction glass cooktops. Be cautious of hot cooking zones. Switch off the cooktop at the wall. Hold the blade at a 30° angle and scrape the soiling to a cool area. Clean up with a dishcloth or paper towel. Then follow steps for everyday soiling. Remove sugary spills as soon as possible to prevent permanent damage to the glass. Scraper blades are razor-sharp; use extreme care and store safely out of reach of children.
- Spillovers on Touch Controls: Switch off the cooktop. Soak up the spill. Wipe the control area with a clean damp sponge or cloth, then dry completely with a paper towel. Switch the power back on. Liquid on controls can cause beeping, auto-shutdown, or malfunction.
Troubleshooting (Hints and Tips):
- Hob not turning on: Check power supply, plug connection, and for power outages. If issues persist, contact a qualified technician.
- Unresponsive/difficult touch controls: Unlock controls (if locked), ensure the area is dry, and use the ball of your finger.
- Scratched glass: Use cookware with flat, smooth bases and avoid abrasive scourers/cleaners.
- Crackling/clicking noises from pans: This is normal due to different metal layers in cookware vibrating and does not indicate a fault.
- Low humming noise at high heat: Normal for induction technology; noise should decrease with lower power.
- Fan noise: Normal, as a cooling fan prevents overheating. It may run even after the hob is off. Do not switch off power at the wall while the fan is running.
- Pans not heating/displaying "U": Use induction-suitable cookware, ensure it's centered, and matches the zone size.
- Hob/zone turning off unexpectedly with error code: Note the error code, switch off power at the wall, and contact a qualified technician.
Failure Display and Inspection (Troubleshooting):
The hob has a self-diagnostic function.
- E1 (Supply voltage too high): Inspect power supply. Restart after voltage is normal.
- E2 (Supply voltage too low): Inspect power supply. Restart after voltage is normal.
- E3 (High temperature of ceramic plate sensor 1#): Wait for temperature to return to normal. Touch ON/OFF to restart.
- E4 (High temperature of ceramic plate sensor 2#): Wait for temperature to return to normal. Touch ON/OFF to restart.
- E5 (High temperature of IGBT 1#): Wait for temperature to return to normal.
- E6 (High temperature of IGBT 2#): Touch ON/OFF to restart. Check if the fan runs smoothly; if not, replace the fan.
- F3/F6 (Ceramic plate temperature sensor failure - short circuit for 1#/2#): Check connection or replace sensor.
- F4/F7 (Ceramic plate temperature sensor failure - open circuit for 1#/2#): Check connection or replace sensor.
- F5/F8 (Ceramic plate temperature sensor failure - invalid for 1#/2#): Check connection or replace sensor.
- F9/FA (Temperature sensor of IGBT failure - short/open circuit for 1#): Replace the power board.
- FC/FD (Temperature sensor of IGBT failure - short/open circuit for 2#): Replace the power board.
Specific Failure & Solution:
- LED not coming on: Check power supply, plug, and outlet. If power board/display board connection or components are damaged, check connection or replace the respective board.
- Buttons not working/LED display abnormal: If the display board is damaged, replace it.
- Cooking Mode Indicator on, but no heating: High hob temperature (ambient temperature too high, air intake/vent blocked) or fan issue (check fan, replace if needed). If power board is damaged, replace it.
- Heating stops suddenly/display flashes "U": Pan type is wrong (use proper pot), pot diameter is too small, or cooker has overheated (wait for temperature to return to normal, push ON/OFF to restart). If pan detection circuit is damaged, replace the power board.
- Heating zones on the same side display "U": If power board/display board connection or components are damaged, check connection or replace the respective board.
- Fan motor sounds abnormal: If the fan motor is damaged, replace it.
Do not disassemble the unit yourself to avoid dangers and damages.