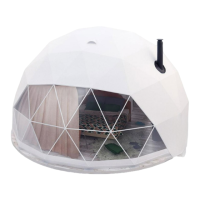
Do you have a question about the FDomes GLAMPING 20 and is the answer not in the manual?
Mark the center and draw a circle with the correct radius for the dome.
Place feet and metal bands on the drawn perimeter and define door/window positions.
Screw feet and metal bands together along the perimeter line.
Double-check positioning and radius, then tighten the nuts on the bolts.
Fix the feet to the deck or concrete slab using anchor bolts.
Unfold and position the PVC ground membrane evenly across the dome perimeter.
Flip excess material over base plates and pierce holes for media connections.
Connect velcro, flip excess membrane, and secure it along the base plates.
Glue membrane, cut for bolts, and leave excess for later trimming.
Overview of the framework assembly with pipe labels and metal bands.
Detailed map showing pipe placement for the dome framework structure.
Build the first level of the framework according to the map, loosening nuts for pipe installation.
Build the second level of the dome framework according to the provided map.
Build the third level of the framework according to the map provided.
Build the fourth level of the dome framework according to the map.
Build the fifth and final level of the dome framework according to the map.
Remove specific pipes from the FG20 framework to prepare for door installation.
Insert and attach the camping door frame to the FG20 framework using designated pipes.
Remove specific pipes from the FG30/40/50 framework for door installation.
Insert and attach the camping door frame to the FG30/40/50 framework using designated pipes.
Use screws to tighten the metal band to the door frame.
Identify the correct positions (P3 or P4) for the doors based on the dome design.
Remove specific metal bands and pipes from the framework for door installation.
Attach metal band extensions to the metal bands on both sides of the door opening.
Insert the glass door frame using pipes, ensuring stamped letters point outwards.
Check and adjust door leveling using pipes and telescopic adjustment.
Unfold the protective ground sheet and place the membrane flat on it.
Hitch three ropes to the membrane's D-rings and throw them over the dome structure.
Pull the membrane slowly onto the structure, ensuring seams align with framework and door opening.
Attach the front panoramic window using velcro, starting from the top corners.
Adjust membrane position and attach it to the door frame using velcro.
Attach canvas straps around the transparent front to the framework and pull them tight.
Use eyelets and bungee cord inside, and magnetic strips outside to secure the membrane.
Insert the circular window into the available slots between the membrane layers.
Select one of the three membrane slots for solar fan installation.
Pierce holes and use short pipes to fix the solar fan plate to the framework from inside.
Place the chimney under a membrane slot and secure the collar between membrane layers.
Install floor protection and connect the exhaust pipe to the stove's chimney.
Steps for installing Alum-Air insulation for domes with a skylight window.
Steps for installing Alum-Air insulation for domes without a skylight window.
Steps for installing Insulation+ for domes with a skylight window.
Install the Alum-Air insulation layer on top of Insulation+ with a skylight.
Steps for installing Insulation+ for domes without a skylight window.
Install the Alum-Air insulation layer on top of Insulation+ without a skylight.
| Brand | FDomes |
|---|---|
| Model | GLAMPING 20 |
| Category | Outdoor Furnishing |
| Language | English |