5
EN
Special safety instructions
• Avoidtoohighpressure
• Keepbystandersandpetsaway
• Childrenandanimalsshouldbekeptfaraway
from the area of operation of the machine.
• Ifthecompressorisnolongerinuse,always
take the plug out of the plug socket.
• Alwaysmakesurethatcompressed-air
hoses are used for compressed air and which
are characterized by a maximum pressure
adjusted to that of the compressor. Do not try
to repair the hose if it is damaged.
Additional safety instructions
• Preferablywearsafetyglasses.
• Donotusethetoolinaworkareawherestairs,
ladders or scaffolding are involved.
• Useaccessorieswithadequatespeedrating.
• Neveraimtheairflowatpeopleoranimals.
• Becautiouswhenusingcompressedair.
• Onlyusecleananddrycompressedairasa
power source for the tool. Never use oxygen or
a combustible gas.
• Donotexceedmaximumoperatingpressure.
• Keepthetoolclean.Donotuseanyaggressive
or alcohol-based cleaner.
• Neverusegasolineorotherflammableliquids
to clean the tool. Vapours in the tool will ignite
by a spark and cause the tool to explode.
• Disconnectthetoolfromtheairsupplybefore
troubleshooting or servicing, or during non-
operation.
• Onlycarrythetoolatthegripandneverwith
the trigger actuated.
• Nevercarrythetoolbytheairhoseorpullthe
air hose to move the tool.
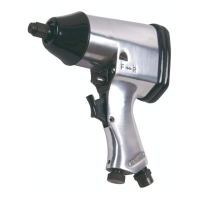
3. MOUNTING ACCESSORIES
Connecting and removing the air hose
Fig. B
• Wrapapieceofsealingtapearoundthe
connecting piece (7) of the air hose.
• Fittheconnectingpieceoftheairhoseintothe
connection (3).
• Checkwhethertheairhoseisconnected
properly.
Mounting a socket
Fig. C & D
• Fitasocketontotheaccessoryholder(4).
• Firmlypressthesocketontotheaccessory
holder.
Adjusting the impact force
Fig. E & F
• Turntheadjustingknob(2)counterclockwise
to increase the impact force.
• Turntheadjustingknobclockwisetoreduce
the impact force.
1 - 190 Nm
2 - 220 Nm
3 - 260 Nm
4 - 310 Nm
Changing the direction of rotation
Fig. A
• Pushtheforward/reverseswitch(6)forwardfor
clockwise rotation.
• Pushtheforward/reverseswitchbackwardfor
counterclockwise rotation.
• Tightenthescrew.
4. USE
Instructions for use
• Checkwhetherthetriggercanmovefreely.
• Makesurethatthetoolislubricatedbefore
connecting it to compressed air.
• Checkiftheairhoseiscorrectlyfitted.
• Settheairpressuretoavaluewithinthe
allowable operating pressure.
• Onlykeepyourfingeronthetriggeratthe
moment of starting the tool.
Switching on and off
• Toswitchonthetool,pressthetriggerswitch(1).
• Toswitchoffthetool,releasethetrigger
switch.
Tightening and loosening fasteners
Fig. A, C & D
• Fitarequiredsocket.
• Selectthedirectionofrotation.
• Placethetoolonthefastener.
• Switchonthetool.
• Ifnecessary,adjusttheimpactforce.
 Loading...