5.4 Resetting IP addresses to the factory setting
1.Set all switch elements for address setting DIL1 (1...6)
and DIL2 (1...2) to “ON”.
2.Switch bus node off and back on.
3.Set IP address via dynamic addressing è 5.3.
5.5 Configuration with “Generic Ethernet Module”
Integrate participants into the project and configure
them
è Documentation of the control system
Example with software STUDIO5000 from
ROCKWELLAUTOMATION:
Integration and configuration of the bus node
can only take place as long as there is no online
connection to the controller è Menu “Commu
nications” è “Go Offline”
1.In the “Controller Organizer” window in the “I/O Config
uration” area, open the dialogue window “Select Mod
ule Type” with a click of the right mouse button on “Eth
ernet” and with the context command “New Module”.
2.In the “Catalog”, select the module “Generic Ethernet
Module” from the table. To simplify the search, limit the
selection with the text filter.
3.Click on “Create” to confirm the selection.
The “Module Properties” dialogue window opens.
4.In the “Name” text field, enter a designation for the bus
node.
5.In the “Comm Format” list field, select the data format:
– “Data-SINT” (standard)
– “Data - SINT - With Statusbyte” with use of status
bytes over a separate connection
– “Data - INT” with usage of Word-based devices, e.g.
analogue module
6.Calculate the total size of the assigned address space.
7.Dependent on the I/O assignment for “Input” and
“Output”, input the following connection parameters.
Connection Parameters
Instance Size
1)2)
Variable Assembly Length Inputs
4)
101
Variable Assembly Length Outputs 100
Single Port Inputs 111 8
3)
Single Port Outputs 110 8
Dual Port Inputs 121 16
3)
Dual Port Outputs 120 16
Dual Port Inputs 131 32
3)
Dual Port Outputs 130 32
Dual Port Inputs 141 64
3)
Dual Port Outputs 140 64
1) Calculate the total size in bytes of the assigned address space
2) For “Data - INT”: Cut value in half
3) Increase value by 2 prefixed status bytes only if DIL switch
2.5 = ON è 5.2
8.Optional: To use status bytes over a separate connec
tion, input the following parameters.
Connection Parameters
Instance Size
Status Input 103 2
Status Output (Heartbeat) 254 –
9.For “Configuration”, enter the following values:
“Assembly Instance”=102 and “Size”=0
10. Enter IP address of the bus node.
11. Click on “Apply” to accept the inputs.
12. Close the dialogue window with “OK”.
In the “Controller Organizer” window in the “I/O Configur
ation” area, the bus node appears under “Ethernet” as a
newly integrated participant.
Using participant properties
è Documentation of the control system
Characteristic
Feature
Vendor Name Festo Corporation
Vendor ID 26 = 1A
h
Device Type 12 = 0C
h
Product Code 6001 = 1771
h
Major Revision 1
Status Current status of the bus node
Serial Number is displayed
Product Name CTEU-EP
Input Size/Output Size 0 ... 64 bytes
AssemblyInstance è Table “Connection Paramet
ers”
Extended EtherNet/IP participant properties
Min. bus cycle time (Reques
ted Packet Interval, RPI)
1 ms
Connections
Total of all connections Max. 32
Exclusive Owner Max. 1
Input only Max. 32
Listen only Max. 31
1)
1) Only with simultaneous connection “Exclusive Owner” or “Input
only”
5.6 Configuration with device master file (EDS file)
To simplify set-up of the CTEU-EP bus node, Festo makes
a device description file (EDS) available è www.festo.
com/sp.
The EDS file contains all information required to integrate
the CTEU-EP into the hardware configuration of your con
trol system.
Note...................................
Requirements
The software for configuration of your control system
supports import of EDS files.
5.7 Changing start addresses of inputs/outputs
è Documentation of the control system
In most cases, the control system handles the assignment
of the input/output addresses and the diagnostic addres
ses.
5.8 Setting up “QuickConnect” (QC) EtherNet/IP
function
è Documentation of the control system
Activate “QuickConnect” in the control system.
Activate “QuickConnect” via attribute 12 of the TCP/IP
interface object (factory setting: deactivated).
Note...................................
With use of the EtherNet/IP function “QuickConnect”,
Auto-Negotiation and Crossover detection (Auto-MDI/
MDI-X) are not available. Assignment of the pins for
transmitted and received data at the TP2 connection is
crossed.
Deactivate Crossover detection in the hardware con
figuration of the network neighbour (“Partner Port)”.
Set baud rate to 100 Mbit/s.
Activate full-duplex mode.
Select interconnecting cable dependent on pin as
signment of network connection of product connec
ted to TP2:
– Crossover-cable with identical pin assignment of
the ports
– Patch-cable with different pin assignment of the
ports
5.9 Check network communication
Note...................................
Functional test
– The LED NS is illuminated green (with faultless com
munication between control system and bus node).
– The LEDs TP1 or TP2 flash green (è 7).
6 EtherNet/IP Objects
Object
class
In
stance
Name Type
1
h
1 Identity Object
4
h
è 5.5 Assembly Object
è “Connection Parameters”
47
h
1 Device Level Ring Object
48
h
1 QoS Object
F5
h
1 TCP/IP-Interface Object
F6
h
1...2 Ethernet Link Object
64
h
1...64 Discrete Output Byte Object
65
h
1...64 Discrete Input Byte Object
67
h
1...2 Diagnostics Object (Status
bytes)
68
h
1...2 Slave Information Object
69
h
1 System Object
6A
h
1...2 IPort Module Parameter Object
6B
h
1...2 Port Configuration Object
300
h
1...2 ISDU Access Object
1)
1) ISDU = Indexed Service Data Unit
For detailed information on the objects è www.festo.
com/sp è User documentation: “CTEU-EP” è Appendix
to operating instructions.
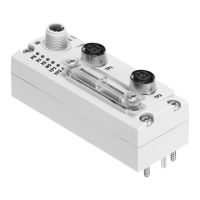
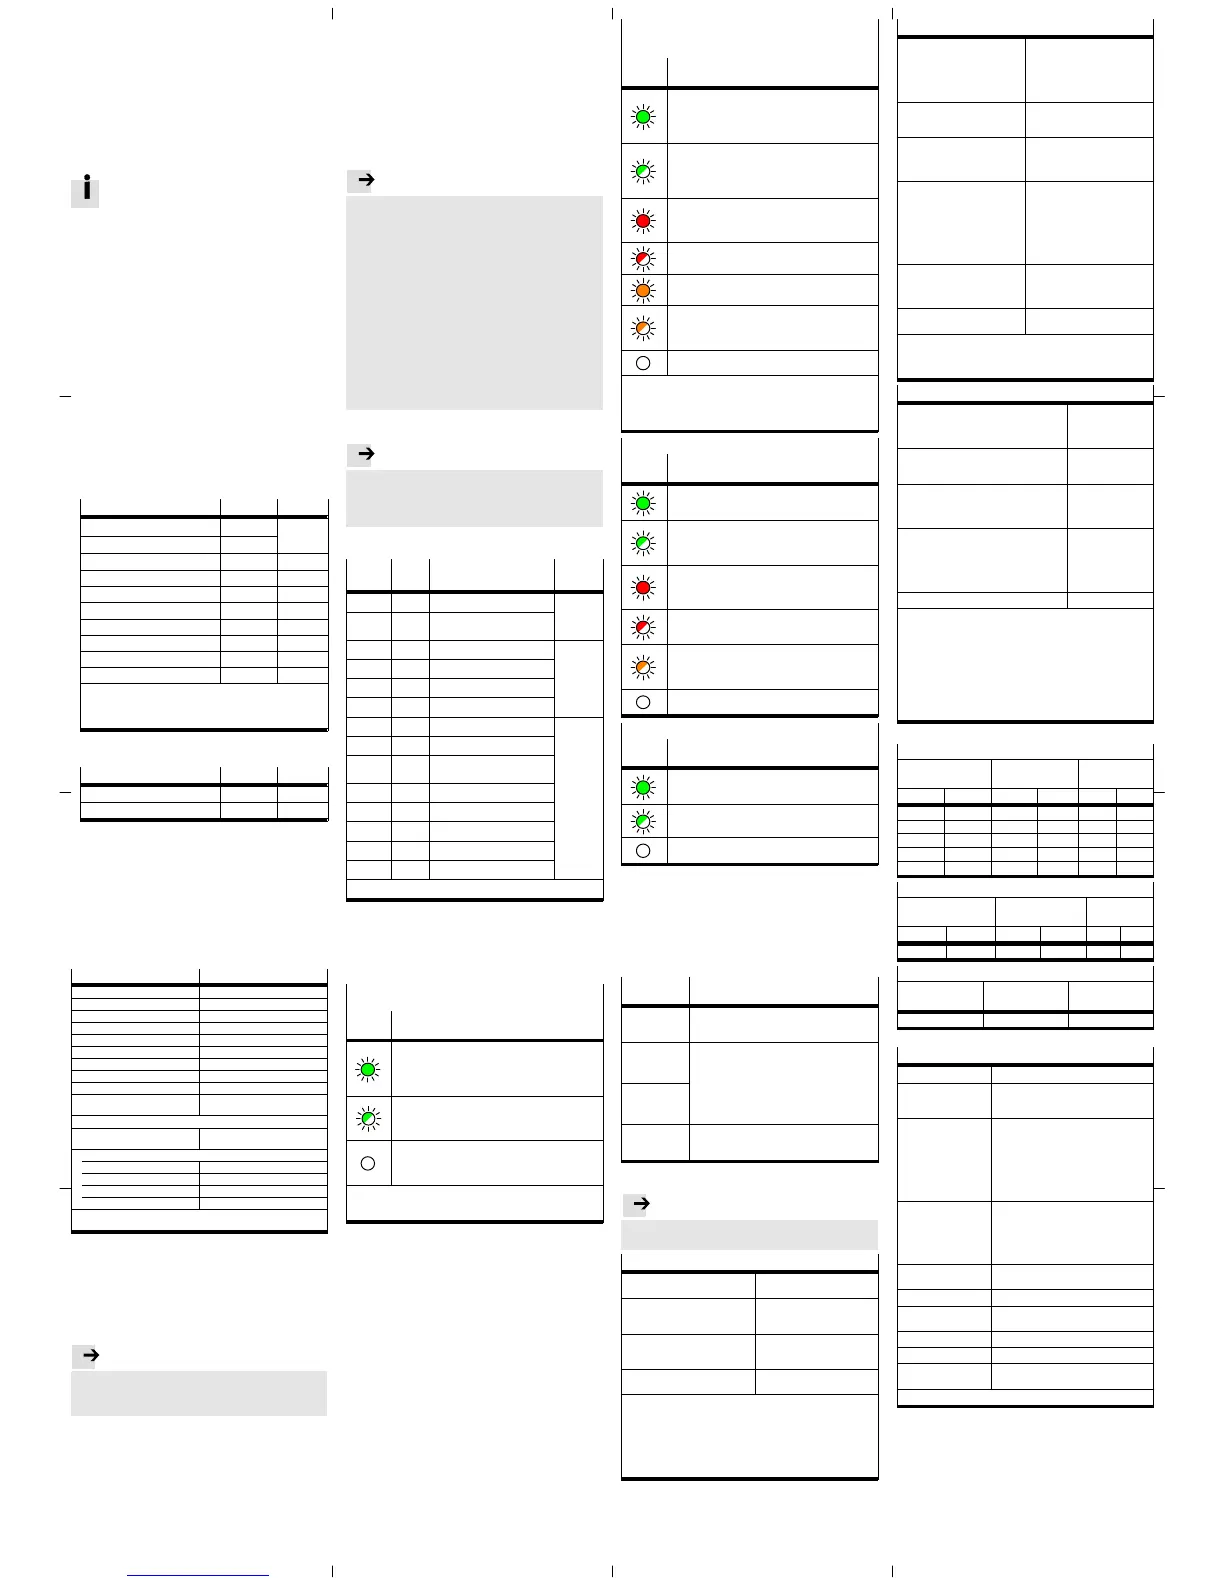
7 Diagnostics
PS – Status of the operating voltage supply
(Power System)
LED
display
Status and significance
LED illuminated green:
– Normal operating status
– Operating voltage is present (within the permissible
range)
– Load voltage is present (within permitted range)
1)
LED flashes green (flashing frequency: 1 Hz)
– Operating voltage is below the required voltage
– Load voltage is below the required level
1)
– Short circuit at the I-Port
1)
LED is off:
– Operating voltage is not present
– Operating voltage is below the voltage required for
diagnostic functions
1) This display only relates to the status of the load voltage if the
connected product is monitoring the load voltage and reports its
status to the bus node.
X1 and X2 – Status of the internal communication
between the bus node and the connected product
“I-Port Device1” or “I-Port Device2”
1)
LED in
dicator
Status and significance
LED illuminated green:
– Normal operating status
– I-Port Device 1 or 2 is connected correctly
– Operating and load voltage are connected (within
permitted range)
2)
LED flashing green:
– Status of diagnostics
– Undervoltage at system or additional power supply
– Connection between the bus node and the I-Port
Device is OK
LED illuminated red:
– I-Port Device is connected correctly, but the internal
communication is malfunctioning
– After commissioning, I-Port Device removed
LED flashing red:
– Error in the bus node
Both LEDs illuminated orange:
– Firmware update active
Both LEDs flash orange
– To locate the bus node (“module location”), e.g. dur
ing hardware configuration in the control system or
for troubleshooting
LED is off:
– No product connected to the bus node
1) Accessory with two I-Port interfaces required to connect two
products
2) This display only relates to the status of the load voltage if the
connected product is monitoring the load voltage and reports its
status to the bus node.
NS – Network status
LED
display
Status and significance
LED illuminated green:
– Normal operating status (“online”)
– Communication with the network is OK
LED flashing green:
– Communication with the network is OK
– IP address is assigned
– Connection is not configured
LED illuminated red:
– No communication to the network (“offline”), e.g.
through invalid bus address (example: address con
flict) or baud rate
LED flashing red:
– Communication with the network disrupted, time-out
detected (Bus time-out)
LED flashes orange:
– To locate the connected product (“module location”),
e.g. during hardware configuration in the control
system or for troubleshooting
LED is off:
– No network connection
TP1/TP2 – connection status “Link1” or “Link2”
LED
display
Status and significance
LED illuminated green:
– Normal operating status
– Network connection is OK
Both LEDs, TP1 and TP2 flash green:
– Data traffic
LED is off:
– No network connected
8 Maintenance
No special measures.
9 Accessories
è www.festo.com/catalogue
10 Glossary
Term/
abbreviation
Significance
QuickConnect Operating mode of the bus node, guarantees a
fast connection after restart of the network parti
cipants.
EtherNet/I P
Network protocol in automation technology
based on Industrial Ethernet (TCP/IP) for data
interchange between a higher-order control sys
tem (industry PC, PLC or IO Controller), network
participants and field devices (Field Devices/
Modules), e.g. valve terminals or drives
è www.odva.org
è www.modbus.org
ModbusTCP
PLC Programmable logic controller, also designated
system controller or controller for short (Program
mable Logic Controller, PLC)
11 Technical data
Note...................................
Technical data for the connected products can be ob
tained from the product documentation.
Electrical characteristics
Degree of protection through
housing
IP65/IP67
1)2)
Protection against electric shock
(protection against direct and
indirect contact)
through the use of PELV circuits
(Protective Extra-Low Voltage)
Disconnection of network
connections for operating voltage
power supply U
EL/SEN
Galvanically separated through
transformer (up to 500 V)
CE mark
3)
(see declaration of con
formity) è www.festo.com
In accordance with EU EMC Dir
ective
1) Requirement: Bus node mounted completely, plug connector in
the plugged-in status or provided with cover cap.
2) Connected products may only satisfy a lower degree of protec
tion.
3) The product is intended for use in an industrial environment.
Outside of industrial environments, e.g. in commercial and
mixed-residential areas, actions to suppress interference may
have to be taken.
General mechanical characteristics
Vibration and shock resistance
(in accordance with
IEC/EN 60068)
1)
– Vibration (part 2-6)
– Shock (part 2-27)
– Continuous shock (part 2-27)
Severity level (SL)
1)
for wall or
H-rail mounting
– Wall: SG2; H-rail: SG1
– Wall: SG2; H-rail: SG1
– Wall and H-rail: SG1
Temperature range
2)
– Storage/transpor t
– Operation
–20 … +70 °C
–5 … +50 °C
Corrosion protection The product is intended for in
door use in a typical industrial at
mosphere.
Avoid condensation.
Materials
– Housing
– Cover
– Fibre-optic cables
– Threaded bushing M12
– Threaded bushing M3
– Seals
– Screws
RoHS-compliant
PA reinforced
PA
PC
Brass, nickel-plated
Brass
NBR
Steel, galvanized
Dimensions
– Width
– Length
– Height
40 mm
91 mm
39 mm
Weight (bus node without cables
and sub-assembly)
98 g
1) Explanation of the severity level è Table “Explanation on
vibration and shock – severity level”
2) Connected products may only cover a less extensive temperat
ure range.
Power supply
Operating voltage for bus node and connec
ted products
1)
– Nominal value
– Tolerance range
24 V DC
18 … 30 V DC
2)
Load voltage for bus nodes and connected
products
1)
– Tolerance range 18 … 30 V DC
2)
Intrinsic current consumption at nominal op
erating voltage 24 V DC
from operating voltage supply for electron
ics/sensors (U
EL/SEN
)
Typ. 65 mA
(internal electronics)
Power rating of operating and load voltage
power supplies
1)3)
– Bus node on the connected product (e.g.
valve terminal)
– Bus node on the decentralised electrical
connection box CAPC
Max. 4 A
Max. 2 A
per I-Port Device
4)
Power failure buffering 10 ms
1) Separate, external fuses are required for the operating and load
voltage power supplies (no bus node-internal overload and po
larity reversal protection for the products connected via X1
and X2).
2) The tolerance range is dependent on the connected products.
3) Total power rating of operating and load voltage power supplies
PS and PL (residual current), maximum permitted current con
sumption of bus node and connected products
4) Total power rating of operating and load voltage power supplies
PS and PL (residual current), maximum permitted current con
sumption per I-Port Device
Explanation on vibration and shock – severity level
Vibration load
Frequency range
[Hz]
Acceleration
[m/s
2
]
Displacement
[mm]
SL1 SL2 SL1 SL2 SL1 SL2
2 … 8 2 … 8 – – ±3.5 ±3.5
8 … 27 8 … 27 10 10 – –
27 … 58 27 … 60 – – ±0.15 ±0.35
58 … 160 60 … 160 20 50 – –
160 … 200 160 … 200 10 10 – –
Shock load
Acceleration
[m/s
2
]
Duration
[ms]
Shocks per
direction
SL1 SL2 SL1 SL2 SL1 SL2
±150 ±300 11 11 5 5
Continuous shock load
Acceleration
[m/s
2
]
Duration
[ms]
Shocks per dir
ection
±150 6 1000
Network-specific characteristics
Network protocol EtherNet/I P or ModbusTCP
Supported protocols – Cyclic data exchange
– Simple Network Management Protocol
(SNMP)
Supported functions – QuickConnect (QC)
– Device Level Ring (DLR)
– Acyclic data access via Explicit Mes
saging
– Address Conflict Detection (ACD)
– Firmware update
– Integrated Switch
– System status via image table
System-specific func
tions
– Diagnostics information (system dia
gnosis, undervoltage, communication
errors)
– Web server (status of bus node and
connected products, serial number,
configuration)
Transmission techno
logy
Switched Fast Ethernet;
Design 100BaseTX
Transmission rate 10/100 Mbit/s, full-duplex/half-duplex
Bus cycle time (Reques
ted Packet Interval, RPI)
1 ms
Network connections 2 x socket, M12, D-coded, 4-pin
Crossover detection Auto-MDI/MDI-X
1)
Max. address volume
inputs/outputs
– 64 bytes I, 64 bytes O,
– 66 bytes I (with status bytes)
1) Only if QuickConnect is not active
 Loading...