EasyManua.ls Logo

Field Controls SWG-4HD User Manual

Field Controls SWG-4HD
4 pages
To Next Page IconTo Next Page
Page #1 background imageLoading...
Page #1 background image
www.fieldcontrols.com
Please retain these instructions after installation.
This device MUST be installed by a qualified agency in accordance with the manufacturer's installation instructions. The definition of
a qualified agency is: any individual, firm, corporation or company which either in person or through a representative is engaged
in, and is responsible for, the installation and operation of HVAC appliances, who is experienced in such work, familiar with all the
precautions required, and has complied with all the requirements of the authority having jurisdiction.
READ THESE INSTRUCTIONS CAREFULLY AND COMPLETELY BEFORE PROCEEDING WITH THE INSTALLATION.
Installation Date:
Installed By: Phone:
REPAIR MOTOR KIT
Model: SWG-4HD, SWGII-4HD, SWG-5,
SWGII-5, SWG-6, SWGII-6
This kit includes a replacement assembly for the SWG and SWGII series sidewall power
venter models listed above.
NOTE: Before working on power venter, shut off electrical power to control box.
ITEMS INCLUDED:
1- Replacement Motor and Blower Wheel on Mounting Bracket with Mounting Fasteners
1-
1
8" Hex wrench
1- Tube of high temperature silicone sealant
1- Instruction Sheet

Other manuals for Field Controls SWG-4HD

Question and Answer IconNeed help?

Do you have a question about the Field Controls SWG-4HD and is the answer not in the manual?

Field Controls SWG-4HD Specifications

General IconGeneral
BrandField Controls
ModelSWG-4HD
CategoryAutomobile Parts
LanguageEnglish

Summary

Repair Motor Kit Overview and Safety

Kit Contents

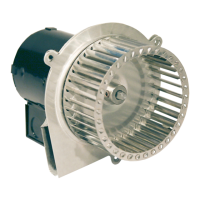
Lists the included items: motor/blower assembly, hex wrench, silicone sealant, and instruction sheet.

Pre-Installation Safety Note

Instructs to shut off electrical power to the control box before working on the power venter.

Removal Procedure

Identify Power Venter Model

Identifies the model of the power venter unit being serviced.

Disconnect Motor Components

Remove motor cover, electrical box cover, and disconnect conduit and wires.

Remove Motor Assembly

Remove nuts securing the motor assembly and pull it straight off the unit.

Clean Blower Housing

Clean any build-up inside the blower wheel housing.

Installation Procedure

Align Motor Mount Bracket

Align the holes in the circular cover plate with the motor mount bracket.

Mount New Motor Assembly

Slide motor assembly onto threaded studs with exhaust chute pointing down.

Reconnect Electrical Connections

Reattach flexible conduit and wires to the motor using the electrical box knockout.

Seal and Install Cover

Seal motor mount bracket edge with sealant and install the motor cover.

Limited Warranty Information

Warranty Periods

Details warranty durations for different product types: 18 months, 5 years, and 90 days.

Warranty Provisions

Outlines terms, conditions, exclusions, and limitations for warranty claims.