Pago Twelve
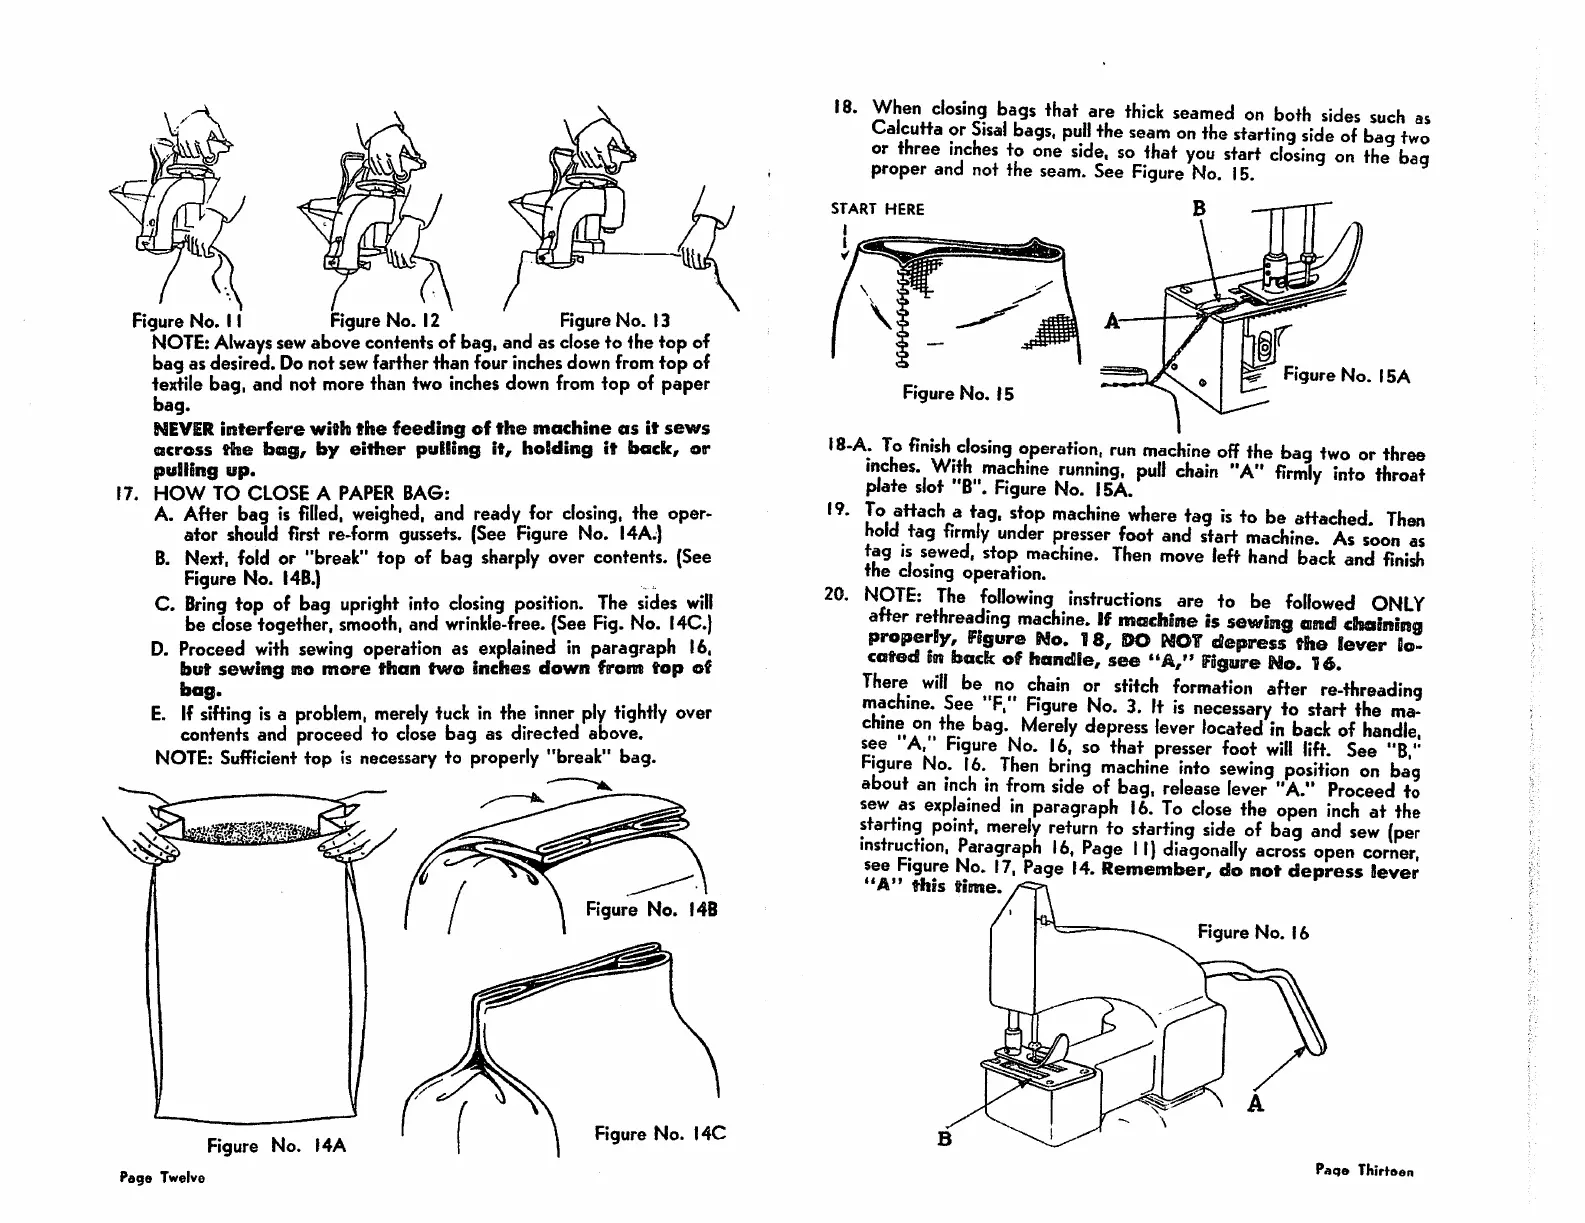
Figure No.
11
Figure No. 12 Figure No. 13
NOTE:
Always
sew
abovecontentsof bag, and as
close
to the top of
bag as desired. Donot sewfarther than four inchesdownfrom
top
of
textile bag, and not more than two inches downfrom top of paper
bag.
NEVER
interfeire
vfith
the
feeding
of
the
machine
as
it
sews
across
the
bag,
by
either
pulling
it,
holding
it
back,
or
pulling
up.
17.
HOW
TO
CLOSE
A
PAPER
BAG:
A. After bag is
filled,
weighed, and ready for closing, the oper
ator should first re-form gussets. (See Figure No. I4A.)
B.
Next, fold or "break" top of bag sharply over contents. (See
Figure No.
I4B.)
C.
Bring
top of bag
upright
into
closing
position.
The
sides
will
be closetogether,
smooth,
and
wrinkle-free.
(See Fig. No.
140.}
D.
Proceed
with
sewing
operation as explained in paragraph 16.
but
sewing
no
more
than
two
inches
down
from
top
of
bag.
E.
If
sifting
is a
problem,
merely
tuck in the
inner
ply tightly over
contents and proceed to
close
bag as directed
above.
NOTE:
Sufficient top is necessary to properly "break" bag.
140
18.
When
closing
bags
that
are
thick
seamed
on
both
sides
such
as
Calcutta
or
Sisal
bags,
pull
the
seam
on
the
starting
side
of
bag
two
or
three
inches
to
one
side,
so
that
you
start
closing
on
the
baq
proper
and
not the
seam.
See
Figure
No.
15.
START
HERE
Figure No. IS
Figure
No.
15A
18-A.
To
finish
closing
operation,
run
machine
off
the
bag
two
or
three
inches.
With
machine
running,
pull
chain
"A"
firmly
into
throat
plate slot "B".
Figure
No. ISA.
To
attach
a
tag,
stop
machine
where
tag
is
to
be
attached.
Then
hold
tag
firmly
under
presser
foot and start
machine.
As
soon
as
tag
IS
sewed,
stop
machine.
Then
move
left
hand
back
and
finish
the
closing operation.
^2^^'
following
instructions
are
to
be
followed
ONLY
after
rethreading
marine.
Iff
maebine
is
sewing
and
cbaining
properly. Figure No.
18,
DO
MOT
depress the lever
So-
caffod
in back
off
handle,
see
"A," Figure No. 16.
There
will
be
no
chain
or
stitch
formation
after
re-threading
njachine.
See
"F."
Figure
No.
3.
It
is
necessary
to
start
the
ma-
chine
on
the
bag.
Merely
depress
lever
located
in
back
of
handle,
see
A,
Figure
No.
16,
so that
presser
foot
will
lift.
See
"B."
Figure
No.
16.^
Then
bring
machine
into
sewing
position
on
bag
about an
inch
in
from
side
of bag,
release
lever
"A."
Proceed
to
sew
as
explained
in
paragraph
16.
To
close
the
open
inch
at
the
starting
point,
merely
return
to
starting
side
of
bag
and
sew
(per
instruction.
Paragraph
16,
Page
11)
diagonally
across
open
corner,
see
Figure
No.
17,
Page
14.
Remember, do
not
depress
lever
"A"
this
time.
19.
20
Page
Thirteen
From the library of: Superior Sewing Machine & Supply LLC


 To Next Page
 Loading...