21
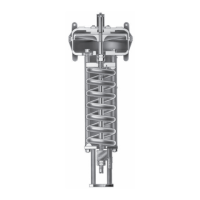
Type EZH DN 100 Actuator Assembly
Maintenance (Figure 17)
1. Remove travel indicator assembly (keys 71, 138, 139,
140, 141, 142, 143, 144, 145 and 192), if present,
by loosening the travel indicator tting (key 141) and
lifting out the travel indicator assembly.
2. Remove hex head cap screws (key 21), washers
(key 22) and hex nuts (key 23). Carefully lift the upper
actuator casing (key 11) off the lower actuator casing
(key 5). Inspect the upper actuator casing (key 11),
O-rings (key 9) and anti-friction rings (key 8) for
damage or wear. If damaged, remove and replace
with new parts. Place the anti-friction rings in the
body rst, then slide the O-ring between the anti-
friction rings.
3. Lift off the diaphragm/plates system. Remove O-ring
(key 15). Inspect diaphragm and O-rings for damage
or wear and replace if necessary.
4. Remove sleeve guide (key 61) utilizing cap (key 70)
to unscrew.
5. Remove cage (key 78).
6. Remove seat ring (key 2). Inspect seat ring for
damage or wear. If damaged, replace with new parts.
7. Remove O-ring (key 34) from body. Inspect for
damage or wear. If damaged, replace with new parts.
8. Lubricate O-ring (key 34) and replace into the body.
9. Place seat ring (key 2) on top of O-ring in body.
10. Place cage (key 78) on the top of seat ring (key 2).
11. Screw sleeve guide into lower casing (key 5) utilizing
cap (key 70).
12. Lubricate the sleeve (key 14) in the upper plate
contact area and assemble the diaphragm/plates
system on the sleeve system.
13. Screw the smart screws (key 68) — already on the
sleeve — to x the diaphragm/plates system on the
sleeve system. See Torque Specication table for
proper torque.
14. Lubricate lower casing (key 5) on the diaphragm
contact area.
15. Carefully insert the trim system into the sleeve
guide (already assembled on the body) utilizing the
eye-bolt (key 35) that ts in the ring nut (key 73)
threaded hole.
16. Lubricate the diaphragm (key 20) on the upper casing
contact area.
17. Carefully place the top actuator casing on the top of
the lower actuator casing/trim system using a stud
to guide.
Note
Rotate the upper casing such that
the outer holes for sensing lines are
18. Lubricate threads on bolts (key 21).
19. Bolt together the upper and lower actuator casings
using bolts (key 21), washers (key 22) and nuts
(key 23). See Torque Specication table for
proper torque.
20. Lubricate and mount the O-ring (key 69) on the cap
(key 70).
21. Lubricate and mount O-rings (key 9) and anti-friction
rings (key 8) inside the cap (key 70).
22. Carefully place the cap on the upper casing (key 11).
23. Lubricate cap screws (key 77) and attach cap
(key 70) to the upper casing using cap screws
(key 77). See Torque Specication table for
proper torque.
24. Mount O-ring (key 75) on the cap (key 70).
25. Screw the eye-bolts (key 35) on the cap (key 70).
26. Place travel indicator assembly (keys 138, 139,
140, 141, 142, 143, 144, 145 and 192) in the upper
actuator casing (key 11), if present and tighten the
travel indicator tting (key 141).
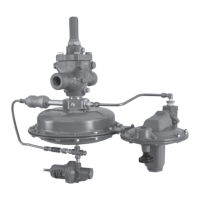
Type EZHSO DN 100 Actuator Assembly
Maintenance (Figure 19)
1. Remove closing cap (key 146), unscrew 2 nuts
(key 151). If present, remove travel indicator
assembly by unscrewing the travel indicator tting
(key 141), then pull out the stem (key 139).
2. Remove hex head cap screws (key 21), washers
(key 22) and hex nuts (key 23). Carefully lift the
upper actuator casing (key 11) off the lower actuator
casing (key 5). Inspect the upper actuator casing
(key 11), O-rings (key 158) and anti-friction rings
(key 157) for damage or wear. If damaged, remove
and replace with new parts. Place the anti-friction
rings in the cap rst, then slide the O-ring between
the anti-friction rings.
3. Unscrew 8 smart screws (key 68). Lift up and remove
the sleeve assembly (key 14). Lift off the diaphragm/
plates system. Remove O-ring (key 15) and replace
as needed. Inspect diaphragm (key 20) for damage
or wear, remove screws (key 16), lift off inlet plate
(key 18) to replace diaphragm and O-ring (key 17)
if necessary.
4. Unscrew 8 screws (key 77) to remove cap (key 70)
from the upper casing (key 5). Align screw holes on
the cap (key 70) to the sleeve guide screw (key 66).
Remove sleeve guide (key 61) utilizing cap (key 70)