22
to unscrew. Inspect O-rings (key 8), (key 64) and
(key 153) for damage or wear, replace anti-friction
ring (key 9) and O-ring (key 8) if necessary. Unscrew
8 bolts (key 6) and remove washer (key 67). Lift
off lower casing (key 5). Inspect O-rings (key 7)
and (key 63) for damage or wear, replace them
if necessary.
5. Remove cage (key 78).
6. Remove seat ring (key 2). Inspect seat ring for
damage or wear. If damaged, replace with new parts.
7. Remove O-ring (key 34) from body. Inspect for
damage or wear. If damaged, replace with new parts.
8. Lubricate O-ring (key 34) and replace into the body.
9. Place seat ring (key 2) on top of O-ring in body.
10. Place cage (key 78) on the top of seat ring (key 2).
11. Place lower casing (key 5) on top of body. Replace
washer (key 67) and tighten bolts (key 6). Screw
sleeve guide into lower casing (key 5) utilizing cap
(key 70).
12. Lubricate the sleeve (key 14) in the upper plate
contact area and assemble the diaphragm/plates
system on the sleeve system. Tighten screws
(key 16) using a "star" criss-cross pattern for ve
times until proper specied torque is achieved.
13. Screw the smart screws (key 68) — already on the
sleeve — to x the diaphragm/plates system on
the sleeve system. See Torque Specication table
for proper torque. Tighten screws (key 68) using a
"star" criss-cross pattern until proper specied torque
is achieved.
14. Lubricate lower casing (key 5) on the diaphragm
contact area.
15. Carefully insert the trim system into the sleeve guide
(key 61).
16. Lubricate the diaphragm (key 20) on the upper casing
contact area.
17. Lubricate and mount the O-ring (key 69) on the cap
(key 70). Lubricate and mount O-rings (key 9) and
anti-friction rings (key 8) inside the cap (key 70).
Carefully place the cap on the actuator upper casing
(key 11). Align the travel indicator hole on the cap
(key 70) to the upper casing travel indicator hole.
Screw 8 screws (key 77) to tighten cap (key 70) to the
upper casing (key 5). Carefully place the top actuator
casing on the top of the lower actuator casing/trim
system using a stud to guide.
Note
Rotate the upper casing such that
the outer holes for sensing lines are
18. Lubricate threads on bolts (key 21).
19. Bolt together the upper and lower actuator casings
using bolts (key 21), washers (key 22) and nuts
(key 23). See Torque Specication table for proper
torque. Tighten screws (key 16) using a "star" criss-
cross pattern for ve times until proper specied
torque is achieved.
20. Assemble one nut (key 151) to the stem (key 147)
until achieve specied torque and then assemble
another nut (key 151) to lock position of stem. Screw
on the closing cap (key 146). Mount O-ring (key 75)
on the cap (key 70).
21. If present, set the stem (key 139) through the casing
hole and tap it into the groove in the diaphragm plate
(key 18). Slide the travel indicator tting (key 141)
over the stem and tighten to the cap (key 70).
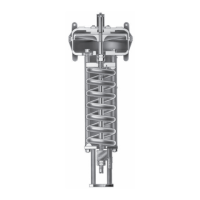
Type EZH OS2 Regulator with
Slam-shut Maintenance (Figure 20)
1. Unscrew the BMS (safety manometric box) impulse
line connector.
2. Remove cover (key 57) from the mechanism
box (BM).
3. Unscrew fastening screw (key 51).
4. Remove holding pin.
5. Remove mechanism box.
6. Unscrew screws (key 50) from the connecting part
(key 48).
7. Remove connecting part (key 48), O-rings (keys 56
and 49) and if necessary the two guide rings (key 54).
8. Remove spring (key 55) and valve plug (key 46).
9. Unscrew bypass (key 53) and remove valve O-ring.
10. Removing the seat (key 52) (not recommended) from
the body (key 47) requires a special extraction tool.
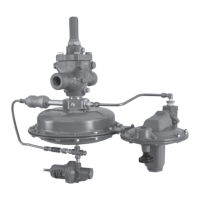
Type PRX Pilot Maintenance (Figure 23)
CAUTION
Always remove spring (key 7) tension
before performing maintenance on
this unit.
To remove spring tension loosen
locknut (key 2) and backout adjusting
screw (key 1) until compression is
removed from the spring.
Lower Case Maintenance
1. Disconnect pilot and remove it from the line.