23
2. Remove screws (key 10) from lower cover (key 21)
and the separate lower cover from the body (key 16).
3. Use a wrench to hold the stem (key 23) and break
loose the stem nut (key 20). Remove the stem nut
and washer (key 11).
4. Remove the diaphragm plate (key 13), diaphragm
(key 14), pad holder (key 22) and O-ring (key 18).
Inspect parts for damage or wear, replace
if necessary.
5. Remove orice (key 19) and O-ring (key 17).
Inspect the parts for damage or wear and replace if
necessary. Lightly lubricate the O-ring and place in
the body (key 16). Install the orice.
6. Set the pad holder (key 22) in the body (key 16).
7. Lightly lubricate the rims of the diaphragm (key 14)
and place it on top of the pad holder (key 22). Set the
diaphragm plate (key 13) on the diaphragm (key 14).
8. Lightly lubricate the O-ring (key 18) and place it in the
lower case (key 21).
9. Place the washer (key 11) and stem nut (key 20) on
the stem (key 23) and tighten.
If also performing upper case maintenance, skip to
step 2 of "Upper Case Maintenance" section.
10. Insert screws (key 10) in the lower cover (key 21) and
tighten uniformly to ensure proper seal.
Upper Case Maintenance
1. Disconnect pilot and remove it from the line.
2. Loosen locknut (key 2) and backout adjusting screw
(key 1) until compression is removed from the spring.
Remove cap (key 3).
3. Lift the spring carrier (key 6) the spring (key 7) and
O-ring (key 4) out of the upper cover (key 8). Inspect
the O-ring and replace if necessary.
4. Remove screws (key 10) from lower cover
(key 21) and separate lower cover from the body
(key 16), unless removed during lower diaphragm
maintenance. Use a wrench to hold stem (key 19)
securely while removing the stem nut (key 26).
5. Remove remaining loose components: washer, upper
diaphragm plate, diaphragm, lower diaphragm plate
and O-rings (keys 11, 13, 14, 15, 18 and 25). Inspect
diaphragm and O-rings for damage or wear and
replace if necessary.
6. Lightly lubricate the O-ring (key 25). Place the O-ring
over the stem (key 19) and press it down into the
body (key 16).
7. Set the lower diaphragm plate (key 15) into the body
(key 16).
8. Lightly lubricate the rims of the diaphragm (key 14)
and place it in the body (key 16) on top of the lower
diaphragm plate (key 15).
9. Set the upper diaphragm plate (key 13) on top of the
diaphragm (key 14).
10. Place washer (key 11) and stem nut (key 26) on the
stem (key 23) and tighten using a wrench to hold
the stem.
11. Set the spring carrier (key 6).
Damper and Restrictor Maintenance
1. Remove the screw (key 31) and plate (key 29).
2. Remove bolts (key 30).
3. Remove the damper adjusting screw (key 27).
Remove and inspect O-ring (key 28) for damage
or wear and replace if necessary. Lightly lubricate
O-ring before placing on the adjusting screw. Insert
damper adjusting screw into the body (key 16) and
tighten. Insert ring nut (key 30) and tighten. Back out
damper adjusting screw until it stops.
4. Remove restrictor adjusting screw with hole (key 32).
Remove and inspect O-ring (key 28) for damage
or wear and replace if necessary. Lightly lubricate
O-ring before placing on the adjusting screw. Insert
restrictor adjusting screw into the body (key 16)
and completely tighten. Insert ring nut (key 30) and
completely tighten. Back out restrictor adjusting
screw 1/2 turn.
Note
When using a Type PRX/120 pilot with
a Type PRX/125 pilot as monitor, follow
back out three full turns,
5. Install plate (key 29) and screw (key 31).
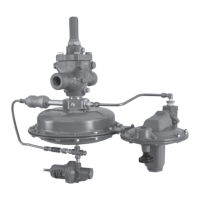
Type SA/2 Pilot Supply Filter Regulator
Maintenance (Figure 24)
1. Disconnect pilot supply lter regulator and remove it
from the line.
2. Remove bolts, washers and nuts (keys 2, 9 and
10) from the body (key 7), then separate upper and
lower covers (keys 19 and 11) from the body (key 7).
When separating the covers from the body, be aware
of loose components: (keys 1, 3, 4, 8, 12, 18, 20
and 21).
3. Remove and inspect O-ring (key 13) for damage
or wear and replace if necessary. Lightly lubricate
the O-ring before placing it back in the lter cover
(key 11).
4. Clean nets (key 8). Replace lter pad (key 12).
5. Inspect diaphragm (key 18) for damage or wear and
replace if necessary. Check the seating surface of the

 Loading...