1 With the 9V battery clip facing you, remove the two screws that hold down the
foil shield . Carefully lift the foil up to expose the terminal block. The foil lifts up
from the side closest to the raised FISHMAN logo.
2 Insert the pickup wire in the slot located in the corner between the terminal block
compartment and the battery compartment.
• The ground wire goes to the terminal closest to the FISHMAN logo.
• The signal (hot) wire goes to the terminal further from the FISHMAN logo.
3 Tighten the terminal block screws with a small slotted screwdriver.
4 Pull the slack on the pickup wire until it lays within the terminal block compart-
ment, tucked in behind the screw boss where the wire exits.
5 Check the foil shield sides to make sure that the shape is intact and the corners
are square.
6 Carefully replace the foil enclosure. Note that when properly installed, the foil
enclosure will cleanly surround both the terminal block and one of the screw
bosses. If the sides of the foil jam up on the terminal block or screw boss, adjust
the fit so that the enclosure closes easily.
7 Replace the two screws that hold the foil in place. Be careful not to cross thread
the holes.
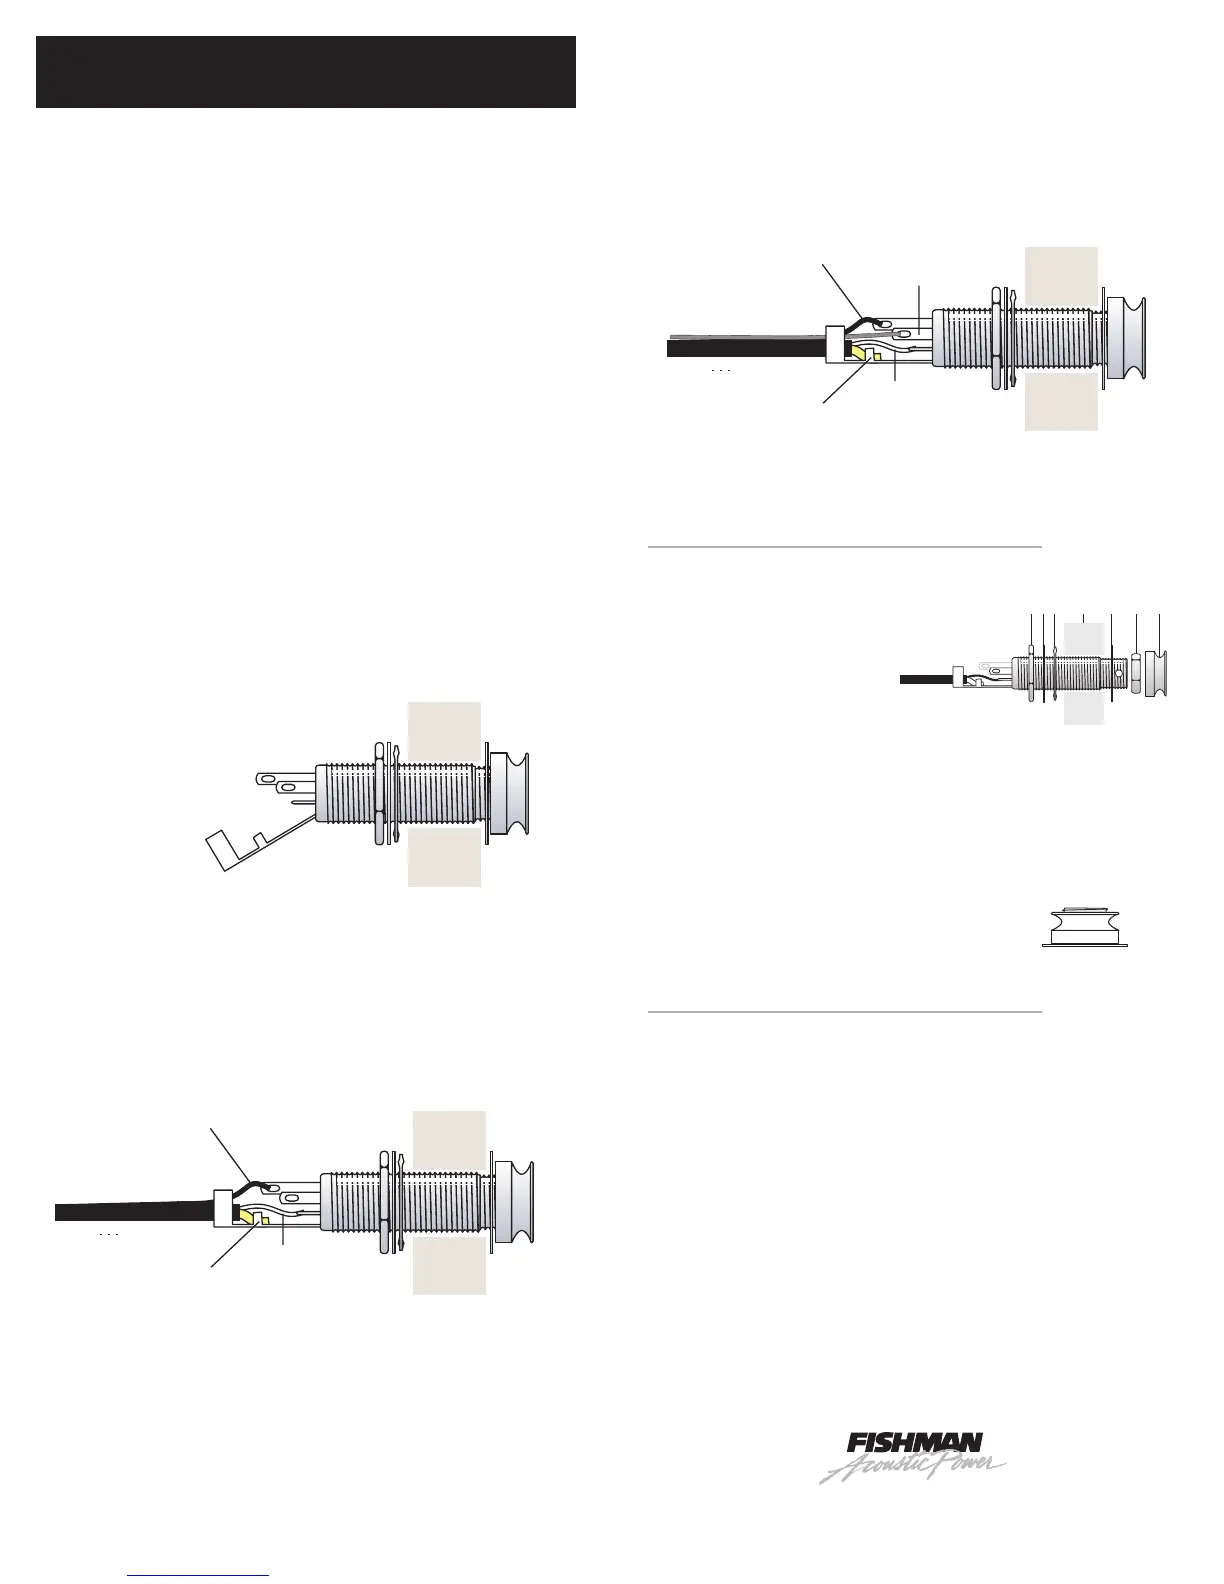
8 Solder the wire ends of the preamp output cable to the terminals on the endpin
jack as illustrated.
9
Feed the output cable through the endpin hole and connect it to the output jack.
To gain better access to the Tip, Ring and Switch terminals, gently bend back the Strain
Relief/Sleeve tab, before you begin to solder.
• Solder the whit wire to TIP (short terminal)
• Solder the black wire to SWITCH (longest terminal)
• Solder the shield wire to SLEEVE (strain relief)
• Leave the RING (middle length) unconnected.
Wiring Options with the Fishman Switchjack
The Switchjack T-R-S-S (Tip/Ring/Sleeve/Switch) stereo switching endpin jack
allows simultaneous stereo operation and battery switching for active pickups. This
new configuration simplifies stereo wiring with many pickup combinations that were
once incompatible.
To add a second pickup in stereo, connect the signal wire from the second pickup to the RING
(middle length( terminal.
INSTALL THE ENDPIN JACK
Follow this sequence when installing the endpin jack:
1 Large hex nut
2 Star washer
3 Large dress washer
4 Guitar end block
5 Small dress washer
6 Small dress nut
7 Strap button
After fitting the small dress washer and the dress nut over the end of the jack, insert
a 3/32” allen wrench through the cross drilled hole on the end of the jack. tighten
the nut with a 1/2” open end wrench while holding the jack in place with the allen
wrench. Thread and hand tighten the strap button.
Note that with the strap button in place, the end of the jack should protrude slightly
to allow proper plug fit.
MOUNT THE PREAMP
1 Angle the preamp 90° from the bezel and insert in the cut-out.
2 Fasten the screws with a #1 Phillips driver. Do not over tighten.
3 Install a 9 volt alkaline battery.
4 To keep the wires inside the guitar from rattling, secure the to the adhesive
backed plastic wire guides. Attach the wire guides to the sides or the kerfed lin-
ing of the instrument.
F
ISHMAN
®
P
REFIX
P
RO
/ P
RO
BLEND
P
REAMP
I
NSTALLATION
- C
ONTINUED
F
ISHMAN
T
RANSDUCERS
340-D Fordham Road Wilmington MA 01887 USA
Phone 978-988-9199 • Fax 978-988-0770 www.fishman.com
3-00 • 009-089-002
Black Wire
to Switch
White Wire
to Tip
Shield
to Sleeve
Black Wire
to Switch
White Wire
to Tip
Second Pickup
to Ring
Shield
to Sleeve