EasyManua.ls Logo

Flash MONOTRON 20 User Manual

Flash MONOTRON 20
6 pages
To Next Page IconTo Next Page
Page #1 background imageLoading...
Page #1 background image
F
Horloge de programmation journalière à 1
ou 2 canaux.
Permet de réaliser au maximum 20 horaires
de programmation ON ou OFF par jour.
Important : à la mise en service du MONO-
TRON 200, il est nécessaire de faire un RESET
pour vider la mémoire avant toute pro-
grammation. La touche RESET est acces-
sible à l’aide d’une pointe de stylo par
exemple (éviter tout objet pointu risquant
d’abîmer la touche).
PRESENTATION
D
Elektronische Tagesschaltuhr mit 1 oder 2
Kanälen.
Die MONOTRON ermöglicht die Speiche-
rung von 20 Schaltbefehlen ON oder OFF,
pro Tag.
Wichtig: nach der Inbetriebnahme und
vor der Programmierung, empfehlen wir
einen RESET, damit der Speicher geleert
wird: Knopf RESET zum Beispiel mit einem
Kugelschreiber drücken. Keinen zu spitzen
Gegenstand verwenden.
BESCHREIBUNG
GB
MONOTRON 200 is a 1 or 2 channel daily
time switch. The memory capacity allows
to program 20 switching actions (ON or
OFF), per day.
Warning : at the beginning of use, we
advise you to reset the MONOTRON 200 in
order to clear the memory before pro-
gramming. Use a pen to push the reset
button ; avoid using a sharp pointed
object.
PRESENTATION
Commutateur de sélection des
modes
= Mise à l’heure
C1 = Programmation canal 1
C2 = Programmation canal 2
AUTO = exploitation
MANU = commandes
manuelles ON ou OFF
permanentes ou temporisées
ON/OFF
➃ ➄
Défilement heures et
minutes
Validation des horaires de
programmation
Reset : mise à zéro générale
Affichage heures et minutes
Etat des canaux
Pour la version 2 canaux :
canal 1 à gauche
Schiebeschalter zur Modenauswahl
= Zeiteinstellung
C1 = Programmierung Kanal 1
C2 = Programmierung Kanal 2
AUTO = Betriebszustand
MANU = Handschaltung
ON oder OFF
Dauer oder Zeitschaltung
ON/OFF
➃ ➄
Zeitablauf (Stunden und
Minuten)
Speicherung oder Schaltbefehle
Reset: Speicher leeren
Zeitanzeige
Kanalzustandsanzeige
Für die 2-Kanal Ausführung:
Kanal 1 links
Selection of the modes
= Time setting
C1 = Programming channel 1
C2 = Programming channel 2
AUTO = running mode
MANU = permanent or timed manual
overrides
ON/OFF
➃ ➄
Scrolling hours and
minutes
Validation of the switching
actions
Reset
Display of the time
State of the channel
For the 2 channel version :
channel 1 on the left
channel 2 on the right
C 1
AUTO
MANU
off
enter
res
OFF
on
C 2
➂➃
Horloge électronique journalière MONOTRON 200
Elektronische Tageschaltuhr MONOTRON 200
Electronic daily time switch MONOTRON 200
GB
D
F
http://waterheatertimer.org/How-to-program-Hagar-timer.html
Question and Answer IconNeed help?

Do you have a question about the Flash MONOTRON 20 and is the answer not in the manual?

Flash MONOTRON 20 Specifications

General IconGeneral
BrandFlash
ModelMONOTRON 20
CategoryTimer
LanguageEnglish

Summary

Presentation of the Monotron 200 Timer

Selection of Modes

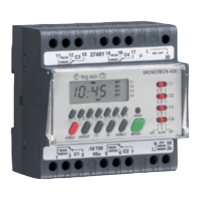
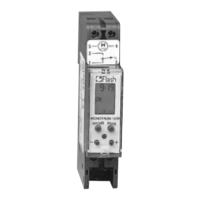
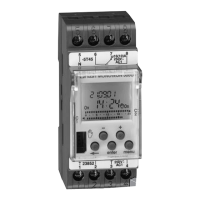
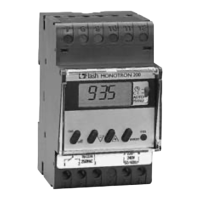
Selector for choosing between different operating modes.

Time Setting Mode

Mode for setting the current time on the device.

Programming Channel 1

Interface for programming the first output channel.

Programming Channel 2

Interface for programming the second output channel (if applicable).

Running Mode AUTO

Automatic operation mode as per programmed settings.

Manual Override Modes

Modes for manual ON/OFF control, permanent or timed.

ON/OFF Function Button

Button to manually switch the device ON or OFF.

Time Scrolling Function

Function to advance hours and minutes during setting.

Saving Switching Actions

Button to validate programmed time settings.

Reset Function

Button to reset all programmed data to factory defaults.

Time Display

Screen showing the current time and device status.

Channel Status Display

Indicator showing the ON/OFF state of the output channels.

Channel 1 Left Position

Indicates channel 1 is on the left side for dual-channel versions.

Time Setting Procedure

Time Setting Mode

Activating the mode to adjust the device's current time.

Inputting Hours and Minutes

Procedure to enter the desired hours and minutes for time setting.

Automatic Start After Setting

Device begins operation upon exiting time setting mode.

Programming Channel 1

First Switching Action

Setting the first ON or OFF command for channel 1.

Select Channel 1

Option to choose programming for channel 1.

Input Switching Time

Entering the specific time for the switching action.

Select ON or OFF

Selecting whether the action is to turn ON or OFF.

Confirm Input Data

Confirming the programmed switching time and action.

Channel 1 Subsequent Actions

Second Switching Action

Setting the second ON or OFF command for channel 1.

Input Switching Time

Entering the specific time for the second switching action.

Select ON or OFF for Second Action

Selecting ON or OFF for the second programmed action.

Confirm Second Action Data

Confirming the second programmed switching time and action.

Programming Following Actions

Procedure for programming subsequent actions.

Programming Channel 2

First Switching Action for Channel 2

Setting the first ON or OFF command for channel 2.

Select Channel 2

Option to choose programming for channel 2.

Programming Channel 2 Similar to Channel 1

Instructions for programming channel 2 mirror channel 1.

Automatic Running Mode

Activating Programmed Operation

Set the switch to AUTO to activate programmed schedules.

Display of Time and Channel State

Shows current time and the ON/OFF status of the channel.

Limitations in AUTO Mode

No manual control or programming possible; only RESET is active.

Reading Programmed Actions

Select Channel for Reading

Option to view programmed actions for channel 1.

Displaying Programmed Actions Sequentially

Pressing 'enter' sequentially shows all programmed switching actions.

Modifying or Cancelling Actions

Changing Switching Time

Procedure to alter the programmed time of an action.

Select Action for Modification

Refer to section 5 to select the action to modify.

Modify Switching Time

Step to change the specific time for a programmed action.

Confirm New Input Data

Validating the modified switching time.

Manual Override Modes

Permanent Override

Forcing the channel ON or OFF indefinitely.

Timed Override

Temporarily forcing the channel ON or OFF for a set duration.

Keeping Switch in MANU Mode

Ensuring the selector remains in the manual position.

Selecting ON or OFF State

Choosing the desired manual ON or OFF state for the channel.

Cancelling Permanent Override

Reverting to AUTO mode to cancel permanent manual control.

Setting Timed Override Duration

Determining the duration for the timed override.

Duration Input (Hours/Days)

Setting duration from 1 to 23 hours or 1 to 27 days.

Selecting Channel State for Timed Override

Choosing the ON or OFF state for the timed override.

Returning to AUTO Mode

Procedure to exit manual mode and resume automatic operation.

Cancelling Timed Override

Inputting '- h' in MANU mode and returning to AUTO to cancel.

Technical Characteristics and Installation

Technical Data

Supply voltage, running reserve, and switching current specifications.

Installation Instructions

Diagrams and steps for mounting and wiring the timer.

Wiring Diagram C1

Shows terminal connections for channel 1.

Wiring Diagram C2

Shows terminal connections for channel 2.

Channel 1 ON/OFF States

Table indicating the ON/OFF status for channel 1.

Channel 2 ON/OFF States

Table indicating the ON/OFF status for channel 2.

Related product manuals