Do you have a question about the Flex LW 1503 and is the answer not in the manual?
Explains warning symbols like DANGER, CAUTION, and NOTE used in the manual.
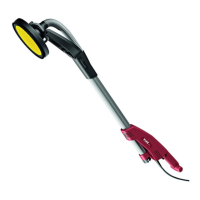
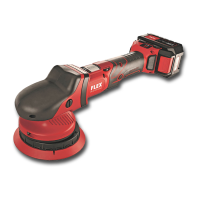
Defines the specific applications and intended purposes for the FLEX LW 1503 wet stone polisher.
Guidelines for maintaining a safe and clean work environment to prevent accidents.
Precautions for safe use of electrical power tools, including plugs, cords, and wet conditions.
Advice on staying alert, using personal protective equipment (PPE), and preventing unintentional starts.
Use the correct power tool for the application and avoid forcing it for optimal performance.
Ensures the power tool's switch operates correctly; faulty tools require repair.
Disconnect power before adjustments, accessory changes, or storage to prevent accidental starts.
Regularly check for damage and misalignment; repair before use to prevent accidents.
Keep cutting tools sharp and clean for better control and reduced binding.
Ensure safety by having the power tool serviced by qualified personnel using identical replacement parts.
Adhere to all safety warnings, instructions, and specifications for wet polishing operations.
Use only manufacturer-recommended accessories with matching speed and size ratings.
Inspect accessories for damage before each use and test at no-load speed.
Wear appropriate PPE, including eye protection, dust masks, and hearing protectors.
Keep bystanders at a safe distance and ensure they wear PPE.
Position the cord clear of the spinning accessory to prevent snagging or cutting.
Never lay the tool down until the accessory has completely stopped spinning.
Kickback is a sudden reaction to a pinched or snagged rotating accessory, causing uncontrolled tool movement.
Maintain a firm grip and proper body position to resist kickback forces effectively.
Keep hands away from accessories and avoid positioning your body in the tool's potential kickback path.
Use special care with corners and edges to avoid bouncing and snagging the accessory.
Tuck away or trim loose polishing bonnet attachment strings to prevent entanglement.
Warns about hazardous dust from construction activities and recommends exposure reduction methods.
Key safety symbols including 'Wear goggles!' and general references.
Definitions for technical symbols such as V (volts), Hz (hertz), A (amperes), n, no, and min-1.
Identifies the machine model as LW 1503.
Specifies the maximum diameter for polishing tools (125 mm).
Indicates the type of tool holder used, which is M14.
States the tool's operating speed in revolutions per minute (4400 RPM).
Specifies the maximum speed at the circumference of the tool (28.8 m/s).
Indicates the power consumption of the tool in Watts (800 W).
States the tool's mechanical output power in Watts (500 W).
Details the water supply connection type and maximum pressure (1/2", max. 6 bar).
Specifies the net weight of the tool without the power cord (2.4 kg).
Indicates the protection class (Class I) and the presence of a PRCD.
Instructions on how to attach the auxiliary handle for improved tool control.
Step-by-step guide for safely installing a polishing wheel onto the spindle.
How to connect the tool to the power supply using the integrated GFCI switch.
Essential checks before use, including testing the GFCI device for proper function.
How to regulate the volume of water by adjusting the shut-off valve.
Explains how water flows through the spindle port for wet operation.
Keep water away from electric parts; never use without water flow; avoid dry applications.
How to turn the tool ON by sliding the switch button forward.
Instructions on how to lock the switch in the 'ON' position and how to release it.
Guidance on using the tool for horizontal and vertical applications, avoiding excessive vertical use.
Steps from attaching the tool to contacting the work with light pressure.
Always lift the polisher off the work before starting or stopping the motor.
Use only accessories recommended by the manufacturer for safety.
Periodically clean air passages with compressed air; use a damp cloth for plastic parts.
Check GFCI, plug contact, fuses, and circuit breakers if the tool fails to start.
The gear housing should only be opened by an authorized service center to maintain warranty.
Brush inspection and replacement must be done by authorized service centers.
Take tool for cleaning, inspection, and lubrication after approx. 100 hours of use.
Details the one-year warranty for professional tools covering defects in workmanship or material.
Warranty does not cover misuse, abuse, normal wear, or unauthorized repairs.
Implied warranties of merchantability and fitness are limited to one year from purchase.
Provides contact information for Chervon North America for warranty inquiries.