STEP 3: RECORDING VIDEO
Press the Record button to start recording video to memory card. The LED
#1 will blink red to indicate active recording and the camera will beep. Press
the Record button again to stop recording video.
QUICK START GUIDE
PLEASE READ THE USER MANUAL FOR COMPLETE
PRODUCT INFORMATION. HAVE QUESTIONS?
DO NOT RETURN THIS PRODUCT TO THE STORE.
CALL OUR TOLL-FREE CONSUMER HELP LINE AT
866.667.7732 FOR ASSISTANCE WITH YOUR FLIR
DRONE PRODUCT.
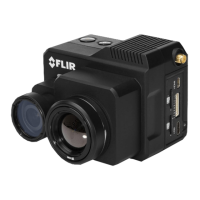
FLIR
DUO
STEP 1: POWER TO THE CAMERA
Plug an external power source into the mini-USB port on side of unit. A
USB battery, UAS power cable, or wall charger that outputs 5V ~0.5A all
work well. The camera has reverse polarity protection and accepts 5-26
Volts. Use the included Bench cable for initial power, display testing, and
configuration.
On initial power-up, LED #2 will flash red for approximately 15 seconds then
it will change to solid Blue; at this point LED #1 will flash yellow for about 5
seconds, then change to solid Green indicating the camera is ready for use.
LED #1 YELLOW–GREEN
MINI-USB
CONNECTOR
MICRO-HDMI
CONNECTOR
LED #2 RED–BLUE
STEP 4: RETRIEVE RECORDINGS
Connect the USB cable to a computer to view SD card as a mass storage
device and retrieve files as you normally would. Note that Duo cannot
record when connected to a computer. Duo will encode the date and
timestamps as part of file name after syncing its clock with the mobile app.
STEP 2: DISPLAY VIDEO
Duo can display either analog or digital
video. To display analog video to a monitor
or television, use the yellow RCA plug on the
supplied Bench Cable to connect Duo to the
monitor’s video input.
For digital video, power the camera as
described in Step 1 and connect Duo to an
HDMI display through the micro-HDMI camera
port. This will automatically disable the analog
video output and turn on the HDMI output.
P/N: 436-0100-01-00S
LED #1 BLINKS RED
RECORD BUTTON
MICRO SD CARD SLOT
SPEAKER