EN-US English
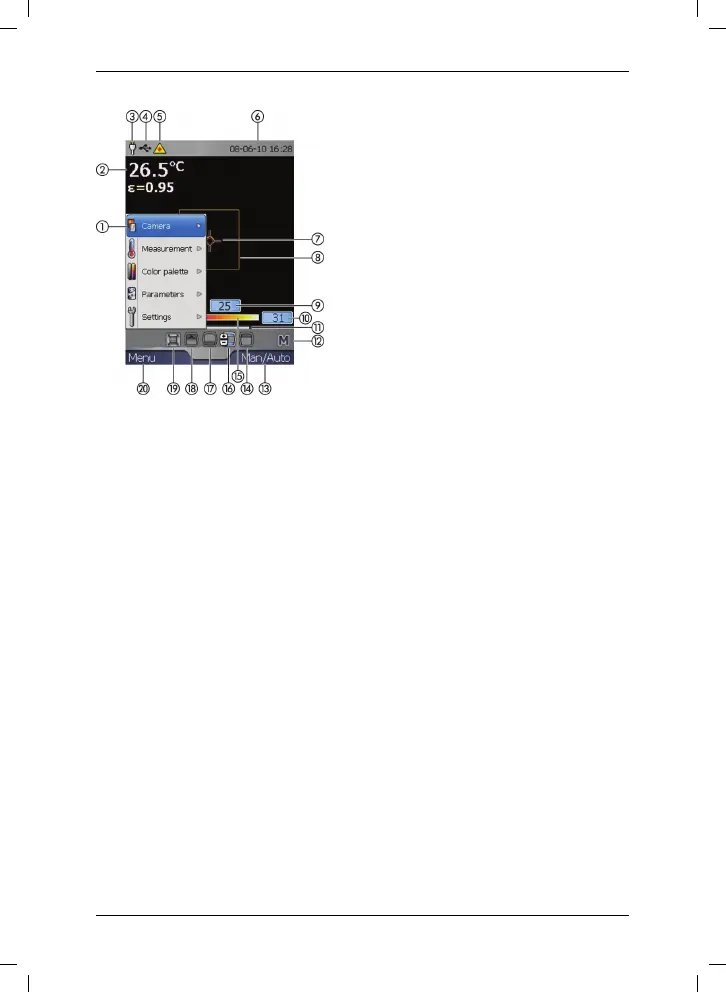
14. Tool to change the maximum
Screen elements
temperature.
15. Temperature scale.
16. Tool to change the maximum and
minimum temperature at the same
time.
17. Tool to change the minimum
temperature.
18. Tool to set an isotherm.
19. Tool to resize the Picture-in-Picture
area.
20. Current function for the left selection
button.
Quick Start Guide
Follow this procedure to start
immediately:
1. Charge the battery for 4 hours before
you start the camera for the first time.
Note: Some of these screen elements
are mutually exclusive.
• You can charge the battery in the
1. Menu system.
stand-alone battery charger, or by
2. Measurement results table, including
connecting the power supply cable
information about the emissivity
directly to the battery.
value.
• When the green light of the battery
3. Power indicator. When the camera is
condition indicator is continuous,
powered using a battery, a battery
the battery is fully charged.
level indicator is displayed.
2. Insert the battery into the battery
4. USB™ indicator. This indicator is
compartment.
displayed when the camera is
3. Insert a memory card into the
connected to a computer using a
memory card slot.
USB™ cable.
4. Push the on/off button to turn on the
5. Laser pointer indicator. This indicator
camera.
is displayed when the laser pointer is
5. Remove the lens cap.
activated.
6. Aim the camera toward your target of
6. Date and time.
interest.
7. Measurement spot.
7. Focus the camera by rotating the
8. Measurement area.
focus ring.
9. Limit value for an isotherm in the
8. Pull the trigger to save the image.
temperature scale.
9. To move the image to a computer, do
10. Limit value for the temperature scale.
one of the following:
11. Temperature span indicator.
• Remove the memory card and
12. Indicator for automatic or manual
insert it into a card reader
mode (A/M).
connected to a computer. An
13. Current function for the right selection
button.
© 2010, FLIR Systems AB. All rights reserved worldwide.
29
Publ. no. T559048, rev. 004
 Loading...