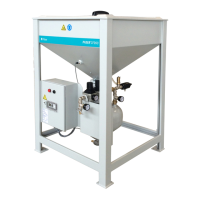
27. Position the gasket around the center of the vessel opening.
28. An assistant is required for this step. Position the vessel under the pinch valve,
and then attach it to the pinch valve with four M16 screws.
29. Evenly tighten the four M16 screws. The gap between the vessel flange and the
lower pinch valve flange must be even after all of the screws are tight.
30. Install the new coupling in the vessel.
31. Attach the pneumatic manifold to the vessel coupling.
32. Install the two screws that attach the tubing support to the sheet metal.
33. Install the abrasive hoses and the air hoses to the vessel, pinch valve, and
pneumatic controls.
34. Connect the cables to the sensors and solenoids.
CAUTION! Wear safety glasses at the beginning of the test cycle
and remain clear of the pinch valve.
35. Connect the air source to the ADS.
36. Gradually increase air pressure of PR1 to 5.5 bar (80 psi) and then do a check for
leaks.
37. Set PR2 to 2.8 bar (40 psi), and then do a check for leaks.
38. If PR1 and PR2 were set to pressures different from what is specified on the
regulator labels, set PR1 and PR2 to their previous settings.
39. Fill the silo with abrasive.
40. Remove the lockout from the power switch.
© 2016–2017 Flow International Corporation