3. OPERATION
DANGER! Risk of physical injury!
Cut injury when the blade turns or the
product starts accidentally.
v Wait for the blade to stop, disconnect the
product from the mains and use gloves before
you connect or adjust the product.
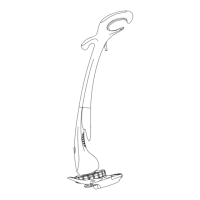
To use the lawnmower with the grass box [ Fig. G / H ]:
Fitting fully assembled grassbox to lawnmower:
1. Lift safety flap (G1).
2. Make sure the discharge chute is clean and free from
debris (G2).
3. Locate fully assembled grassbox onto 2 location
points (G3) at the rear of the deck as illustrated
in Fig. H.
4. Locate safety flap onto the top of the grassbox.
Ensure the grassbox is securely located.
• IMPORTANT!
AFTER FITTING ENSURE NO GAP REMAINS
BETWEEN THE SAFETY FLAP AND THE
GRASSBOX.
• Removal is the reverse procedure.
• For larger areas of grass where grass collection is not
required you can use your lawnmower without the
grassbox. Ensure the Safety Flap is fully closed. The
design of the safety flap permits the cut grass to be
discharged downward behind the machine.
To adjust the cutting height [ Fig. J / K ]:
• Height of cut is adjusted by raising or lowering the front
and rear wheels.
• There are five heights of cut on this product.
• NOTE:
A medium height of cut is recommended for most
lawns. The quality of your lawn will suffer and collection
will be poor if you cut too low.
Cutting height Wheel position
Low Front position 2 cm
Rear position 2 cm
Low to Medium Front position 2 cm
Rear position 4 cm
Medium Front position 4 cm
Rear position 4 cm
Medium to High Front position 4 cm
Rear position 6 cm
High Front position 6 cm
Rear position 6 cm
To start the lawnmower [ Fig. L / M / N ]:
DANGER! Risk of injury!
Risk of injury if the product does not stop
when you release the start levers.
v Do not bypass the safety devices or switches.
For example do not attach the start levers to the
handle.
The product is fitted with a two-handed safety
device (start levers with lock-off button (L1))
to prevent the product from being turned on by
accident.
To start:
v Connect plug to mains and switch on.
1. Press and hold the lock-off button (L) on the switchbox,
then squeeze one of the start / stop levers towards the
upper handle (M).
2. Continue to squeeze the start / stop lever towards the
upper handle and release the lock-off button (N).
3. Lower the lawnmower to its proper operating position
and commence mowing.
• NOTE: There are two start / stop levers fitted. Either
one can be used for starting the lawnmower.
2. Place the washer (B1) and the wing knob (B2) on to
the bolt and tighten the wing knob. It may take
20 – 25 turns to fully tighten on initial assembly.
3. Repeat on the other side.
To assemble the upper handles to the lower handles
[ Fig. C ]:
1. Ensure the upper handle is located correctly with the
lock-off button on the switchbox uppermost.
2. Ensure the upper handle (C1) and the lower handle (C2)
are aligned correctly.
4. Fit the bolts (C3), washers (C4) and wing knobs (C5).
Tighten the wing knob.
5. Fit the cable to the handles with the clips provided.
Make sure the cable is not trapped between the upper
and lower handles.
To assemble the grassbox [ Fig. D / E / F ]:
1. Slide the grassbox tongue into the slots in the grassbox
lower until it clicks securely into position (D).
2. Push the grassbox handle into the slots in the grassbox
upper until it clicks securely into position (E).
3. Starting at the rear of the grassbox, locate the grassbox
upper into the grassbox lower by aligning the clips (F1).
Ensure all clips are correctly located (F2) before clicking
into position.
4. Clip the two halves together, ensuring all clips are
securely connected.
8
21032-85.960.01.indd 821032-85.960.01.indd 8 20.09.21 14:2820.09.21 14:28