Do you have a question about the Flymo Mini Trim Contour XT and is the answer not in the manual?
Explains the meaning of symbols displayed on the product for user safety and product understanding.
Provides essential safety rules and guidelines for operating the trimmer, including user responsibilities.
Details precautions for safe use with electricity, avoiding shocks, and handling damaged cables.
Ensures the trimmer is in safe working condition by checking for wear, damage, and correct part fitment.
Key guidelines for safe and effective operation, including handling, cutting, and stopping procedures.
Important warnings about keeping clear of the cutting means and avoiding hazards from thrown objects.
Ensures the trimmer remains in safe working order through regular tightening of parts and replacement of worn items.
Provides advice on storing the trimmer safely in a cool, dry place, out of reach of children.
Details required dimensions and ratings for extension cables to ensure safe and efficient operation.
Instructions and warnings regarding the replacement of the mains plug, emphasizing double insulation.
Guides on connecting the lower and upper shaft sections of the trimmer for proper assembly.
Instructions for fitting the wheels to the trimmer head, ensuring they are securely attached and rotate freely.
Details on how to correctly attach the safety guard to the cutting head, ensuring it is securely locked.
Provides guidance on holding the trimmer, starting, cutting, and stopping for effective grass trimming.
Explains how to convert the trimmer to edging mode and line up for precise lawn edging.
Instructions on how to remove and securely refit the spool cap for line replacement.
Guides on fitting new spool and line, or manual nylon line, ensuring correct winding for optimal performance.
Details on how to clean the trimmer after use, emphasizing avoiding water and using appropriate tools.
Guidance on the responsible disposal of the product as electronic waste and its recycling.
Advice on recommended service intervals for maintaining product performance and longevity.
Outlines the terms and conditions of the product guarantee and exclusions for covered failures.
This document contains user manuals for two products: the Flymo Glider Compact 330AX Electric Hover Collect Lawn Mower and the Flymo Contour XT Electric Grass Trimmer and Edger.
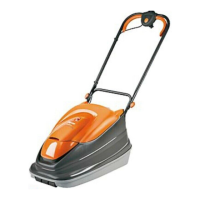
This is an electric hover collect lawn mower designed for domestic use. Its primary function is to cut grass and collect the clippings into a grass box. The hover design allows the mower to glide over the lawn, making it easier to maneuver across uneven surfaces.
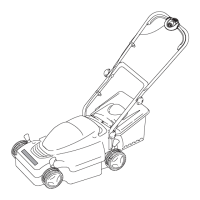
Usage Features: The mower requires self-assembly, with clear instructions provided for each step. Users begin by placing the lawnmower base on a flat surface and aligning the handle support. The handle support is then raised to an upright position until it rests vertically. The bumper is aligned with the lawnmower base, ensuring the dial on the bumper is set to position 1, and then pushed firmly into place until it clicks.
The lower handle is attached to the handle support using pins and R-clips, ensuring correct orientation. The upper handle is then secured to the lower handle with bolts, washers, and wing nuts. Cable clips are used to secure the power cable to the handles, preventing it from interfering with operation.
The grass box assembly involves attaching the handle to the grass box lid, and then securing the lid to the grass box lower. A chute is attached to the rear of the grass box to direct clippings. Finally, the grass box window is attached to the main mower body.
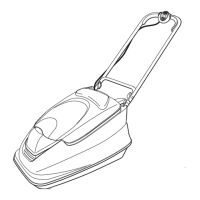
The mower is designed for ease of use with foldable handles, which aid in compact storage. The grass box includes a vision window, allowing users to monitor the fill level of clippings without stopping the mower. The orange color scheme provides high visibility.
Maintenance Features: While specific maintenance instructions for the mower itself are not detailed in this excerpt, the assembly process implies that components are designed for straightforward attachment and detachment, which would facilitate cleaning or part replacement if needed. The foldable handles also contribute to easier storage and potentially less wear and tear during transport.
This is an electric grass trimmer and edger designed for maintaining lawn edges and trimming grass in hard-to-reach areas. It features a dual function, allowing it to switch between trimming and edging modes.
Usage Features: Before use, users are advised to read the instructions carefully, wear eye protection, substantial footwear, and long trousers. The trimmer should not be operated barefoot or with open sandals. It's crucial to inspect the area to be cut for objects like stones, glass, nails, or wire that could be thrown or entangled. The cutting head should also be checked for correct fitting.
The trimmer is equipped with a Plant & Tree Guard, which can be flipped down to protect plants and trees from the cutting line while trimming close to them.
To trim, the user holds the trimmer as illustrated, squeezes the safety lock-off/switch lever to start, and cuts with the nylon line at an angle, taking small cuts. The trimmer should be swung in and out of the cutting area. The line feeds out automatically when the trimmer head stops rotating and returns to operating speed. Extra line can also be fed out manually. To stop, the switch lever is released.
For edging, the head is twisted by pressing a button until an audible "click" confirms it's locked into edging mode. The edger is then rested on its wheel for stability, aligning the lawn edge with the indicators on the guard. Edging should be done in the direction indicated. To return to trimming mode, the button is pressed, and the head is twisted back until it clicks.
The automatic line feed system works by feeding out a small length of line when initially switched on. A "clattering" noise is normal as the lines hit the line cutter, and this noise will reduce as the motor reaches full speed. If the noise isn't heard, more line may need to be fed out by stopping and restarting the motor. Manual line feed is also possible by pressing and releasing the manual line feed button and gently pulling on the lines until they reach the line cutter.
Maintenance Features: Regular maintenance is crucial for safe operation. Users should keep all nuts, bolts, and screws tight and replace worn or damaged parts for safety. Only the specified replacement cutting line should be used, along with other replacement parts and accessories recommended by Husqvarna UK Ltd.
After any maintenance involving the cutting line, the product must be returned to its normal operating position before switching on. The unit should be cleaned with a dry cloth; water, cleaning fluids, or solvents should not be used. Debris should be removed from around the inside of the safety guard, the cutting head, and the motor housing air vents using a soft brush.
The cutting head components, including the spool cap and spool, can be removed for cleaning and line replacement. The spool cap is removed by pressing and holding two release latches and pulling it away. When refitting, all areas of the cap and spoolholder must be clean, and the cap should be pressed firmly down until securely located.
To replace the nylon line, old spools are removed, and new spools are placed into the spoolholder, aligning cut-out areas with eyelets. Line is released from the cleat and fed through the eyelet. For fitting nylon line only, users must remember to use only 1.5mm genuine Flymo nylon line and wind it onto the upper section of the spool first, ensuring it's neatly coiled.
The product should be stored in a cool, dry place, out of reach of children, and not outdoors. It should be allowed to cool for at least 30 minutes before storage. The mains cable can be stored on the product, wound carefully to avoid kinking. Users are advised to inspect the cable for damage or aging before winding it for storage and to replace damaged cables with genuine Flymo replacement cables.
A fault-finding chart is provided to help diagnose common issues such as line not feeding, continuous clattering, line snaps, or the wheel stopping. This chart guides users through checks and corresponding actions, including manually feeding line, cleaning components, rewinding line, or contacting customer service.
| Power source | AC |
|---|---|
| Cutting width | 250 mm |
| Grass catcher | Yes |
| Product color | Black, Orange |
| Maximum lawn area | - m² |
| Mulching function | - |
| Sound power level | 81 dB |
| Minimum cutting height | - mm |
| Depth | 290 mm |
|---|---|
| Width | 260 mm |
| Height | 960 mm |
| Weight | 2100 g |
| Package weight | 2800 g |