5. STORAGE
To put into storage:
The product must be stowed away from children.
1. Disconnect the mains cable.
2. Clean the product (see 4. MAINTENANCE).
3. Stow the product in a dry area where it has protection
from frost.
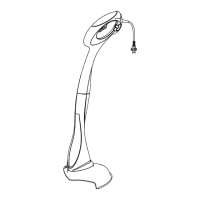
Recommendation:
The product can be hung up by the handle. The cutting
head is not put under too much strain if the product is
stowed hanging up.
Disposal:
(in accordance with RL2012/19/EC / S.I. 2013 No. 3113)
The product must not be disposed of to normal
household waste. It must be disposed of in line
with local environmental regulations.
IMPORTANT!
v Dispose of the product through or via your municipal
recycling collection centre.
Problem Possible Causes Remedy
Filament is to short or trimmer
vibrates
Filament not fed out and visible.
v Pull the filament until it reaches the
filament limiter
Filament not removed from the cleat.
v Remove the filament from the cleat.
Filament is jammed on the filament
cassette.
v Rewind the filament to remove
crossed loops. Check that the fila-
ment is neatly winded. If it does not
help change the filament cassette.
Filament is broken inside the filament
cassette.
v Replace the cutting filament.
6. TROUBLESHOOTING
DANGER! Risk of physical injury!
Cut injury when the product starts
accidentally.
v Before you troubleshoot the product, make sure
that the mains cable is disconnected.
Customer Service. You can buy either a Replacement
Filament Cassette or the Cutting Filament only.
For Mini Trim ET21 Art. 9676944:
FLYMO Filament Cassette and Cutting Filament
Reference no.: FLY031 Part no.: 513106090
To replace the filament cassette [Fig. M3/O6]:
1. Push and hold the two latches
w
.
2. Remove the cassette cover.
3. Remove the old filament cassette
t
.
4. Remove all dirt in the cassette holder
i
.
5. Release the filament
5
from the cleat
ß
C
of the new
filament cassette
t
.
6. Pull approximately 10 cm of the filament
5
out of the
filament cassette
t
through the hole
u
in the cassette
holder
i
.
7. Put the filament cassette
t
into the cassette holder
i
.
Make sure, the filament is not caught and the latches
w
are locked in the latches
o
.
8. Check that the filament cassette
t
is correctly
locked (Try to remove the filament cassette
t
without to push the latches
w
).
To replace the cutting filament [Fig. M4/M5]:
1. Remove the filament cassette
t
.
2. Remove all dirt in the cassette holder
i
.
3. Take approximately 5 meters of the filament
5
and
insert it into one of the filament lock holes
p
in the
filament cassette
t
.
4. Wind the filament
5
onto the filament cassette
t
in
the direction of the arrows on the top of the filament
cassette
t
.
Make sure, the filament
5
is neatly winded on the
filament cassette
t
.
5. Replace the filament cassette
t
.
6
41121-85.960.01.indd 641121-85.960.01.indd 6 20.09.21 11:3820.09.21 11:38