2.4 Maintenance and storage
a) When the machine is stopped for servicing, inspec-
tion, or storage, or to change an accessory, shut off
the power source, disconnect the machine from the
supply and make sure that all moving parts are come
to a complete stop. Allow the machine to cool before
making any inspections, adjustments, etc. Maintain
the machine with care and keep it clean.
b) Store the machine in a dry place out of the reach of
children.
c) Always allow the machine to cool before storing.
d) When servicing the shredding means be aware that,
even though the power source is switched off due to
the interlock feature of the guard, the shredding
means can still be moved.
e) Replace worn or damaged parts for safety. Use only
genuine replacement parts and accessories.
f) Never attempt to override the interlocked feature of the
guard.
2.5 Additional safety instructions for units with
bagging attachments
Switch-off the machine before attaching or removing the
bag.
2.6 Recommendation
The machine should be supplied via a residual current
device (RCD) with a tripping current of not more than
30 mA.
Additional safety warnings
Danger! Small parts could be swallowed during assembly
and there is a risk of suffocation from the polybag. Keep
infants away during assembly.
Warning! This product produces an electro magnetical
field during operation. This field may under some
circumstances interfere with active or passive medical
implants. To reduce the risk of serious or fatal injury, we
recommend persons with medical implants to consult
their physician and the medical implant manu facturer
before operating this product.
2. ASSEMBLY
WARNING! Risk of physical injury!
Cut injury when the impeller turns or the
product starts accidentally.
v Wait for the impeller to stop, disconnect the
product from the mains and use gloves before
you do assembly.
To assemble for blower use:
To fit the blower tube [ Fig. A1 ]:
NOTE: A safety switch will prevent the product from start-
ing if the blower tube
1
is not installed correctly.
1. If the collection bag is assembled, remove the collection
bag.
2. Align the grooves on the blower tube
1
with the
grooves on the blower outlet
2
.
3. Push the blower tube
1
onto the blower outlet
2
until it
snaps into place.
The blower tube is secured to the blower outlet with the
tube release button
3
.
To remove the blower tube
1
, push the tube release but-
ton
3
and pull out the blower tube
1
at the same time.
To fit the intake cover [ Fig. A2 ]:
NOTE: A safety switch will prevent the product from start-
ing if the intake cover
4
is not latched closed.
1. If the vacuum tube is assembled, remove the vacuum
tube.
2. Put the intake cover
4
on the lower opening of the
garden blower and turn the intake cover
4
clockwise
up to the stop (bayonet fastening).
3. Tighten the fastening screw
5
.
To remove the intake cover
4
, loosen the fastening screw
5
,
turn the intake cover
4
anti-clockwise and remove it.
To assemble for vacuum use:
To fit the vacuum tube [ Fig. A3 / A4 ]:
WARNING! Do not use the vacuum
6
unless the lower
tube
ß
6b
is fitted to the upper tube
ß
6a
.
1. If the intake cover is assembled, remove the intake
cover.
2. Align the seams of the lower tube
ß
6b
and upper tube
ß
6a
.
3. Push the tubes
ß
6a
/
ß
6b
together until they are fully
engaged.
NOTE: A safety switch will prevent the product from start-
ing if the vacuum tube
6
is not installed correctly.
4. Put the vacuum tube
6
on the lower opening of the
garden vacuum and turn the vacuum tube
6
clockwise
up to the stop (bayonet fastening).
5. Tighten the fastening screw
5
.
To remove the vacuum tube
6
, loosen the fastening
screw
5
, turn the vacuum tube
6
anti-clockwise and
remove it.
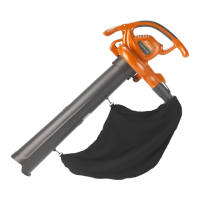
To attach the collection bag [ Fig. A5 ]:
NOTE: A safety switch will prevent the product from start-
ing if the elbow tube
7
is not installed correctly.
1. If the blower tube is assembled, remove the blower
tube.
2. Align the grooves on the elbow tube
7
with the grooves
on the blower outlet
2
.
3. Push the elbow tube
7
onto the blower outlet
2
until it
snaps into place.
The collection bag is secured to the blower outlet with
the tube release button
8
.
4. Clip the collection bag
9
into both loops
0
on the
vacuum tube
6
.
5
51300-85.960.01.indd 551300-85.960.01.indd 5 07.09.21 11:1507.09.21 11:15

 Loading...