EasyManua.ls Logo

FoodSaver V2220 User Manual

FoodSaver V2220
6 pages
To Next Page IconTo Next Page
Page #1 background imageLoading...
Page #1 background image
Tips
Tips for Successful Vacuum Packaging
For more usage tips and safety information, please refer to the FoodSaver Reference Guide or visit our website at www.foodsaver.com.
Tips on Sealing a Bag
Make sure you’ve securely latched the
appliance lid. When making a bag from a roll, place
bag material on Sealing Strip (I), close lid and make
sure to use the Latch (D) to lock lid. Then press Seal
Button (O).
Prevent moisture or liquid from being pulled into the
Vacuum Channel or trapped in the seal. Either pre-freeze
moist food such as raw meat for 1-2 hours before
vacuum packaging, or place a folded paper towel
between food and end of bag to absorb excess liquids.
Just be sure to leave at least 3 inches between paper
towel and end of bag so that bag seals properly with
paper towel inside.
Make sure you give appliance time to cool down. Wait
at least 20 seconds between seals. Under very heavy
usage, appliance will shut off automatically to prevent
overheating. If it does, wait 20 minutes to allow
appliance to cool off.
Tips on Removing Air from a Bag
Make sure you’ve securely latched the
appliance lid. When vacuuming and sealing a bag or
canister, make sure the Latch (D) is in the locked
position.
Check for wrinkles in the bag along the Sealing Strip.
Wrinkles in seal may cause leakage and allow
air to come back into bag. Check for wrinkles in bag
along Sealing Strip (I) before closing lid and vacuum
packaging. If you find wrinkles after sealing bag, simply
cut bag open and vacuum package again.
If motor runs for more than 30 seconds
without stopping, you may need to adjust bag and try
again. If you are making the initial seal on a piece of
bag material with two open ends, make sure bag is
placed on Sealing Strip. If you are vacuum packaging
with a bag, make sure open end is placed down
inside Vacuum Channel and make sure Accessory
Hose is not attached. If you are vacuum packaging
with an accessory, check Accessory Hose in appliance
lid and in accessory to ensure a tight fit.
Tips on Storage
Always store appliance with the Latch in the unlocked
position.
Question and Answer IconNeed help?

Do you have a question about the FoodSaver V2220 and is the answer not in the manual?

FoodSaver V2220 Specifications

General IconGeneral
TypeVacuum Sealer
ModelV2220
BrandFoodSaver
ColorBlack
Weight4.5 pounds
Power120 watts
Voltage120V
Sealing MethodHeat Seal
Bag CompatibilityFoodSaver Bags and Rolls
OperationAutomatic
Power SourceElectric
Included AccessoriesStarter kit with bags

Summary

Tips on Sealing a Bag

Tips on Removing Air from a Bag

Tips on Storage

General Tips

Features of Your FoodSaver Appliance

Advanced Design Features

Adjustable Food Settings

Select food type to optimize seal: Dry for normal time, Moist for juicy foods.

Accessory Port

Port to attach accessory hose for vacuum packaging canisters and accessories.

Vacuum & Seal Button

Button for vacuuming, sealing, or canceling the process.

Canister Vacuum Button

Button to achieve best vacuum for canisters and accessories on specific models.

Seal Indicator Light

Indicates sealing process engagement or errors.

CrushFree™ Instant Seal Button

Stops vacuum and seals bag, prevents crushing delicate items.

Getting Started

How to Make a Bag from a FoodSaver Roll

Steps for cutting bag material and creating a sealed bag from a roll.

How to Vacuum Package with FoodSaver Bags

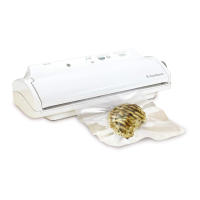
Instructions for placing food in a bag and vacuum packaging.

FoodSaver Accessories

FoodSaver Accessory Guidelines

General guidelines for using FoodSaver accessories and ensuring proper sealing.

How to Vacuum Package with FoodSaver Accessories

Steps for vacuum packaging using various FoodSaver accessories.

How to Open FoodSaver Accessories after Vacuum Packaging

Methods for releasing vacuum and opening different types of FoodSaver accessories.

Related product manuals