4
EN
7. Self-calibration
8. Video recording
9. Headless mode
10. LED
11. Lever used to control fl ight direction (forward – backwards, left – right), 360 stunts
12. Automatic landing
13. Smartphone holder
14. Drone fl ight calibration (left – right, forward – backwards)
15. Remote battery socket
After turning the remote on, the power LED lights up red. Slow fl ashing of the LED means weak
battery. Fast fl ashing means searching for frequency (connecting with the drone).
Remote controller batteries
– Use only AAA batteries;
– Batteries must be installed in accordance with markings in the socket;
– Remove batteries from the remote when it is not used.
– The fl ight time will be shortened when the remote is not suffi ciently supplied.
– Do not throw the batteries into fi re. Protect batteries against overheating.
– Protect the batteries against mechanical damage.
– Hand over used batteries to batteries collection points. Do not dispose of batteries and elec-
tronics with municipal solid waste.
Insuffi cient power supply may also cause diffi culties with start, control or fl ight altitude
of the device.
Installation of batteries in the remote controller
1. Unscrew the battery cover locking screw;
2. Open the battery socket cover;
3. Install 3 AAA alkaline batteries in accordance with markings in the socket;
4. Close the battery cover;
5. Secure the battery cover with a screw;
Warning! The batteries must be of the same type and the same charge level. If the drone is
unused for a longer period, remove batteries from the remote.
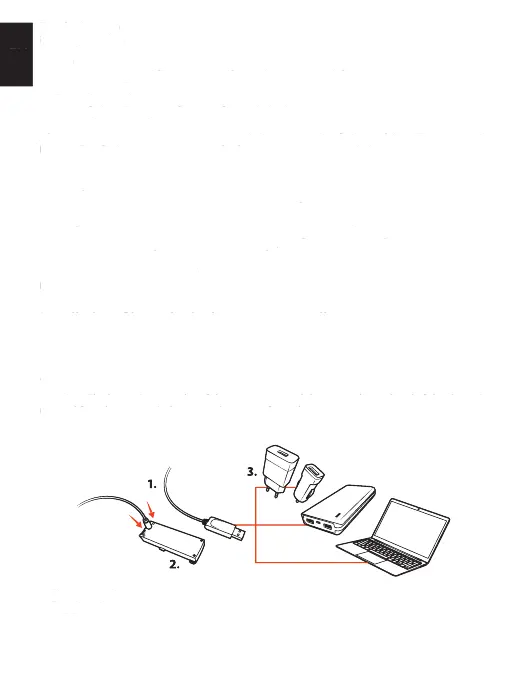
Drone batteries charging
1. Charging cable
2. Flex drone battery
3. USB 5 V DC power supply source
– Before charging a battery, remove it from the drone.
– If the battery is hot, before charging, wait until it cools down.
11. Lever used to control fl ight direction (forward – backwards, left – right), 360 stunts
14. Drone fl ight calibration (left – right, forward – backwards)
15. Remote battery socket
After turning the remote on, the power LED lights up red. Slow fl ashing of the LED means weak
battery. Fast fl ashing means searching for frequency (connecting with the drone).
Remote controller batteriesRemote controller batteries
– Use only AAA batteries;
– Batteries must be installed in accordance with markings in the socket;
– Remove batteries from the remote when it is not used.
– The fl ight time will be shortened when the remote is not suffi ciently supplied.
– Do not throw the batteries into fi re. Protect batteries against overheating.
– Protect the batteries against mechanical damage.
– Hand over used batteries to batteries collection points. Do not dispose of batteries and elec-
tronics with municipal solid waste.
Insuffi cient power supply may also cause diffi culties with start, control or fl ight altitude
Installation of batteries in the remote controllerInstallation of batteries in the remote controller
1. Unscrew the battery cover locking screw;
2. Open the battery socket cover;
3. Install 3 AAA alkaline batteries in accordance with markings in the socket;
4. Close the battery cover;
5. Secure the battery cover with a screw;
Warning! The batteries must be of the same type and the same charge level. If the drone is
unused for a longer period, remove batteries from the remote.
Drone batteries chargingDrone batteries charging
3. USB 5 V DC power supply source
– Before charging a battery, remove it from the drone.
– If the battery is hot, before charging, wait until it cools down.
 Loading...