EasyManua.ls Logo

Fox 34 Float 29 - User Manual

Fox 34 Float 29
4 pages
Print Icon
To Next Page IconTo Next Page
Loading...
34 FLOAT 29
Installing Your Fork | Before You Ride | Setting Sag | Adjusting Rebound | Climb. Trail. Descend. | Adjusting Trail Mode | Service Intervals | Important Safety Information
travel
5.5 in./140 mm
5.9 in./150 mm
model
features,
adjustments
Factory FIT CTD with Trail Adjust; 140,
150: Kashima coated or hard anodized
upper tubes, 1.5" tapered steerer, lever
actuated 3-position Climb/Trail/Descend, 3-
position Trail Adjust, air spring pressure,
rebound
Factory FIT CTD Remote; 140, 150:
Kashima coated or hard anodized upper
tubes, 1.5" tapered steerer, remotely
actuated 3-position Climb/Trail/Descend, air
spring pressure, rebound
Performance FIT CTD; 140, 150: Hard
anodized upper tubes, 1.5" tapered steerer,
lever actuated 3-position Climb/Trail/
Descend, air spring pressure, rebound
Evolution O/C CTD Remote; 140, 150:
Hard anodized upper tubes, 1.5" tapered
steerer, remotely actuated 3-position Climb/
Trail/Descend, air spring pressure, rebound
Evolution O/C CTD; 140, 150: Hard
anodized upper tubes, 1.5" tapered steerer,
lever actuated 3-position Climb/Trail/
Descend, air spring pressure, rebound
lower leg
15QR thru axle system, post style disc brake
mounting
spring air
riding style trail, AM
Installing Your Fork
Be sure your fork is properly installed before proceeding. If your fork came pre-installed on your bicycle, continue to the next section.
Before You Ride
1. Check that quick-release levers are properly adjusted and tightened.
2. Clean the outside of your fork with only mild soap and water, and wipe dry with a soft dry rag. NOTE: Do not use any solvents or de-greasers, as these products can cause serious
damage to paint and anodized parts (upper tubes, knobs, steerers).
Do not spray water directly on the seal/upper tube junction. Do not use a high pressure washer on your fork.
3. Inspect the entire exterior of your fork. The fork should not be used if any of the exterior parts appear to be damaged. Contact your local dealer or FOX Racing Shox for further inspection
and repair.
4. Check your headset adjustment. If loose, adjust it accordingly to your bicycle manufacturer's recommendations.
5. Check that all brake cables or hoses are properly fastened.
6. Test the proper operation of your front and rear brakes on level ground.
Setting Sag
To get the best performance from your fork, it is necessary to set the proper air spring pressure by adjusting sag. Generally, sag should be set to 15-25% of total fork travel.
1. Unscrew the blue aircap on top of the left fork leg to expose the Schrader valve.
2. Attach a FOX Racing Shox High Pressure Pump to the Schrader valve.
3. Pump your fork to the appropriate setting from the Suggested Air Spring Pressure Settings table below, then remove the pump. TIP: Use your air spring PSI value in "34 FLOAT 29" only
as a starting point. Discovering your best sag value is a process that takes some time to fully discover, given your riding style, bike geometry, total weight, and suspension feel
preferences.
4. Unless your fork already has a sag setting o-ring on an upper tube, install a zip tie to an upper tube. Slide the o-ring or the zip tie down against the scraper lip of the fork dust seal.
5. Make sure your fork is in Descend mode (fully counter-clockwise).
6. Dressed to ride, position your bike next to a wall or table to support yourself. Without bouncing, mount your bicycle. Assume a normal riding position for at least 30 seconds, allowing the
suspension to fully settle.
7. Dismount your bike without bouncing downward, without further moving the o-ring or zip tie. Measure the distance between the seal and the zip tie. This measurement is your sag value.
8. Compare your actual sag value to your target sag value in the Sag Setup table below.
If your sag value is less than the table value, screw on the pump tting, note the current air pressure setting and depress the black bleed-valve to reduce the gauge pressure by 5 psi.
Measure sag again and repeat this adjustment, if necessary.
If your sag value is greater than the table value, screw on the pump tting, note the current air pressure setting and pump to increase the gauge pressure by 5 psi. Measure sag again
and repeat this adjustment if necessary.
9. Screw the blue aircap back on.
10. Rider
Weight
lbs.
11. Suggested Air Spring Pressure Settings
PSI
12. 140 mm 13. 150 mm
14. 125 15. 45 16. 40
17. 125 - 135 18. 50 19. 45
20. 135 - 145 21. 55 22. 50
23. 145 - 155 24. 65 25. 60
26. 155 - 170 27. 70 28. 65
29. 170 - 185 30. 75 31. 70
32. 185 - 200 33. 80 34. 80
35. 200 - 215 36. 90 37. 90
38. 215 - 230 39. 100 40. 100
41. 230 - 250 42. 110 43. 110
44.
45. Sag Setup
46. Travel 47. XC/Race FIRM 48. All-Mountain PLUSH
49. 140 mm (5.5") 50. 21 mm (0.83") 51. 35 mm (1.38")
52.
53. Sag Troubleshooting
54. Symptom 55. Remedy
56. Too much sag 57. (+) air pressure in 5 psi increments
58. Too little sag 59. (-) air pressure in 5 psi increments
60. Excessive bottoming 61. (+) air pressure in 5 psi increments
62. Harsh ride; full travel not utilized 63. (-) air pressure in 5 psi increments

Questions and Answers

Summary

Installing Your Fork

Before You Ride

Setting Sag

Suggested Air Spring Pressure Settings

Table providing recommended air pressure based on rider weight for different travel settings.

Sag Setup

Table defining target sag measurements for different travel and riding styles.

Sag Troubleshooting

Guidance on how to adjust air pressure if measured sag is too high or too low.

Adjusting Rebound

Climb. Trail. Descend.

Climb Mode

Setting for climbing and sprinting, offering a firm ride with blow-off for large impacts.

Trail Mode

Balanced setting for pedaling platform and technical terrain, offering moderate compression damping.

Descend Mode

Softest setting for descending, providing maximum compliance with minimal low-speed compression damping.

Adjusting Trail Mode (FIT CTD Trail Adjust Only)

Service Intervals

Rear Shocks Service

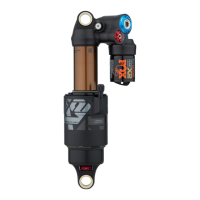
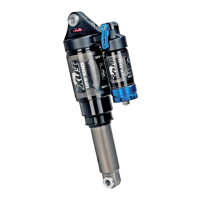
Recommended maintenance schedule for rear shocks, including sag checks and cleaning.

Air Spring Forks Service

Maintenance intervals for air spring forks (32, 34, 36 FLOAT, TALAS, DRCV), including oil changes.

Coil Spring Forks Service

Maintenance schedule for coil spring forks (36 VAN & 40), covering sag, damping, and oil changes.

Important Safety Information

Fork Safety Warnings

Critical safety warnings regarding misuse, modification, and secure fastening of forks.

Rear Shocks Safety

Safety precautions for rear shocks, including nitrogen charge and 'stuck down' conditions.

Overview

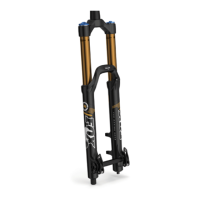
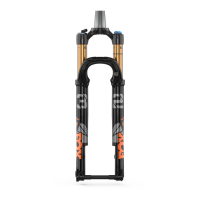
This document describes the FOX 34 FLOAT 29 bicycle suspension fork, a component designed to enhance the riding experience through adjustable suspension.

Function Description

The FOX 34 FLOAT 29 fork is a front suspension system for bicycles, designed to absorb impacts and provide a smoother, more controlled ride. It utilizes an air spring system, allowing riders to adjust the suspension's firmness to match their weight and riding style. The fork features a damping system that controls how quickly the fork compresses and extends, further refining ride quality. Different models offer varying levels of adjustability, from basic air pressure and rebound to more advanced compression damping settings, including a "Climb. Trail. Descend." (CTD) system. This CTD system allows riders to quickly switch between three distinct ride modes optimized for climbing, trail riding, and descending, respectively. Some models also include a "Trail Adjust" feature within the Trail mode, offering fine-tuning of low-speed compression damping. The fork is designed for trail and all-mountain (AM) riding styles, accommodating various terrains and rider preferences.

Usage Features

Before riding, it's crucial to ensure the fork is properly installed and adjusted. This includes checking quick-release levers, headset adjustment, and brake fastening. The core usage feature is the ability to set sag, which is the amount the suspension compresses under the rider's weight. This is achieved by adjusting the air spring pressure using a high-pressure pump. Sag is typically set between 15-25% of total fork travel, with specific recommendations provided based on rider weight and desired riding feel (XC/Race FIRM or All-Mountain PLUSH).

Rebound adjustment is another key feature, controlling the speed at which the fork extends after compression. A knob at the bottom of the right fork leg allows riders to slow down (clockwise) or speed up (counter-clockwise) rebound. A slower rebound prevents the fork from "packing down" on successive bumps, while a faster rebound improves traction and prevents "wheel hop."

The CTD system is a prominent usage feature, allowing on-the-fly adjustments to the fork's damping characteristics.

  • Climb Mode (fully clockwise lever position) provides the firmest setting, ideal for climbing and sprinting, minimizing suspension movement. It includes a "blow off" feature for unexpected large impacts. Factory settings for Climb mode can be "medium" or "firm," depending on the fork's travel and intended use.
  • Trail Mode (middle lever position) offers a balance between climbing efficiency and descending capability. It provides less compression damping than Climb mode, suitable for undulating terrain and preventing excessive travel on technical sections. Some Factory FIT CTD models also have a "Trail Adjust" dial within Trail mode to fine-tune low-speed compression damping, allowing for a firmer (clockwise) or lighter (counter-clockwise) setting.
  • Descend Mode (fully counter-clockwise lever position) provides the softest ride with the least low-speed compression damping, optimized for aggressive descending.

The fork is designed with a 15QR thru-axle system for secure wheel attachment and post-style disc brake mounting.

Maintenance Features

Regular maintenance is essential to prolong the service life of the FOX 34 FLOAT 29 fork.

  • Post-Ride Cleaning: After each ride or race, the fork exterior should be cleaned with mild soap and water, then wiped dry with a soft rag. It's important not to use solvents or de-greasers, as these can damage paint and anodized parts. High-pressure washers should also be avoided, and water should not be sprayed directly on the seal/upper tube junction. This prevents dirt from chafing and damaging the wiper seals, which could lead to internal contamination.
  • Service Intervals: The manual outlines specific service intervals for various components, categorized by "each ride/race," "every 30 hours," and "every 100 hours/annually." These intervals are recommendations, and more frequent service may be necessary if riding in extreme conditions (wet, muddy, downhill racing, winter riding).
  • Regular Checks: Riders should regularly check sag, damping adjustments, and inspect the fork exterior for any damage.
  • Lower Leg Oil Change: A lower leg oil change is recommended at specific intervals to ensure smooth operation and proper lubrication of internal components.
  • Air Chamber Fluid Change: For FLOAT forks, changing the FLOAT fluid in the air chamber is also part of the maintenance schedule.
  • Damper Service: More complex damper services (for FIT, OC, and Terralogic® cartridges) are typically performed at longer intervals and often require specialized tools and expertise, recommending service by FOX Racing Shox or an Authorized Service Center.
  • Troubleshooting: The manual includes a troubleshooting section for common issues like too much/too little sag, excessive bottoming, or a harsh ride, providing remedies such as adjusting air pressure.

The design emphasizes user-friendly adjustments for daily riding, while also providing clear guidelines for more in-depth maintenance to ensure the fork's longevity and performance.

Fox 34 Float 29 Specifications

General IconGeneral
Wheel Size29"
Travel120mm, 130mm, 140mm
SteererTapered
Stanchion Diameter34 mm
Brake MountPost Mount
SpringAir
Offset44mm, 51mm
Recommended UseTrail, All-Mountain
DamperGRIP
Axle15x110mm Boost
Spring TypeAir

Related product manuals