
М
МихаилAug 7, 2025
Какую можно максимальную резину поставить на эту вилку?
Какую можно максимальную резину поставить на эту вилку?
Pre-ride checks including pinch bolts, cleaning, inspection, headset, and brakes.
Table of recommended air pressures based on rider weight for different travel settings.
Troubleshooting common sag issues like too much/little sag or bottoming.
Explains rebound knob function, settings, tuning tips for fork extension speed.
Controls fork behavior during weight shifts and braking; factory setting is 12 clicks.
Controls fork response to bumps; adjuster has 24 clicks, factory setting is 12.
How to select between 180mm and 140mm travel using the topcap adjuster.
Schedule for maintenance tasks like setting sag, cleaning, and fluid service.
Warnings against misuse, modification, improper installation, and brake checks.
Details on correct thread engagement and torque for disc brake caliper mounting bolts.
Safety advice for mounting bikes on carriers and securing wheels with quick releases.
Safety warnings for shocks, service recommendations, and handling 'stuck down' conditions.
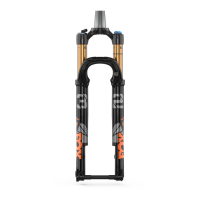
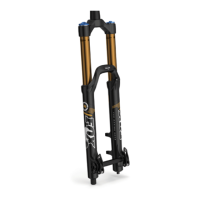
The FOX 36 TALAS 180 is a high-performance suspension fork designed for aggressive mountain biking disciplines such as All-Mountain (AM), Freeride (FR), and Downhill (DH). Its primary function is to absorb impacts and maintain tire contact with the ground, providing a smoother, more controlled ride over varied terrain. The fork features an air spring system, allowing riders to adjust the spring rate to match their weight and riding style, ensuring optimal performance.
The core function of the FOX 36 TALAS 180 is to provide suspension for the front wheel of a bicycle. This is achieved through an internal air spring and a sophisticated damping system. The air spring, which is adjustable, supports the rider's weight and absorbs initial impacts, while the damping system controls the speed at which the fork compresses and extends. This control is crucial for preventing harsh bottom-outs and maintaining traction. The TALAS (Travel Adjust Linear Air Spring) system is a key feature, enabling riders to quickly change the fork's travel between two distinct settings (180mm and 140mm). This on-the-fly adjustment is particularly useful for adapting to different trail conditions, such as reducing travel for climbing efficiency or extending it for downhill descents. The fork is specifically designed for use with downhill brake systems and accommodates 200-225mm rotors, indicating its robust construction for demanding applications.
The FOX 36 TALAS 180 offers several user-adjustable features to fine-tune its performance.
Travel Adjustment (TALAS): This is a primary usage feature, allowing riders to switch between 180mm and 140mm of travel. This adjustment is made via a topcap on the left fork leg. The system automatically adjusts the air spring rate when travel is changed, eliminating the need for manual air pressure adjustments. This feature is designed to be used when not riding the bike for safety.
Sag Setting: Proper sag is critical for optimal performance. Riders set the sag by adjusting the air spring pressure to achieve a specific percentage of total fork travel (typically 15-25%) when in a normal riding position. This ensures the fork can both compress and extend to absorb bumps effectively. The manual provides a suggested air spring pressure table based on rider weight to guide this initial setup.
Rebound Adjustment: Located on the bottom of the right fork leg, the rebound knob controls the speed at which the fork extends after compression. Turning the knob clockwise slows down rebound, while counter-clockwise speeds it up. This adjustment is crucial for preventing the fork from "packing down" on successive bumps (too slow) or "kicking back" and losing traction (too fast). The manual suggests a starting point of 9 clicks out from fully clockwise.
Low-Speed Compression Adjustment: This adjuster, found on the fork, controls how the fork responds to rider weight shifts and braking forces. It has 24 clicks of adjustment, with a factory setting of 12 clicks out from fully closed (clockwise). Adjusting low-speed compression can help resist brake dive and keep the fork higher in its travel, or provide maximum wheel traction and bump compliance.
High-Speed Compression Adjustment: Similar to low-speed compression, this adjuster (also with 24 clicks and a factory setting of 12 clicks out) controls the force required to move the fork through its travel and how quickly it responds to sharp, high-speed impacts. This helps prevent bottom-outs on large hits and ensures smooth absorption of square-edged bumps.
Regular maintenance is essential to ensure the longevity and performance of the FOX 36 TALAS 180. The manual outlines a comprehensive maintenance schedule, categorized by frequency.
Each Ride/Race:
Every 30 Hours:
Every 100 Hours/Annually:
The manual emphasizes the importance of following these service intervals, especially if riding in extreme conditions (wet, muddy, downhill racing, winter riding). It also provides crucial safety warnings regarding unauthorized modifications, improper service, and the use of non-genuine FOX parts, all of which can lead to product malfunction, serious injury, or death. The fork is not designed for motorized bicycles or tandem use, and misuse voids all warranties. Proper installation of brakes and wheels, along with correct torque specifications for mounting bolts, are also highlighted as critical safety considerations.
| Travel | 180mm |
|---|---|
| Spring Type | Air |
| Brake Mount | Post Mount |
| Adjustable Travel | Yes |
| Wheel Size | 26" |
| Damper | FIT |
| Weight | Approx. 2100g |