Do you have a question about the Fox 36 Float 160 and is the answer not in the manual?
This document describes the FOX 36 FLOAT 160 suspension fork, a component designed for mountain biking, specifically for All-Mountain (AM) and Freeride (FR) riding styles. It covers installation, setup, adjustment, and maintenance procedures, along with important safety information.
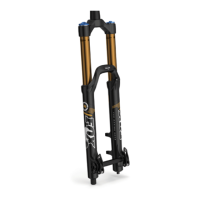
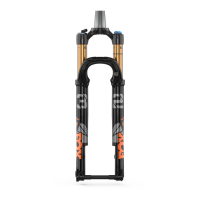
The FOX 36 FLOAT 160 is an air-sprung suspension fork that provides 160 mm (6.3 inches) of travel. Its primary function is to absorb impacts and vibrations from the terrain, enhancing rider comfort, control, and traction. The fork features an air spring system that allows for adjustable stiffness, catering to different rider weights and preferences. Damping is managed through rebound, low-speed compression, and high-speed compression adjustments, which control how quickly the fork extends after compression and how it reacts to various types of impacts.
The fork is available in two main models: the Factory FIT RC2 and the Performance O/B R. Both models feature hard anodized or Kashima coated upper tubes and are compatible with 1.5" tapered or 1 1/8" steerer tubes. They utilize a 20QR thru-axle system for secure wheel attachment and post-style disc brake mounting. The FIT RC2 model offers more advanced damping adjustments, including low-speed and high-speed compression, while the Performance O/B R model provides air spring pressure and rebound adjustments.
Before riding, it's crucial to ensure the fork is properly installed and adjusted. This includes checking that the 20 mm axle pinch bolts and crown pinch bolts are tightened. The sag setting is a critical initial adjustment for optimal performance. Sag refers to the amount the fork compresses under the rider's weight. The document recommends setting sag to 15-25% of the total fork travel. This is achieved by adjusting the air spring pressure using a FOX Racing Shox High Pressure Pump. The process involves attaching the pump to the Schrader valve, inflating to a suggested pressure based on rider weight, and then measuring the sag with an O-ring or zip tie. Fine-tuning the air pressure is done by adding or releasing small amounts of air until the desired sag value is reached.
Once sag is set, the damping adjustments can be configured. The rebound adjuster, located at the bottom of the right fork leg, controls the speed at which the fork extends after compression. Turning it clockwise slows rebound, while counter-clockwise speeds it up. A starting point of 12 clicks out from fully clockwise (full in) is suggested. Adjusting rebound is essential to prevent the fork from "packing down" (too slow) or causing poor traction and wheel hop (too fast).
For models with compression adjustments, low-speed compression damping influences how the fork reacts to rider weight shifts and braking. This adjuster has 24 clicks, with 12 clicks out from fully closed (clockwise) as the factory setting. Softer settings provide maximum wheel traction and bump compliance but can lead to excessive brake dive and a "wallowy" feel. Firmer settings resist brake dive and keep the fork higher in its travel but may reduce traction in loose conditions.
High-speed compression damping, also with 24 clicks and a factory setting of 12 clicks out from fully closed, controls the force required to move the fork through its travel and how quickly the wheel responds to bumps. Softer settings offer maximum traction and compliance but might lead to frequent bottom-outs on sharp impacts. Firmer settings reduce bottom-out and improve bump absorption but can result in a harsh ride with less traction if too firm.
Regular maintenance is vital for extending the service life of the FOX fork. After each ride or race, the exterior of the fork should be cleaned with mild soap and water, rinsed with a light pressure water spray, and wiped dry with a soft, dry rag. It's crucial to avoid using solvents or de-greasers, as these can damage the paint and anodized parts. Direct water spray on the seal/upper tube junction and high-pressure washers should also be avoided. Inspecting the fork's exterior for any damage is important; if damage is found, the fork should not be used and should be inspected by a local dealer or FOX Racing Shox.
The document provides a detailed service interval chart for various FOX suspension products, including rear shocks, air spring forks (32, 34, 36 FLOAT, TALAS, and DRCV), and coil spring forks (36 VAN & 40). For air spring forks, daily or "each ride/race" maintenance includes checking and resetting sag and damping adjustments, and cleaning the fork exterior. Every 30 hours, additional checks include inspecting dropout thickness (for 9 mm dropouts) and bushings. Every 100 hours or annually, more in-depth service is required, such as changing oil in the lower legs, changing FLOAT fluid in the air chamber, and servicing the damper. Some of these procedures, particularly damper service, are recommended to be performed by FOX Racing Shox or an Authorized Service Center.
Important safety warnings are highlighted throughout the manual. These include warnings against using FOX products on motorized vehicles, puncturing or disassembling pressurized components, modifying any part of the fork, and ensuring wheels and brakes are securely fastened and adjusted. Specific torque requirements for disc brake caliper mounting bolts are also provided to prevent failure. The document also advises against cutting threads into threadless steerers or using a fork with nicks or gouges on the steerer tube. If the fork loses oil, makes unusual sounds, or experiences a broken damper cartridge, riding should cease immediately, and the fork should be inspected by a qualified technician. For rear shocks, similar warnings apply regarding oil loss, unusual noises, and the dangers of opening nitrogen-pressurized shocks or attempting to service a "stuck down" shock without proper knowledge.
| Travel | 160mm |
|---|---|
| Spring Type | Air |
| Axle | 15x110mm Boost |
| Steerer Tube | 1.5" Tapered |
| Stanchion Diameter | 36mm |
| Wheel Size | 27.5", 29" |
| Intended Use | Enduro |
| Damper | GRIP2 |
| Offset | 44mm |
| Brake Mount | Post Mount |
| Adjustments | Rebound, Compression |