Do you have a question about the Fox FLOAT X2 and is the answer not in the manual?
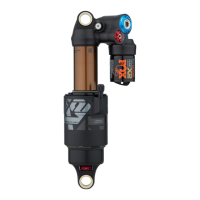
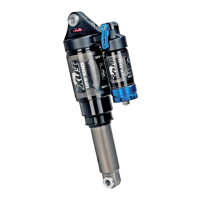
Controls shock performance under rider inputs and impacts, detailing LSC and HSC.
Provides on-the-fly adjustments for Open and Firm modes, affecting compression damping.
Controls shock performance under brake bumps, technical climbing, and off-camber cornering.
Allows the shock to recover quickly from bigger hits and square-edged bumps.
Internal adjustment to change mid-stroke and bottom-out resistance by altering air volume.
This document is a tuning guide for a FOX FLOAT X2 shock absorber, designed to help users optimize its performance for their specific riding style and conditions. The guide covers essential setup procedures, including sag adjustment, damper adjustments (compression and rebound), and additional tuning options like volume spacers.
The primary function of the FOX FLOAT X2 shock is to provide suspension for bicycles, absorbing impacts and vibrations to enhance rider comfort, control, and traction. It features a highly adjustable damping system that allows riders to fine-tune the shock's response to various terrains and riding preferences.
The guide emphasizes the importance of proper sag setting as the foundation for optimal shock performance. Sag is defined as the amount the suspension compresses under the rider's weight and riding gear. The recommended sag range is 25-30% of the total shock travel. To set the sag, riders are instructed to:
A visual aid in the guide illustrates the O-ring, Dust Wiper, and the sag measurement area, clearly indicating the 25-30% sag range. It also shows the "TOTAL SHOCK TRAVEL" and "EYE-TO-EYE DISTANCE" for context.
The FOX FLOAT X2 shock features both compression and rebound adjustments, categorized into low-speed and high-speed settings. These adjustments allow riders to control how the shock responds to different types of impacts and terrain.
The guide also details a 2-position lever, which provides on-the-fly adjustments to shock performance. This lever is intended to be adjusted throughout the ride.
A comprehensive table is provided to help users find suggested starting RVS damper settings based on their air spring pressure. The table lists air spring pressures from 90 psi to 300 psi and corresponding recommended clicks from closed for LSR, HSR, LSC, and HSC settings. Users are instructed to turn all four damper adjusters to the closed position (full clockwise) until they stop, then back them out (counter-clockwise) to the number of clicks shown in the table. The table clarifies that "O Clicks = Closed." For example, at 150 psi, the recommended settings are 10-12 clicks for LSR, 5-6 for HSR, 13-15 for LSC, and 6-7 for HSC.
Volume spacers are an internal adjustment that allows riders to change the amount of mid-stroke and bottom-out resistance.
A "TYPICAL AIR SPRING CURVES" graph illustrates the effect of volume spacers on shock force versus shock travel. It shows two curves: "MAX SPACERS (LEAST AIR VOLUME)" resulting in a steeper curve (more progressive, higher bottom-out resistance) and "NO SPACER (MOST AIR VOLUME)" resulting in a flatter curve (less progressive, lower bottom-out resistance). Both curves start at "FULL EXTENSION" and extend to "FULL COMPRESSION."
The guide emphasizes that the recommended settings are a "starting point" to get users on their first ride quickly. It encourages riders to adjust settings as they ride and become more familiar with their new shock. Detailed information and videos are available in the online owner's manual.
For further support, the guide mentions that each shock has a 4-digit ID code on the shock body, which can be used on the Help page at www.ridefox.com to find more information, including shock travel.
The document concludes with contact information for FOX FACTORY, including their website (ridefox.com), phone number (1.800.FOX.SHOX, 831.768.1100), and physical address (915 DISC DRIVE SCOTTS VALLEY, CA 95066 USA). It also includes a copyright notice (©FOX FACTORY, INC. 2019) and a revision number (605-00-222 REV B), along with the hashtag #RIDEFOX.
| Type | Rear Shock |
|---|---|
| Shaft Material | Aluminum |
| Body Material | Aluminum |
| Spring Type | Air |
| Adjustments | Low-speed compression, high-speed compression, low-speed rebound, high-speed rebound |
| Air Spring | EVOL |
| Sizes | Available in various eye-to-eye lengths and stroke sizes |
| Intended Use | Enduro, Downhill |
| Travel | Varies (depends on bike model) |
| Compatibility | Designed for frames that accommodate metric or imperial sized rear shocks. Compatible with frames designed for Trunnion or standard eyelet mounting. |