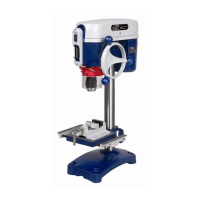
See Fig. 1 and its label to check all parts of the drill press.
CAUTION: FOR YOUR SAFETY, CONNECT THE DRILL PRESS TO THE POWER SUPPLY
AND SWITCH IT ON AFTER READING THIS INSTRUCTION MANUAL AND AFTER
ASSEMBLING IT COMPLETELY.
CLEANING
Before assembly it is preferable to remove the coating that protects from the corrosion of
processed metal parts. This coating can be removed by means of a cloth and a little bit of gas
oil or kerosene. DO NOT use, petrol or water thinners.
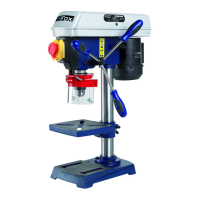
DRILL PRESS F11-951
1. Assemble the column (A) fig. 3, to the base (B), as illustrated in the figure, with two 20
mm hexagonal headed screws (C) fig. 4.
2. Assemble the workbench (O) fig. 5, on the drill press (A), by making the workbench slide
on the column as illustrated in the figure.
3. Screw the locking lever (E) fig. 5 in the holes behind the support of the workbench, as
illustrated in the figure. Align the workbench (O) to the base (B) and tighten the
workbench’s locking lever (E).
4. Place the head of the drill press (F) fig. 6, on the column (A) and lower it as much as you
can. After aligning the workbench with the base, tighten the two screws (G) with the
wrench included in the package.
5. Place the handwheel (A) on the pinion fig. 7 and tighten the locking screw (B) with the
wrench for hexagonal screws as illustrated in the figure.
6. IMPORTANT: The morse cone of the spindle axle (K) fig. 8, and the conic hole (L) of the
spindle (M) are covered with a transparent coating protecting from corrosion, which can
be removed with a thinner. These surfaces must be cleaned in order that the spindle
correctly sticks to the axle and remains fixed during use. CAUTION: to remove the
protection coating you can use a home detergent, but you have to follow product’s
instructions. Later on assemble the spindle (M) on the axle (K) with a sharp stroke.
7. IMPORTANT: Open completely the jaws of the spindle by turning the ring of the spindle
(M) fig. 9.
8. Hold the spindle carefully on the axle and lock it, by striking it with a piece of wood and a
hammer, or with a mallet as illustrated in fig. 9.
9. IMPORTANT: To prevent the damage of the spindle, NEVER USE a metal hammer to
install it.
10. The belt is installed before the delivery of the drill press, however, you must check its
tensioning (see par. “Change of speed and adjustment of belt tensioning”).