EasyManua.ls Logo

FRAME IT ALL 300001063 - User Manual

FRAME IT ALL 300001063
2 pages
Print Icon
To Next Page IconTo Next Page
Loading...
300001063/300001064/300001066/300001067
300001421/300001423/300001442/300001443
300001420/300001442/300001440/300001441
300001090/300001091/300001097/300001098
RAISED GARDEN BED
4’ x 8’
Layout your timbers along the borderline and connect each
timber together by inserting the top of the stake through the
bracket loops with the stake pointing to the sky. This enables
you to freely position your border to get your desired location.
Customer Service: 1800-914-9835 |
support@frameitall.com
© Frame It All. All Rights Reserved.
1 LEVEL KIT CONTAINS:
Composite timbers 4’ x 6
Stacking Brackets x 12
Stacking Stakes x 6
Plugs x 24
Caps x 6
ASSEMBLY INSTRUCTIONS For the First Level
STEP 1:
Assemble the timbers by sliding one end of timber into channel end
of one of the brackets. Use plugs to cover the holes on both sides to
lock the bracket in place.
Repeat this process on the opposite end of the timber flipping the bracket in the opposite
direction (see image). Repeat for all timbers on
the first level.
STEP 2:
Layout the base level of your raised garden in a straight rectangular shape, using 6
timbers. Insert stake through the hole of the bracket and into each of the corners to lock
all sides in place. If you are installing a 2
nd
level, insert your stakes upside down so that
your base shape can be adjusted.
FOR INDOOR & HARD SURFACE:
If you plan to assemble raised bed on a hard surface, use
hacksaw to remove the spike of each stake. Use these cut
down stakes for the base level only of your raised garden.
Trim stake spike with
hacksawfor use indoor
or on hard surfaces
1 LEVEL
STEP 2a: For one level, add caps to each of the top
corner joints to finish off the raised garden.
HAPPY GARDENING!
ASSEMBLY INSTRUCTIONS For Product with Two to Four Levels
How the Joints Work
Use plugs (included)
to cover the holes on
both side of timbers
Use plugs to
cover the holes
two plugs are
required per
bracket (1 on
each side)
Use a Cap to
complete the
top level.
Use stacking
stakes for
ground level
frames and
stacking
additional levels.
Use stacking
stake when
creating a
multi-level
Stacking stake fit
into the tops other
Stacking stakes
3-Way Connection:
Combining two halves
of a 4-way bracket and
a stacking bracket (A),
will result in a 3-way
junction (B).
STEP 3:
For the second level, connect 2 timbers with a
stacking bracket on one end and a mid-section 4-
way bracket on the other end in alternating
orientation.
Then, connect 1 timber with top 4-way brackets on
both ends in alternating orientation as shown to the
right. These 3 timbers will be used to install the
cross timber.
Now connect 4 timbers with stacking brackets on
both ends as you did for the first level.
2 x
1 x
4 x
2 LEVEL KIT CONTAINS:
Composite timbers 4’ x 13
Stacking Brackets x 22
4-way Brackets x 4
Stacking Stakes x 12
Plugs x 52
Caps x 6
3 LEVEL KIT CONTAINS:
Composite timbers 4’ x 19
Stacking Brackets x 34
4-way Brackets x 4
Stacking Stakes x 18
Plugs x 76
Caps x 6
4 LEVEL KIT CONTAINS:
Composite timbers 4’ x 26
Stacking Brackets x 44
4-way Brackets x 8
Stacking Stakes x 24
Plugs x 104
Caps x 6
A
B
C
Question and Answer IconNeed help?

Do you have a question about the FRAME IT ALL 300001063 and is the answer not in the manual?

Summary

First Level Assembly Instructions

Step 1: Bracket Attachment

Slide timber ends into bracket channels and secure with plugs.

Step 2: Base Layout and Stakes

Arrange timbers for base level, insert stakes through brackets.

Step 2 a: Top Corner Caps

Add caps to the top corner joints for a finished look.

Multi-Level Assembly Instructions

Step 3: Second Level Connections

Connect second level timbers using stacking and 4-way brackets.

Step 4: Second Level Layout

Layout and place second level timbers on upside stakes.

Step 5: Third Level Assembly

Connect timbers for the third level and stack them.

Step 6: Fourth Level Assembly

Connect timbers for the fourth level and stack them.

Understanding Joint Connections

Bracket and Stake Usage

Explanation of how stacking stakes and brackets connect.

3-Way Connection

Description of how to create a 3-way junction using brackets.

Overview

This document provides assembly instructions for the "frame it all" simple modular raised garden bed, available in various configurations from one to four levels. The product is designed to create a customizable garden space, suitable for both outdoor and indoor/hard surface use.

Function Description

The Frame It All Raised Garden Bed system allows users to construct modular garden beds of different heights and shapes. The core function is to provide an elevated growing space for plants, which can offer benefits such as improved drainage, better soil control, and easier access for gardening tasks. The modular design, utilizing composite timbers and various brackets, enables flexibility in creating garden layouts. The system is designed for easy assembly and can be expanded or reconfigured as needed.

Important Technical Specifications

The raised garden bed system is built using composite timbers, which are likely durable and weather-resistant, suitable for outdoor use. The system utilizes several types of brackets and stakes for assembly and stability:

  • Stacking Brackets: Used to connect timbers end-to-end and for stacking multiple levels.
  • 4-way Brackets: Used for corners and for creating cross-timbers within the garden bed, especially for multi-level designs. These brackets can be combined with stacking brackets to form 3-way junctions.
  • Stacking Stakes: Inserted through bracket holes and into the ground (or into previous level stakes for multi-level designs) to secure the structure. For hard surfaces, the spike of the stake can be removed.
  • Plugs: Used to cover holes on both sides of the brackets, locking them in place.
  • Caps: Used to finish off the top corner joints of a single-level raised garden.

The kits are available in different configurations, each with specific quantities of components:

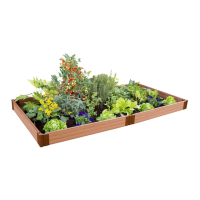
1 Level Kit (4' x 8'):

  • Composite timbers 4' x 6
  • Stacking Brackets x 12
  • Stacking Stakes x 6
  • Plugs x 24
  • Caps x 6

2 Level Kit (4' x 8'):

  • Composite timbers 4' x 13
  • Stacking Brackets x 22
  • 4-way Brackets x 4
  • Stacking Stakes x 12
  • Plugs x 52
  • Caps x 6

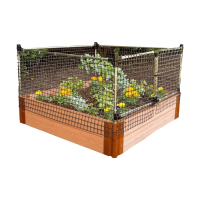
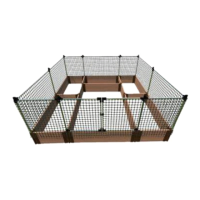
3 Level Kit (4' x 8'):

  • Composite timbers 4' x 19
  • Stacking Brackets x 34
  • 4-way Brackets x 4
  • Stacking Stakes x 18
  • Plugs x 76
  • Caps x 6

4 Level Kit (4' x 8'):

  • Composite timbers 4' x 26
  • Stacking Brackets x 44
  • 4-way Brackets x 8
  • Stacking Stakes x 24
  • Plugs x 104
  • Caps x 6

The dimensions of the raised garden bed are specified as 4' x 8' for all configurations, indicating the base footprint. The number of timbers and brackets increases with each additional level, allowing for greater height and complexity in the design.

Usage Features

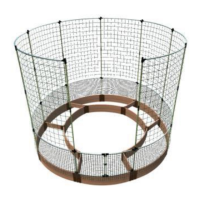
Modular Design: The primary usage feature is its modularity. Users can start with a single level and expand to two, three, or four levels, or even create custom shapes by combining multiple kits. The ability to adjust the base shape by inserting stakes upside down for a second level provides flexibility during initial setup.

Easy Assembly: The assembly process is designed to be straightforward:

  1. Connecting Timbers: Timbers slide into channel ends of brackets. Plugs are then inserted to lock the brackets in place.
  2. Securing the Base: Stakes are inserted through bracket holes and into the ground to secure the base level. For multi-level designs, stakes from the lower level serve as connection points for the upper levels.
  3. Multi-Level Construction: For two to four levels, specific timber and bracket combinations are used to create cross-timbers and additional height. The instructions detail how to connect timbers with stacking brackets and 4-way brackets in alternating orientations to build the upper levels.
  4. Cross-Timbers: The system incorporates cross-timbers for multi-level designs (one for 3-level, two for 4-level) to provide structural integrity and potentially divide the garden bed into sections.

Indoor/Hard Surface Use: A notable feature is its adaptability for hard surfaces or indoor use. For these applications, the spike of the stacking stakes can be removed using a hacksaw. These modified stakes are then used for the base level, allowing the raised bed to be placed on patios, decks, or other non-soil surfaces without needing to penetrate the ground.

Adjustable Layout: The initial layout process allows for free positioning of the border. By laying out timbers and connecting them with stakes pointing upwards, users can adjust the desired location before fully securing the structure.

Finishing Touches: For single-level designs, caps are provided to cover the top corner joints, giving a clean, finished appearance.

Maintenance Features

While the document does not explicitly detail maintenance features, the use of composite timbers suggests a low-maintenance product. Composite materials are generally resistant to rot, decay, and insect damage, unlike traditional wood. This would reduce the need for staining, sealing, or frequent replacement of components. The modular nature also implies that individual components could potentially be replaced if damaged, rather than requiring a complete overhaul of the garden bed. The plugs used to cover holes in the brackets likely protect the internal mechanisms from dirt and debris, contributing to the longevity of the connections.

FRAME IT ALL 300001063 Specifications

General IconGeneral
BrandFRAME IT ALL
Model300001063
CategoryLawn and Garden Equipment
LanguageEnglish

Related product manuals